Table of Contents >> Show >> Hide
- Why Faux Brick Walls Are Having a Moment
- Choosing the Right Faux Brick Method
- Planning Your Faux Brick Wall Like a Pro
- Step-by-Step: Faux Brick Panels Installation
- Step-by-Step: Joint Compound Faux Brick Wall
- Common Faux Brick Mistakes (and How to Dodge Them)
- Where a Faux Brick Wall Really Shines
- Maintenance and Durability
- Cost Snapshot: What You Might Spend
- Real-Life Faux Brick Wall Experiences: What DIYers Learn
Want the cozy charm of an exposed brick loft but live in a totally normal drywall box?
Same. The good news: you don’t need a demo crew, a bricklayer, or a billionaire’s
renovation budget. A faux brick wall can give you that “I converted an old factory
into a chic studio” vibe in a single weekend, with way less dust and drama.
From lightweight wall panels to joint-compound “bricks” and peel-and-stick tiles,
there are now tons of ways to get the look. DIYers across home improvement sites
and communities like Hometalk, This Old House–style guides, and modern decor blogs
have turned plain walls into eye-catching focal points using simple tools and basic
painting skills. The trick isn’t just slapping panels onto a wall – it’s planning,
layout, and finishing details that make your faux brick look convincingly real.
Why Faux Brick Walls Are Having a Moment
All the Character, None of the Chaos
Real brick is beautiful, but it’s also heavy, messy, and expensive. Cutting into
walls, adding structural support, and hauling in pallets of brick is more
“full-scale renovation” than “Saturday DIY.” Faux brick lets you cheat:
you get depth, texture, and that cozy rustic feel without altering the structure
of your home.
Modern faux brick options include:
- Foam or PVC panels with molded 3D brick patterns.
- Hardboard or MDF panels that you paint and age.
- Joint compound (“mud”) bricks created directly on the wall.
- Peel-and-stick tiles for renters and low-commitment makeovers.
- Thin brick veneer – actual slices of brick that are lighter and easier to install than full bricks.
Surprisingly Budget-Friendly
A single 4×8 faux brick panel from a home center can cover a big chunk of wall for
the cost of a fancy dinner out. Joint compound and painter’s tape projects are even
cheaper: think one bucket of compound, a roll or two of tape, primer, and paint.
Peel-and-stick options might cost a bit more per square foot, but they save on tools
and time – which is priceless if DIY is not your normal weekend hobby.
Flexible and Customizable
You’re not stuck with classic red brick. Faux brick walls can be:
- Whitewashed for a cottage or farmhouse feel.
- Smoky gray for an industrial loft look.
- Warm terracotta shades for Mediterranean vibes.
- Heavily textured with “broken plaster” edges for an old-world, European look.
Because you’re painting and finishing the surface yourself, you have total control
over the mood of your space.
Choosing the Right Faux Brick Method
1. Faux Brick Panels (Fast and High-Impact)
Faux brick panels are large sheets (often 4×8 feet) made from MDF, hardboard,
or lightweight plastic. They’re pre-molded with a brick pattern, so your job is
mostly cutting, attaching, and finishing.
Best for:
- Covering a large wall quickly.
- Relatively smooth, flat walls.
- Spaces where you want real-looking depth and texture with minimal mess.
Typical process:
- Measure the wall and calculate how many panels you need (with 10–15% extra).
- Cut panels to size, including cutouts for outlets and switches.
- Attach panels using construction adhesive plus nails or screws into studs.
- Stagger vertical seams so they don’t line up in obvious “panel stripes.”
- Fill gaps and nail holes, then paint or stain for a realistic finish.
2. Joint Compound Faux Brick (Custom and Artistic)
This method creates the brick pattern directly on the wall using drywall joint
compound (also called “mud”). It’s perfect if you enjoy artistic projects and want
a one-of-a-kind texture.
Basic idea:
- Prime the wall so the compound sticks and doesn’t dry too fast.
- Use painter’s tape to create a brick grid: long horizontal lines and shorter vertical “mortar” gaps.
- Spread joint compound over the taped wall in a thin, even coat.
- While the compound is still workable, gently pull off the tape to reveal recessed “mortar lines.”
- Let it dry, then sand lightly and paint your new “brick” surface.
It takes more time than panels, but the payoff is huge: your wall looks like
it has actual sculpted brick, not just a printed pattern.
3. Peel-and-Stick Faux Brick (Renter-Friendly)
Peel-and-stick brick tiles or foam sheets are the quickest option. Just peel off
the backing and stick them directly to the wall. Many products have a raised
pattern, so they look more realistic than flat wallpaper.
They’re ideal for:
- Renters who can’t damage walls.
- Temporary backdrops for photos or events.
- Small accent areas like behind shelves or around a console table.
The key to a good result is careful layout: dry-fit a few pieces, check that lines
are level, and trim neatly around outlets and corners.
4. Thin Brick Veneer (Most Realistic and Permanent)
Thin brick veneer uses actual slices of brick, attached to the wall with mortar or
specialized adhesive. It feels and looks like real brick because, well, it is – just
in a slimmer, lighter form.
This option is great if:
- You own your home and want a long-term feature.
- You don’t mind extra weight and a bit of masonry work.
- You want the most authentic look and feel possible.
Planning Your Faux Brick Wall Like a Pro
Choose the Right Wall
Not every wall wants to be famous. Pick a spot where a textured accent makes sense:
- The TV wall in your living room.
- A home office backdrop for video calls.
- The headboard wall in a bedroom.
- An entryway wall that needs personality.
Avoid walls with extreme moisture (like inside a shower) unless your product
is specifically rated for it.
Measure, Then Measure Again
Before you buy anything, measure the height and width of your wall in feet, then
multiply to get square footage. If you’re using panels, divide the total by the
square footage of one panel. Always round up and grab an extra panel or pack
to account for cuts and mistakes.
Pick Your Brick Personality
Decide early whether you’re going:
- Classic red brick for warmth and vintage charm.
- White or off-white for a light, airy, Scandinavian feel.
- Gray and taupe mixes for modern, industrial interiors.
- Heavily smeared mortar (German schmear) for a soft, worn-in look.
Collect a few inspiration photos and note what you like: darker mortar,
chipped edges, varied brick tones, or a more uniform look.
Step-by-Step: Faux Brick Panels Installation
Here’s a simplified, Hometalk-style walkthrough for a typical faux brick
panel accent wall.
Step 1: Prep the Wall
- Remove nails, hooks, and outlet covers.
- Fill major holes and sand bumps.
- Wipe down dust and grease so adhesive sticks.
- Use a stud finder and mark vertical lines where studs run.
Step 2: Plan Your Layout
Dry-fit a panel at the bottom center or in a corner and check how the brick pattern
will line up. Ideally, stagger seams so they don’t create a vertical line from
floor to ceiling. Use a level to mark a straight horizontal line to keep your first
row perfectly even.
Step 3: Cut the Panels
Use a circular saw or jigsaw (for outlets and switches) to cut panels. Mark
everything with a pencil first. Remember: “cut once, cry once” is a thing; measure
carefully so you’re not making emergency hardware-store runs.
Step 4: Attach the Panels
- Run beads of construction adhesive on the back of the panel, avoiding edges so glue doesn’t squeeze out.
- Press the panel onto the wall, starting from your level line.
- Shoot brad nails or screws through “brick” areas into studs so fasteners are easy to hide.
- Repeat with remaining panels, keeping lines level and patterns aligned.
Step 5: Hide Seams and Gaps
Use caulk or filler that matches your planned mortar color. Fill nail holes,
corner gaps, and visible seams. Smooth with a damp finger or caulk tool so
it blends in. Let it dry fully before painting.
Step 6: Paint and Age the Brick
Even if panels come pre-finished, a little custom painting makes them look
higher-end:
- Start with a base coat that matches mortar color.
- Dry-brush various brick tones (rust, brown, soft gray) across the raised “bricks.”
- For a whitewashed look, mix paint with water and brush lightly, wiping back with a rag.
- For German schmear, use thin joint compound or thick paint and smear across bricks, leaving some exposed.
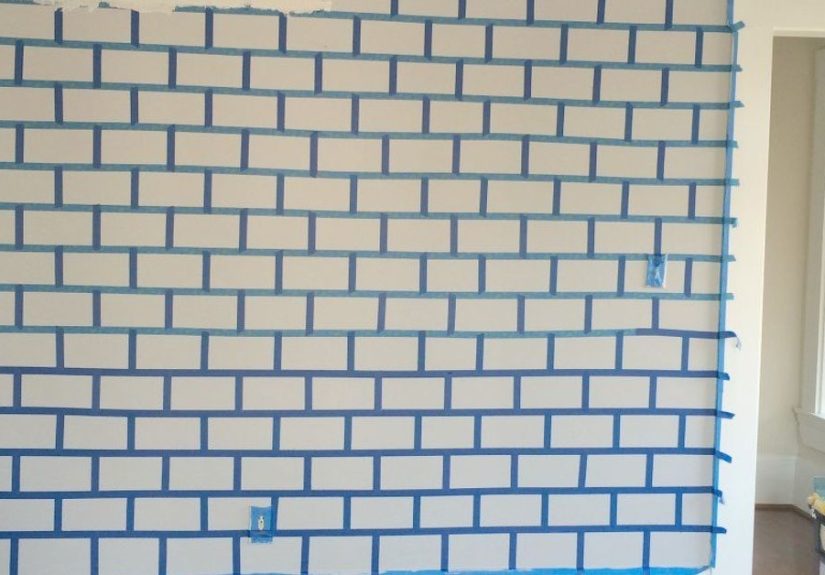
Step-by-Step: Joint Compound Faux Brick Wall
Step 1: Prime and Mark the Wall
Prime the wall with a good bonding primer. Then lightly draw guide lines for your
brick rows using a level and pencil. This keeps your “bricks” from turning into a
tipsy Jenga game.
Step 2: Tape the Brick Pattern
Use 3/4″ painter’s tape to create long horizontal stripes. Then add short vertical
pieces to form staggered “bricks.” Real bricks are usually around 2–3 inches tall
and 7–8 inches long, with 3/8″ mortar lines, but you can adjust to taste.
Step 3: Apply Joint Compound
Using a drywall knife or trowel, apply a thin but textured layer of joint compound
over the entire taped wall. It doesn’t need to be perfectly smooth – a little
variation makes the “bricks” feel authentic.
Step 4: Pull the Tape
While the compound is still damp (not fully dry), carefully peel off the tape.
Work slowly and pull at an angle so you don’t tear chunks of compound. As the tape
comes off, clean mortar lines appear like magic.
Step 5: Refine the Texture
Once dry, knock down any sharp edges with a sanding sponge or putty knife. Here’s
where you can chip corners, add a few “damaged” bricks, or build up compound in
certain spots to mimic old plaster.
Step 6: Paint the Brick
Start by painting the entire surface in a mortar color (light gray, warm beige, or
off-white). Then dry-brush brick tones onto each raised “brick,” layering colors to
avoid a flat, one-shade look. Step back frequently; what looks too dramatic up close
often reads perfectly balanced from across the room.
Common Faux Brick Mistakes (and How to Dodge Them)
-
Uneven rows: Always use a level or chalk line for your first row.
If the first course is off, everything above it will be, too. -
Visible panel seams: Stagger seams, fill gaps thoroughly, and use
paint or joint compound to visually blend transitions. -
Too-perfect bricks: Real brick has variations. Mix up colors,
chip a few corners, and avoid a repeatable “patterned” look. -
Wrong product for the space: Foam or thin wallpaper-style
products don’t love steam or heavy moisture; use moisture-rated materials
near kitchens and baths. -
Skipping primer: Primer helps everything stick and improves paint
coverage. Don’t skip it to “save” 20 minutes.
Where a Faux Brick Wall Really Shines
- Living room accent wall: Behind the TV or sofa for instant depth.
- Home office: A stylish backdrop that makes video calls look like a design show.
- Dining nook: Add warmth and a restaurant feel to a small eating area.
- Bedroom headboard wall: Cozy, textural, and highly Instagrammable.
- Hallways or entry: Turn a boring pass-through into a memorable moment.
Maintenance and Durability
Most faux brick finishes are low-maintenance. Dust panels with a soft cloth or
vacuum brush. For painted surfaces, a damp cloth and mild soap handle most smudges.
Peel-and-stick may need occasional re-pressing at edges in high-humidity spaces,
while joint compound bricks are sturdy once sealed with paint.
If a section gets damaged, it’s often as simple as patching with more compound or
replacing one panel or tile instead of ripping out an entire wall.
Cost Snapshot: What You Might Spend
- Faux brick panels: Roughly $30–$60 per 4×8 panel.
- Joint compound method: One bucket of compound ($15–$25), tape, primer, and paint.
- Peel-and-stick tiles: Around $25–$50 per pack depending on thickness and brand.
- Thin brick veneer: Highest cost per square foot, but still cheaper than full masonry.
For a standard 8×10-foot accent wall, many DIYers keep materials under a few
hundred dollars, especially when using panels or a joint compound technique.
Real-Life Faux Brick Wall Experiences: What DIYers Learn
If you scroll through Hometalk-style projects and DIY forums, you’ll notice a few
themes in people’s faux brick stories: excitement, a bit of panic halfway through,
and a lot of “I can’t believe this actually worked.”
1. Planning Saves Your Sanity
People who jump in without a layout often end up with weird slivers of brick near
corners or ceilings. Those who take time to mark a level line, test-fit a panel, or
mock up their brick size on paper usually finish faster and with fewer regrets.
Ten minutes of planning can undo hours of “why does this look wrong?”
2. Texture Beats Perfection
DIYers who tried for perfectly uniform bricks often felt their walls looked a bit
like printed wallpaper. The most convincing results come from embracing subtle
imperfections: slightly varied color, a few chipped edges, a touch of extra
joint compound here and there. Those little irregularities are what trick the eye
into reading the surface as real brick.
3. Light Changes Everything
Many people are surprised by how much lighting affects the final look. A brick
color that feels rich and cozy in a dim store can read way too dark in a bright
south-facing room. Doing a small sample section and checking it throughout the day
– morning, midday, and evening – helps you avoid repainting an entire wall because
it turns out “cozy” actually meant “dungeon.”
4. Renters Need Exit Strategies
Renter DIYers tend to gravitate toward peel-and-stick options or lightly attached
panels. They install panels with screws into studs (no heavy adhesive), and when
it’s time to move, they simply patch screw holes. This approach gives you a
high-impact look while keeping your security deposit safe.
5. Don’t Skip the Sample Board
One recurring tip: try your painting technique on a scrap piece of panel or a
small area of joint-compound wall first. That’s where you can experiment with
color layering, whitewash ratios, and how heavy your “German schmear” should be.
It’s a low-stress way to get comfortable before touching the main wall.
6. Weekend Project, Lifetime Payoff
Many faux brick walls come together over a single weekend: Day 1 for prep and
installation, Day 2 for paint and finishing touches. Once done, the wall instantly
becomes the star of the room. People report rearranging furniture to highlight it,
styling shelves and artwork specifically for that backdrop, and loving how it shows
up in photos and video calls.
7. The “I Should Have Done This Sooner” Effect
A common reaction after finishing a faux brick wall is wishing they’d started
sooner. It’s one of those projects that looks intimidating but is surprisingly
manageable once you begin. With basic tools, a bit of patience, and a good podcast
or playlist, you can turn a blank wall into a custom feature that feels like it’s
always belonged in your home.
Whether you go the panel route, sculpt your own bricks from joint compound, or
keep things simple with peel-and-stick, a faux brick wall is a high-impact,
budget-friendly way to transform your space. Plan carefully, embrace texture,
and let your inner designer have some fun – your “before and after” photos
will do the bragging for you.