Table of Contents >> Show >> Hide
- What Does “Floating” Actually Mean?
- Why This Mirror Style Works So Well
- Planning the Size: Go Big (But Not “Blocking the Closet Big”)
- Materials and Tools You’ll Actually Use
- Build Option A: A DIY “Floating Frame” Leaning Floor Mirror
- Build Option B: A Wall-Mounted “Near-Floor” Floating Mirror (More Secure)
- Safety and Stability: Because Gravity Never Sleeps
- Design Tips: Where a Floating Wood Floor Mirror Looks Best
- Finishes That Make the “Floating” Effect Pop
- Common Mistakes (and How to Fix Them Without Crying)
- Conclusion: A Statement Piece That’s Also a Workhorse
- Experience Notes: What It’s Like Living With a Floating Wood Floor Mirror (About )
A full-length mirror is already a power tool for your home: it bounces light, fakes square footage, and tells you
whether your “I totally woke up like this” outfit reads more “effortless” or “I fought a laundry basket and lost.”
Now add woodwarm, natural, forgiving woodand the whole thing levels up.
Enter the floating wood floor mirror: a modern, design-forward mirror that looks like the glass is
hovering inside (or slightly off) a wood frame. It’s the kind of piece that makes guests say, “Where did you get
that?” and makes you say, “Oh, this? Just a little thing I… carefully planned and then panicked through at 11 p.m.”
(Even if you buy it instead of building it, you’re allowed to keep that last part for yourself.)
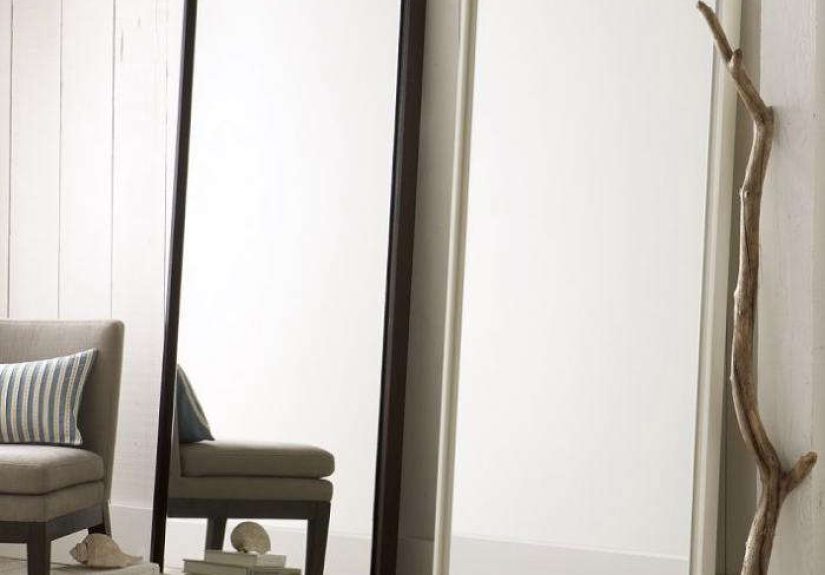
What Does “Floating” Actually Mean?
“Floating” is one of those decorating words that sounds like it should require magic, crystals, or a small team of
stagehands. In reality, it’s a visual trick created by spacea gap, a shadow line, or hidden supports.
With a floating wood floor mirror, you’ll usually see one (or a combo) of these styles:
1) Floating inside the frame (the classic “reveal”)
The mirror sits inside a wood frame, but instead of the glass touching the frame edge, there’s a deliberate gap
(often 1/8″–1/2″) around it. That negative space creates a crisp shadow line that makes the mirror look suspended.
2) Floating off the wall (the “shadow gap” mount)
The mirror (or framed mirror) mounts a small distance away from the wall using hardware like a French cleat and
spacers. The result is an elegant halo of shadowlike your mirror is hovering, but still obeying gravity’s strict
management style.
3) Floating above the floor (the “hidden base” illusion)
Some floor mirrors use a recessed plinth or a concealed support so the mirror appears to “stand” without visible
feet. This works especially well with thick frames and minimalist rooms.
Why This Mirror Style Works So Well
Floating wood floor mirrors hit a sweet spot: they’re visually light (thanks to that gap), but still grounded and
cozy (thanks to the wood). Here’s what they do for a room:
- They brighten spaces by reflecting windows and lamps, pushing light deeper into the room.
- They add “architectural” detail without needing renovations (or permits, or emotional support).
- They look custom because shadow gaps and reveals read as intentional, designer-level choices.
- They’re flexible: lean it, mount it, move ityour mirror can have a more active social life than you.
Planning the Size: Go Big (But Not “Blocking the Closet Big”)
A floor mirror should be functional first. Most people want a true head-to-toe view, so height matters. A common
target range is 60–72 inches tall for a full-length look. Width is usually about 18–30
inches, depending on the wall space and how dramatic you want the statement.
Example sizes that work in real rooms
- 60″ × 20″: Great for bedrooms, small apartments, and “I need a mirror, not a mural.”
- 65″ × 24″: A popular “just right” full-length size that feels substantial without dominating.
- 72″ × 30″: Bold, boutique-dressing-room energybest for larger rooms or wide hallways.
Mirror thickness: don’t cheap out on the part made of glass
For home décor, 1/4-inch mirror glass is commonly recommended because it’s sturdier and less prone
to distortion than thinner optionsespecially as the mirror gets larger. If you’re doing a big floor mirror, the
extra thickness is your friend. (So is safety backing film, which we’ll get to in a second.)
Materials and Tools You’ll Actually Use
You can build a floating wood floor mirror with basic woodworking tools. You do not need a fully equipped shop,
three apprentices, and a mystical forest where walnut boards volunteer as tribute.
Core materials
- Mirror (cut to size, ideally with polished edges)
- Wood for the frame (poplar, oak, walnut, maple, or pinechoose based on budget and stain goals)
- Spacers (thin strips, dowels, or hidden blocks to create the “float” gap)
- Backing (plywood, MDF, or a stable panel if your design needs it)
- Fasteners (brad nails, screws, pocket-hole screws, or corner brackets)
- Finish (stain + topcoat, paint, or clear sealer)
- Safety gear (gloves and eye protectionglass doesn’t care about your weekend plans)
Helpful tools
- Measuring tape, square, pencil
- Miter saw or circular saw + guide
- Drill/driver
- Clamps (the unsung heroes of “why won’t this line up?!”)
- Stud finder + level (if mounting)
- Sanding block or sander
Build Option A: A DIY “Floating Frame” Leaning Floor Mirror
This is the crowd-pleaser style: the mirror looks suspended inside a wood frame, and the whole piece leans against
the wall like it owns the place. The key is a reveal gap around the mirror and hidden supports
that hold the glass securely.
Step 1: Decide your reveal gap
Choose a gap that looks intentional. 1/4 inch is crisp and modern; 3/8 inch reads
a little bolder; 1/2 inch feels architectural and works nicely with thicker frames.
Step 2: Design the frame profile
For a modern floating look, a deeper frame (think 1×3, 1×4, or a custom milled
profile) helps create shadow and depth. If you want the mirror to look like it’s “in” the frame but not touching,
you’ll typically create a lip or a rabbet behind the opening.
Step 3: Build the outer rectangle first
Cut your frame pieces with clean corners (mitered or square butt joints). Dry-fit before you glue. If you’ve ever
built anything, you already know why: wood has a sense of humor, and it’s usually at your expense.
Step 4: Add hidden supports for the mirror
Inside the frame, install spacer blocks or thin strips behind the mirror’s edges. These keep the glass centered and
prevent rattle. If you’re going for a more “gallery” vibe, you can even use subtle metal dowels or rods as visible
design elementsjust make sure they’re structurally honest, not just decorative “thoughts and prayers.”
Step 5: Finish the wood before final assembly
Sand, stain/paint, and seal. Pre-finishing reduces the chance of getting stain on the mirror later (because nothing
says “handmade” like a permanent smudge you pretend is rustic).
Step 6: Install the mirror carefully
If your design uses adhesive, use a mirror-safe adhesive and follow the label instructions. Many
mirror-install guides recommend applying adhesive in vertical beads spaced apart to allow airflow, and avoiding
sealing the edges so moisture doesn’t get trapped. Let the adhesive cure fully before moving the mirror.
Step 7: Add anti-slip pads and a wall tether
Even if your mirror is leaning (not hanging), it should still be secured so it can’t tip. Add rubber pads at the
bottom for traction and use a discreet strap or bracket near the top to anchor it to the wall. It’s not overkill;
it’s “I prefer my mirror upright and my floor unshattered.”
Build Option B: A Wall-Mounted “Near-Floor” Floating Mirror (More Secure)
Want the floating look with less leaning drama? Mount the mirror slightly above the floor so it appears to hover.
This is especially good for households with kids, pets, or that one friend who gestures wildly while telling stories.
Why a French cleat is your best friend
A French cleat spreads weight and creates a strong, tidy mount. Many DIY and home-improvement guides recommend
fastening the wall side of the cleat into studs whenever possible, keeping everything level, and using suitable
anchors where studs aren’t available. Wider mirrors often benefit from anchoring across multiple studs.
How to make it “float”
- Use spacers (small bumpers or blocks) behind the mirror so it sits off the wall evenly.
- Set the bottom edge 1–3 inches above the floor for a subtle hover effect.
- Add soft bumpers so the mirror doesn’t tap the wall when doors slam or vibes shift.
Safety and Stability: Because Gravity Never Sleeps
Mirrors are heavy, rigid, and made of glassthree traits that are awesome in a mirror and terrible in a falling
object. So let’s keep it standing.
Don’t trust “adhesive hooks” with mirrors
Designers routinely warn against hanging mirrors with adhesive hooks or strips, especially heavier ones. Temperature,
humidity, and wall texture can turn “rated to hold” into “rated to disappoint.”
Choose hardware like you choose friends: supportive and properly rated
- Find studs where you can. Stud-mounted hardware is the gold standard.
- Use anchors rated for the load if studs aren’t available at your mounting points.
- Use two points of support (or more) to distribute weight and reduce twist.
- For leaning mirrors, use an anti-tip strap or bracket so it can’t topple forward.
Consider safety backing film
Safety backing film can help keep shards together if the mirror breaksespecially smart for large floor mirrors.
It’s not a force field, but it can reduce the “glass confetti” situation if the worst happens.
Design Tips: Where a Floating Wood Floor Mirror Looks Best
Mirrors can make a room feel larger and brighter, but placement matters. The mirror should reflect something you
actually want to see. (Pro tip: if the mirror reflects a clutter corner, congratulationsyou’ve invented
“clutter: doubled.”)
Easy wins for placement
- Across from a window (or near a light source) to bounce light and lift the room.
- In the entryway so you can check your look before leaving and also fake a grander foyer.
- In a bedroom dressing zone near the closet for functional everyday use.
- At the end of a hallway to add depth and interest.
Make it intentional: scale + surroundings
A big mirror needs breathing room. Keep nearby décor simple so the mirror reads as the statement. If you’re placing
it above a console, aim for a width that feels proportionate to the furniture below (not a tiny mirror floating
awkwardly like it’s unsure why it’s there).
Finishes That Make the “Floating” Effect Pop
The finish you choose can either emphasize the shadow gap or erase it. Here are dependable directions:
Modern + crisp
- Matte black frame + small reveal gap
- White oak or maple with a clear sealer
- Walnut stain with minimal grain fill for texture
Warm + lived-in
- Reclaimed wood look (but sand it smooth so you don’t snag sweaters forever)
- Medium stain + satin topcoat
- Subtle brass accents (rods, pins, or corner details)
Common Mistakes (and How to Fix Them Without Crying)
Mistake: The mirror rattles inside the frame
Fix: Add thin rubber bumpers or felt pads at contact points. A tiny cushion goes a long way toward
“luxury” instead of “maraca.”
Mistake: The mirror leans and slides
Fix: Add anti-slip pads at the bottom and tether the top with a strap. Also check the floor:
slick tile and enthusiastic mirrors don’t mix.
Mistake: The frame looks bulky, not floating
Fix: Increase the reveal gap slightly, or add a small bevel/chamfer on the inner edge of the frame
to create a cleaner shadow line.
Mistake: Distorted reflection
Fix: Choose thicker mirror glass for larger sizes and ensure the mirror is supported evenly. Uneven
pressure can subtly warp the look (and nobody needs funhouse vibes before coffee).
Conclusion: A Statement Piece That’s Also a Workhorse
A floating wood floor mirror is the rare décor item that earns its keep: it’s practical every single day, and it
makes a room feel brighter, bigger, and more finished. Whether you DIY a reveal-gap frame, mount a near-floor mirror
to “hover,” or buy one and upgrade it with smarter anchoring, the formula is the same:
good materials + solid support + intentional spacing.
And remember: the real “floating” effect isn’t magicit’s just smart design creating a shadow line that looks
expensive. Which is wonderful, because magic is hard to sand and even harder to stain evenly.
Experience Notes: What It’s Like Living With a Floating Wood Floor Mirror (About )
People usually buy or build a floating wood floor mirror for looksbut the day-to-day experience is what makes it
a keeper. The first thing most homeowners notice is how much the mirror changes the room’s mood at different times
of day. In the morning, it pulls in soft daylight and makes a bedroom feel calmer and more open. At night, it
reflects lamps and warm bulbs and turns a dark corner into something that feels styled on purpose, not “the place
where random things go to retire.”
The second “real life” discovery is that the floating gap is surprisingly forgiving. A standard framed mirror can
sometimes read heavylike a big rectangle announcing itself. The reveal gap breaks up that mass. Even people who
normally avoid large décor say the floating effect feels lighter and cleaner, especially in smaller spaces. It’s
a subtle trick, but it works: your eye reads the shadow line as detail, and the mirror as a designed object rather
than just a utility slab.
DIYers also tend to have a very specific emotional arc with this project. Phase one is optimism: “This will take
one afternoon.” Phase two is realism: “Why is my wall not perfectly square, and why does wood move like it’s alive?”
Phase three is bargaining: “If I sand this corner for another ten minutes, surely the universe will reward me with
perfect miters.” And then, finally, satisfactionusually the moment the mirror drops into place and the reveal gap
looks crisp. That’s the point where people stop seeing their tiny mistakes and start seeing the whole piece.
Another common experience: you will think about safety more than you expected. A large mirror feels stable until
you imagine it tipping. Many homeowners end up adding a wall tether “just in case,” and then feel instantly better
about itespecially if kids, pets, or frequent guests are in the mix. That one small strap can turn the mirror from
“beautiful but slightly nerve-wracking” into “beautiful and I can relax.”
Cleaning becomes part of the routine, too. People often underestimate how quickly mirrors collect fingerprints,
dust, and mystery specks that appear out of nowhere (possibly transported by household gremlins). The practical
trick is keeping a microfiber cloth nearby and doing quick touch-ups instead of waiting until it looks like a crime
scene. For the wood frame, most folks prefer a durable topcoat so they don’t have to baby it; the mirror is used
daily, so the finish should be ready for real life, not just photo day.
Finally, there’s the “placement journey.” Many owners move the mirror once or twice before it lands in the perfect
spot. First it goes where it fits. Then it goes where it works. Then it goes where it looks bestoften near a
window, a dresser, or an entry wall that needed a focal point. When it’s finally in the right place, the mirror
becomes one of those pieces you use constantly but also notice every time you walk by. And honestly, that’s the
dream: functional, beautiful, and just dramatic enough to feel like you did something special.