Table of Contents >> Show >> Hide
- Why This Nightstand Is Perfect for Beginner Builders
- Materials and Tools: Keep It Simple
- Step-by-Step: How to Build a SUPER Easy Nightstand
- Safety Tips and Common Beginner Mistakes
- Fun Ways to Customize Your DIY Nightstand
- Beginner Builder Diary: Real-World Lessons from This Nightstand Project
- Conclusion: Your First Nightstand, Not Your Last Project
If you’ve been dying to try a “real” woodworking project but the table saw aisle still feels a little terrifying, this SUPER easy DIY nightstand is your perfect first build. It uses straight cuts, affordable lumber, and basic tools, but still gives you a legit piece of furniture you’ll be proud to park next to your bed.
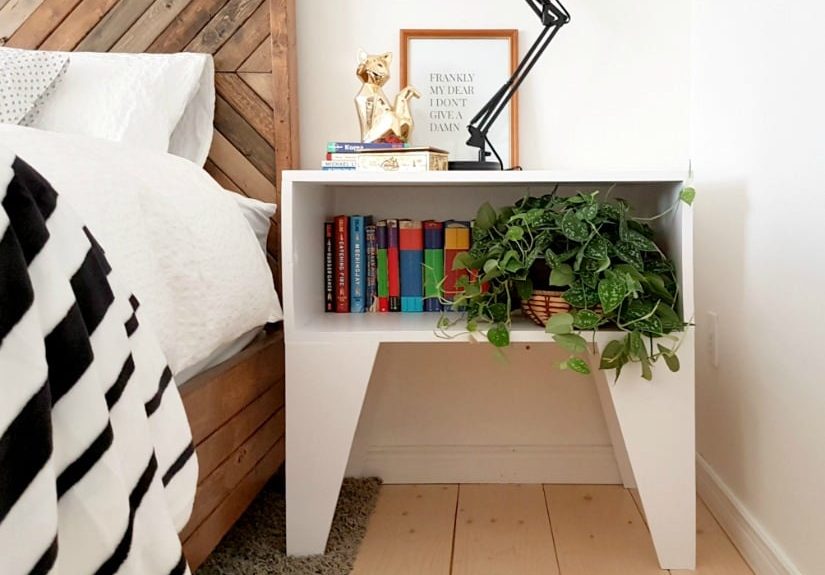
This style of simple nightstandlike the Remodelaholic beginner-friendly designis all about clean lines: four sturdy legs, a lower shelf, and a solid top that can handle books, a lamp, and that glass of water you always forget to bring. Projects like this are consistently recommended for beginners by woodworking and DIY sites because you get practice with measuring, cutting, drilling, and finishing without dozens of complicated joints.
In this guide, we’ll walk through everything step by stepfrom choosing your boards to the final coat of finishplus some hard-earned tips from real-world beginner builds. By the end, you’ll have a sturdy nightstand and the confidence to say, “Yep, I built that.”
Why This Nightstand Is Perfect for Beginner Builders
Lots of woodworking projects look simple on Pinterest but secretly require advanced tools or sneaky joinery. This one really is beginner-friendly. Here’s why:
- Straight cuts only: No curves, no fancy profilesjust square cuts you can make with a circular saw, miter saw, or even a handsaw with a guide.
- Simple structure: Legs, rails, a lower shelf, and a topno drawers, no hinges, no complicated hardware to line up.
- Minimal tools: You can build a nightstand like this with a tape measure, circular saw, drill/driver, sander, and a square. These tools are frequently listed as the core starter kit for nightstand projects.
- Forgiving design: A little gap in a shelf or a minor sanding mistake can be disguised with wood filler, paint, or stain. Beginners make mistakes; this project expects that.
- Fast payoff: Many DIY nightstands can be built in a weekend, which is ideal when you’re still building your skills and patience.
Think of this as Woodworking 101 but with a stylish piece of bedroom furniture as your final exam.
Materials and Tools: Keep It Simple
You can adjust the exact dimensions, but most super easy nightstand builds use common, off-the-shelf boards in standard sizes so you’re not wrestling with sheet goods right away.
Suggested Materials
- Lumber:
- 2×2 boards (for legs and base frame)
- 1×12 or 3/4″ project panel (for top and lower shelf)
- Fasteners:
- Wood screws (1 1/4″ and 2″ are typical)
- Pocket-hole screws (if using a pocket hole jig)
- Wood glue
- Finishing supplies:
- Sandpaper (80, 120, 180 or 220 grit)
- Wood filler (for screw holes and gaps)
- Primer (for paint) or pre-stain conditioner (for stain)
- Paint or stain + clear topcoat (polyurethane, polycrylic, or similar)
Basic Tools
- Tape measure and pencil
- Speed square or combination square
- Circular saw or miter saw
- Drill/driver (with bits for pilot holes and driving screws)
- Random orbital sander (or sanding block if you’re ambitious)
- Clamps (nice-to-have, but extremely helpful)
Many beginner nightstand tutorials use almost exactly this tool listjust enough to give you real skills, without needing a full-blown woodshop.
Step-by-Step: How to Build a SUPER Easy Nightstand
This walkthrough is based on the kind of simple, boxy nightstand showcased on Remodelaholic and similar DIY sites: four 2×2 legs, connecting rails, a lower shelf, and a top sized to your space. Adjust dimensions to fit your mattress height and bedside needs.
Step 1: Pick Your Dimensions and Style
Before cutting anything, decide how tall and wide you want your nightstand:
- Height: Aim for your nightstand to be level with or slightly below the top of your mattressusually somewhere around 24–28 inches.
- Width and depth: Common beginner builds are roughly 16–20 inches wide and 14–18 inches deepbig enough for a lamp and a book without dominating the room.
Sketch a quick diagram with rough dimensions. It doesn’t need to be architectural perfectionjust enough to know how long to cut your legs, rails, and panels.
Step 2: Cut the Boards
Once you have dimensions, make a simple cut list. For a basic build, you’ll likely have:
- 4 legs (2x2s) cut to your finished height minus the thickness of the top
- 4 side rails for the lower shelf (front and back)
- 4 rails for the top frame (optional; some designs attach the top directly to legs)
- 1 shelf panel
- 1 top panel
Use a miter saw or a circular saw with a straightedge. Mark your lines with a square and cut slowlyaccuracy matters more than speed. Many beginner nightstand guides emphasize making all legs exactly the same length to avoid wobble, so stack and clamp them together and trim them in one pass if you can.
Step 3: Assemble the Base Frame
Now it starts looking like furniture.
- Mark the shelf height: Measure up from the bottom of each leg and mark where the shelf will sitoften 6–10 inches off the floor.
- Pre-drill pocket holes or screw locations: If you have a pocket hole jig, drill pocket holes on the ends of your rails. If not, simply drill pilot holes through the legs into the ends of the rails.
- Attach side rails: Lay two legs down, clamp them, and attach front-and-back rails between them to form a “U” shape. Repeat for the other two legs.
- Connect the assemblies: Stand them up and attach rails between the two “U” shapes, forming a rectangular frame.
Take your time to keep everything square. A simple builder’s square or even measuring diagonals (they should match) can help you detect twist or racking before it becomes obvious in a wobbly finished piece.
Step 4: Add the Shelf and Top
With the frame assembled, it’s time to add horizontal surfaces.
Lower Shelf
- Cut your shelf panel so it fits snugly inside the frame, resting on cleats or directly on the lower rails (depending on your design).
- Dry-fit the shelf first. If it’s too tight, trim a tiny amount at a time.
- Attach with wood glue and a few countersunk screws from underneath or small brad nails from above (you can fill those later).
Top Panel
- Cut the top so it overhangs the base by about 1/2″–1″ on all sides for a finished look.
- Center the base on the underside of the top, marking its position with a pencil.
- Attach from underneath with screws through the rails or the tops of the legs, using glue for extra strength.
At this point, you officially have a nightstand shape. Pause for a second and admire it. Yes, even if it’s still covered in pencil lines.
Step 5: Sand, Prep, and Finish
The difference between “homemade” and “handcrafted” is often in the finishing. Almost every professional guide emphasizes sanding and surface prep.
- Fill holes and gaps: Use wood filler on screw holes, visible seams, and any dings.
- Sand the whole piece: Start with 80 or 100 grit to knock down rough spots, move to 120, then finish at 180 or 220 for a smooth feel.
- Remove dust: Vacuum, then wipe with a tack cloth or a barely damp rag.
- Prime (for paint) or condition (for stain): Primer helps paint adhere; conditioner helps stain absorb evenly on softwoods like pine.
- Apply color: Brush or roll on paint or stain, following the product instructions for dryness and recoating times.
- Seal it: Add a clear protective topcoat for durability, especially if you’re a chronic coffee-spiller.
For a Remodelaholic-style look, you can combine a stained top with a painted base, or keep everything one color for a modern, minimalist vibe.
Safety Tips and Common Beginner Mistakes
Even with a simple nightstand project, safety and technique matter. Most beginner woodworking resources repeat a few golden rules for good reason.
Safety Basics
- Always wear safety glasses when cutting or drilling.
- Use hearing protection with power saws.
- Clamp your work instead of holding it near a spinning blade.
- Keep cords out of the cutting path and never bypass blade guards.
Beginner Mistakes to Avoid
- Skipping the measuring tape: “Close enough” measurements can add up to a crooked, wobbly nightstand.
- Not pre-drilling screws: Driving screws into end grain without pilot holes can split boards and weaken joints.
- Rushing the sanding: If you hate sanding, you’re in good companybut rushing it is how you end up with scratchy edges and blotchy finishes.
- Using wet lumber: Warped boards later can twist and rack your piece. Choose straight, relatively dry boards off the rack.
- Skipping finish protection: Raw wood looks good for about five minutesthen it absorbs water rings, stains, and fingerprints.
If you can be patient for just a few extra minutes at each step, you’ll get a much more polished result.
Fun Ways to Customize Your DIY Nightstand
One of the best parts of building your own nightstand is that it doesn’t have to look like it rolled off an assembly line. DIY sites are packed with variations on this basic design, and you can borrow ideas freely to make the piece feel like “you.”
- Add a second shelf: If you’re a book hoarder, double up on storage by adding a second shelf halfway up.
- Mix finishes: Try a stained top with a painted base, or vice versa, for a high-end look on a budget.
- Accent hardware: Even on a drawerless nightstand, you can add metal corner brackets or decorative screws for a more industrial vibe.
- Color pop inside: Paint the underside of the top or the shelf a bold color you’ll see only when you bend downlike a little secret design surprise.
- Charging station upgrade: Drill a neat hole at the back of the top or shelf to feed phone and tablet cords through, turning your build into a simple tech hub.
Start with the basic Remodelaholic-style shape and let your personality do the rest.
Beginner Builder Diary: Real-World Lessons from This Nightstand Project
So what is it actually like to build a SUPER easy nightstand as a true beginner? Let’s talk about the experience side of the projectthe emotions, little wins, and “oh no” moments that every first-time builder goes through.
The “I Hope I Don’t Ruin This Board” Stage
The first cut is always the scariest. You’ll probably triple-check the tape measure and stare at the saw like it might bite. That’s normal. A good trick: practice on a scrap piece first. Get used to lining the blade up with your pencil mark, holding the saw steady, and letting it reach full speed before cutting.
Most beginner builders are surprised at how quickly the fear fades after those first few cuts. Once you see your legs and rails stacking up in neat little piles, you start to think, “Okay, I can actually do this.”
The “Hey, This Looks Like Furniture” Moment
The next emotional milestone comes when you screw the frame together. Suddenly, your random pile of cut boards stands there on four legs. It might be a little wobbly, and you might notice a rail that isn’t exactly flush, but that’s part of the charm.
This is also when most people start mentally matching the nightstand with their décor: “Should I stain it? Paint it white? Go bold with a deep navy or a sage green?” You’re no longer just following a plan; you’re designing something for your space.
Dealing with Imperfections Without Giving Up
Here’s the secret you don’t always see in picture-perfect blog posts: every project has imperfections. Maybe your shelf sits 1/8″ lower on one side, or a screw wandered a bit and left a small chip in the edge. The key is not to quitbut to problem-solve.
- A gap at a joint? That’s what wood filler and sanding are for.
- Small surface dings? Sand them out or embrace the “distressed” look.
- Minor wobble? Add felt pads or trim an extra hair off one leg.
Woodworking is a craft where fixes are usually possible. You learn to see mistakes not as disasters, but as opportunities to learn a technique you’ll use on every project after this one.
What You Learn Beyond the Nightstand
Building this easy nightstand teaches a surprising number of skills you can reuse:
- Accurate measuring and marking so parts line up correctly.
- Understanding grain direction and how it affects sanding and finishing.
- How long glue and finish really take to dry (spoiler: longer than you think when you’re impatient).
- How to read a project plan and adapt it to your space and style.
After this nightstand, a matching second one or a small side table doesn’t look scary at allit just looks like “Round Two.” Many beginners use a simple bedside table as a springboard into building desks, shelves, or full bedroom sets. That’s the real power of a project like this: it’s a low-pressure way to unlock a new hobby.
Why This Project Feels So Rewarding
Buying a nightstand is easy. Clicking “Add to Cart” takes maybe 10 seconds. But waking up next to something you built yourself hits differently. Every time you set your phone down or rest a book on top, you’re using your skills, not just your wallet.
The cost savings can be realDIY nightstands often come in far cheaper than store-bought furniturebut the confidence you gain is worth more than any price tag. You’ll walk away from this project not just with a piece of furniture, but with the feeling of, “If I built this, what else can I build?”
And that’s when you know you’re no longer “just a beginner.” You’re a builder.
Conclusion: Your First Nightstand, Not Your Last Project
Building a SUPER easy nightstand in the Remodelaholic style is the perfect way to step into woodworking without feeling overwhelmed. Straight cuts, simple joinery, and a forgiving design make it doable, while a polished finish and endless customization options keep it exciting.
With a few basic tools, some inexpensive lumber, and a weekend’s worth of patience, you can go from “I’ve never built anything before” to “I made this, and it lives right next to my bed.” Once you’ve finished your first nightstand, don’t be surprised if friends start asking, “Hey…can you make one for me too?”


