Table of Contents >> Show >> Hide
- Snowblowers 101: What These Machines Actually Do
- Step 1: Match the Snowblower to Your Driveway
- Step 2: Choose the Right Type and Power Source
- Step 3: Key Features That Actually Matter
- How to Use a Snowblower Like a Pro
- Safety First: Snowblowing Without the Drama
- Maintenance and Storage to Make Your Snowblower Last
- Real-Life Snowblower Lessons from the Driveway
- The Bottom Line
If you’ve ever woken up to find your driveway buried under a fresh, knee-high blanket of snow, you know the feeling: a mix of quiet winter magic and pure dread.
Sure, shoveling is technically “good exercise,” but so is not slipping a disk. That’s where a good snowblower earns its spot as the hero of your winter tool lineup.
The challenge? Walk into any home center in November and you’ll find a wall of machines in different sizes, stages, power sources, and price tags that can rival a used car.
Picking the wrong one can leave you with a heavy, cranky beast that either can’t keep up with real storms or wildly overkills your tiny driveway.
In this guide, we’ll walk through how to choose the right snowblower for your driveway and how to use and maintain it so winter stays manageable instead of miserable.
Snowblowers 101: What These Machines Actually Do
A snowblower (or snow thrower, if you’re feeling fancy) is basically a conveyor system for snow. An auger at the front scoops snow off the ground and sends it into a chute,
which throws it out of your way and preferably onto your lawn instead of your neighbor’s windshield. On some models, an impeller helps launch snow farther and faster.
The “stage” of a snowblower describes how many steps it uses to move snow:
- Single-stage: One auger does all the work scoops the snow and throws it through the chute in a single motion. Simple, lightweight, and great for light to moderate snow on paved surfaces.
- Two-stage: The front auger gathers snow and feeds it to a second impeller that throws it out the chute. These machines cut through deeper, heavier snow and handle longer or wider driveways.
- Three-stage: Adds an accelerator that breaks up dense, packed snow and ice before the impeller throws it. These are serious machines for serious winters and big properties.
Step 1: Match the Snowblower to Your Driveway
Size and Layout: How Much Pavement Are You Clearing?
Before falling in love with a specific brand, take a hard look at your driveway. A narrow, one-car suburban driveway has very different needs than a wide rural driveway with a turnaround.
Many manufacturers think of size in terms of how many “parking spaces” you’re clearing. Compact single-stage machines are typically designed for smaller areas, while larger two- and three-stage models are built for long or wide driveways that can fit multiple cars side by side.
As a rough rule of thumb:
- Short, single-car driveway or small parking pad: A single-stage or compact battery model is often enough.
- Medium-size, two-car driveway: Look at beefier single-stage or entry-level two-stage machines.
- Long or wide driveway, or a corner lot: A full-size two-stage or even three-stage unit can save you a lot of time after big storms.
Typical Snowfall and Climate
Your average winter matters just as much as your driveway length. If you’re in a milder region that gets a few lighter storms a year, a compact single-stage snowblower can handle the job.
But if you regularly see storms dropping a foot or more at a time, a two-stage machine is worth the investment, since many are designed to handle around a foot of snow or more in a single pass.
If your winters include heavy, wet snow or frequent plow berms at the end of your driveway, consider a more powerful two- or three-stage unit that can chew through dense piles without bogging down.
Surface Type: Pavement vs. Gravel
The type of surface you’re clearing plays a huge role:
- Paved, smooth driveways: Single-stage machines that scrape right down to the surface are fine here.
- Gravel or uneven surfaces: You’ll want a two-stage machine with adjustable skid shoes so the auger rides slightly above the surface, preventing it from scooping up rocks and turning them into high-speed projectiles.
Step 2: Choose the Right Type and Power Source
Single-Stage vs. Two-Stage vs. Three-Stage
Here’s a quick breakdown of what each type is best for:
- Single-stage snowblowers are lightweight, easy to maneuver, and perfect for flat, smaller driveways with up to moderate snow depths. They’re great if you value simplicity and don’t get constant heavy storms.
- Two-stage snowblowers handle deeper snow, heavier drifts, and longer driveways. They often have self-propelled drive systems, bigger engines, and more robust construction ideal for regions with regular snowstorms.
- Three-stage snowblowers are the heavy hitters for big properties, steep driveways, and deep or icy snow. The extra accelerator helps chew through packed, plow-piled snow much faster than smaller machines.
Gas, Electric Corded, and Battery-Powered Snowblowers
Once you know the type, it’s time to pick a power source:
- Gas-powered: Classic, powerful, and great for longer runtimes and tough conditions. They require fuel storage, oil changes, and more maintenance, but remain the go-to choice in snowbelt regions and for larger driveways.
- Corded electric: Quieter, lighter, and low-maintenance, but you’re tethered to an extension cord. These are best for short driveways, walkways, and areas close to outlets.
- Battery-powered: A fast-growing category. Modern battery snowblowers offer solid power with zero gas fumes and far less maintenance, especially in the single- and two-stage space. They’re excellent for small-to-medium driveways if you’re willing to manage battery charging and possibly keep spare packs on hand.
Think about how far you’ll need to go and how cold it gets. Extreme cold can shorten battery runtime, while gas engines need fresh fuel and occasional tune-ups. If you hate dealing with cords and gas cans, a quality battery model can be the sweet spot.
Step 3: Key Features That Actually Matter
Once you’ve narrowed your category, focus on features that affect how the machine feels in daily use not just the flashy marketing numbers.
Clearing Width, Intake Height, and Throw Distance
Clearing width is how wide a path your snowblower clears in one pass. Wider models cover more ground faster, but may be harder to maneuver in tight spaces like curved walks or between parked cars.
Intake height tells you how deep of a snowfall your machine can handle at once, while throw distance shows how far it can toss that snow often 20 to 50 feet on larger two-stage machines, which helps you keep snow piles away from the driveway edge.
Chute Controls and Direction
Being able to aim the snow where you want it and away from cars, windows, and the neighbor’s walkway is crucial. Look for:
- Easy-to-reach levers or joysticks for chute direction.
- Deflector controls to change how high or low the snow flies.
- Some models offer one-handed operation so you can steer and adjust the chute at the same time.
Drive System, Steering, and Traction
Two- and three-stage models commonly include a self-propelled drive system, so the machine helps pull itself forward a lifesaver when pushing through wet, heavy snow.
Features to consider:
- Multiple speeds: Slow for heavy drifts, faster for lighter, fluffier snow.
- Power steering or easy-turn controls: Helpful on larger, heavier units.
- Wheels vs. tracks: Wheels are common and work well for most paved driveways. Tracks can offer better traction on steep slopes or uneven surfaces, but add cost and complexity.
Comfort and Convenience Features
If you’ll be out there at 6 a.m. before work, creature comforts matter:
- Electric start: Press a button instead of wrestling a recoil cord in subzero wind.
- Heated handles and LED headlights: Nice extras that make dark, cold mornings more tolerable.
- Folding handles and compact storage: Helpful if you’re short on garage space.
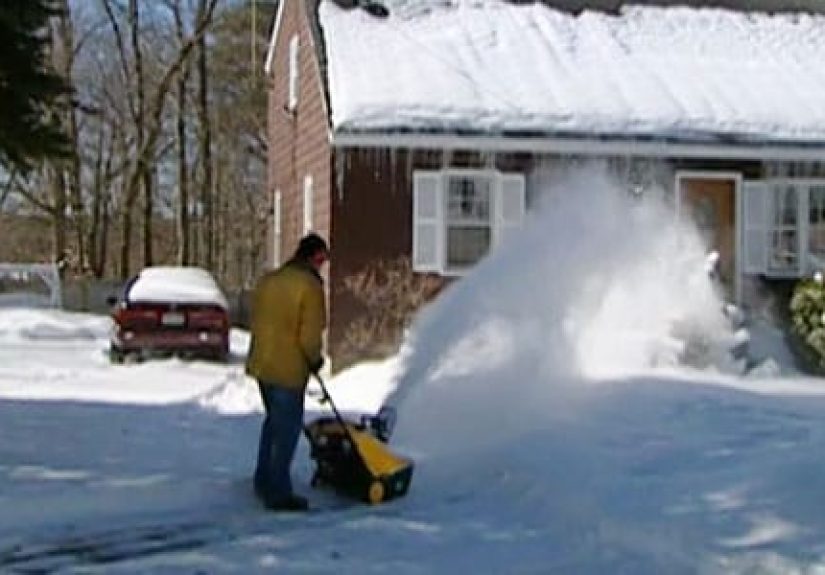
How to Use a Snowblower Like a Pro
Before the Storm: Prep Your Machine and Driveway
A few minutes of prep can prevent breakdowns when the snow finally hits:
- Check the oil level and fuel, or make sure your batteries are charged.
- Inspect belts, skid shoes, and shave plate for wear and replace anything that’s badly worn.
- Keep spare shear pins on hand these small, sacrificial parts are designed to break if the auger hits a solid object, protecting the gearcase from damage.
- Walk the driveway and remove doormats, hoses, rocks, toys, and extension cords.
Start-Up Checklist
Follow the owner’s manual for the exact starting procedure, but in general:
- Move the machine outside or into a well-ventilated space.
- Set the choke and throttle as directed.
- Use electric or recoil start; let the engine warm up for a minute.
- Engage the auger only after the engine is running smoothly.
Smart Patterns for Clearing Your Driveway
Instead of wandering randomly, work in a pattern:
- Start by clearing a path down the center or along one edge of the driveway.
- Work in overlapping passes, throwing snow away from the area you still need to clear.
- Pay attention to wind direction blowing with the wind helps keep snow out of your face and off your freshly cleared path.
Dealing with the Notorious Plow Pile
That crusty, compacted wall of snow the street plow leaves at the end of your driveway can feel personal. One trick is to clear a “pocket” on the side of your driveway a small open area where plowed snow can dump before reaching your main drive. Then, when the plow comes by, most of the heavy pile collects in that pocket, making it easier to remove later with the snowblower.
What to Do About Clogs
Heavy or wet snow can clog the chute. Never, ever stick your hand in there. Shut off the engine, wait for all moving parts to stop, and use a clean-out tool or a sturdy stick designed for the job. Many modern machines come with one clipped to the handle.
Safety First: Snowblowing Without the Drama
Snowblowers are powerful machines, and using them carelessly can lead to property damage or serious injury. Keep these key safety rules in mind:
- Keep hands and feet away from moving parts, and shut off the engine before clearing clogs or making adjustments.
- Aim the chute away from people, cars, windows, and the street.
- Wear sturdy boots with good traction, eye protection, and warm gloves.
- Be extra cautious on slopes and icy areas; go slow and avoid sudden turns.
- Never run a gas-powered snowblower in an enclosed area carbon monoxide builds up quickly.
- Keep kids and pets well away from the work zone.
Maintenance and Storage to Make Your Snowblower Last
Routine Winter Maintenance
Treat your snowblower like a small car engine that lives in freezing weather. Basic maintenance can dramatically extend its life:
- Change the oil as recommended by the manufacturer.
- Inspect and replace the spark plug when needed for easier starts.
- Check for loose bolts or fasteners; vibration can work them loose over the season.
- Inspect belts, skid shoes, shave plate, and tires periodically and replace worn parts before they fail mid-storm.
End-of-Season Storage
When spring finally arrives, don’t just shove the machine into a corner and forget about it. Proper storage makes next winter much easier:
- Clean off all snow, salt, and debris, and let the machine dry completely to prevent rust.
- Lubricate moving parts according to the manual.
- Add fuel stabilizer to fresh gasoline and run the engine briefly so treated fuel circulates through the system. This helps prevent stale fuel, corrosion, and dried-out gaskets over the off season.
- Store the snowblower on a level surface in a dry, ventilated area. If you cover it, use a breathable cover don’t wrap it in plastic.
Real-Life Snowblower Lessons from the Driveway
Owning a snowblower doesn’t automatically make you a winter wizard but a little experience goes a long way. Here are some real-world lessons that many seasoned homeowners discover the hard way:
First, bigger isn’t always better. It’s tempting to buy the largest, most powerful machine you can afford, but if your driveway is short and tight, wrestling a giant two-stage unit around parked cars and curves can be exhausting. Many people end up using a smaller, more nimble machine more often simply because it’s less of a hassle to move and store. Think about how you’ll actually use it at 6 a.m. on a workday, not just how it looks lined up at the store.
Second, your snowblower is only as good as its prep. The day you discover a loose belt or stale gas is always the morning after a big storm. Homeowners who treat the first forecast of the season as a “dress rehearsal” checking fuel, tightening bolts, and doing a quick test run are the ones who calmly roll out their machines while the rest of the neighborhood is wrestling with dead batteries and flooded carburetors.
Third, technique matters more than raw muscle. People often start by pushing the machine as fast as they can, then wonder why the chute clogs or the engine bogs. Slowing your walking pace, overlapping passes slightly, and working with the wind instead of against it usually results in a cleaner driveway in less time. You’ll also learn which direction to throw snow so it doesn’t drift right back into your path or bury your mailbox.
Another big “aha” moment is how much difference a good plan for the plow pile makes. Homeowners who create a small catch area at the end of the driveway and keep side piles low early in the season have an easier time when storms stack up. If you let snowbanks get too tall, every new storm gives you less room to throw snow, and eventually your blower starts ricocheting snow back at you like a frosty boomerang.
Finally, people quickly learn the value of a quick post-storm cleanup. Doing a fast touch-up pass after the city plow comes through, brushing snow off steps, and widening paths while the snow is still light keeps things manageable. Waiting until you absolutely must move the snow means dealing with refrozen slush, tire ruts, and compacted drifts that are harder on both you and the machine.
Over time, using a snowblower becomes a rhythm: watch the forecast, prep early, clear in smart passes, and stay ahead of buildup. With the right machine and a bit of practice, keeping your driveway clear stops feeling like a battle and starts feeling like just another part of your winter routine maybe even one you secretly enjoy.
The Bottom Line
Choosing the right snowblower is about matching the machine to your driveway, climate, and comfort level. Once you’ve picked the right type and power source, focus on features that really affect day-to-day use width, intake height, chute controls, drive system, and ease of maintenance.
Combine that with safe operating habits and simple seasonal care, and your snowblower will keep your drive clear and your back happier for many winters to come.