Table of Contents >> Show >> Hide
- Why mint cuttings work so well
- Mint propagation keywords to know (without getting nerdy)
- What you’ll need
- Step 1: Choose the right mint cutting
- Method 1: How to grow mint from cuttings in water
- Method 2: How to propagate mint cuttings in soil
- Aftercare: turning a rooted cutting into a mint machine
- How to keep mint from taking over your yard
- Troubleshooting: common mint cutting problems (and fixes)
- FAQ: quick answers for mint propagation
- Conclusion
- Extra: Real-world experiences & lessons (the stuff guides don’t always say out loud)
- 1) “My cutting looked fine… until it turned into swamp soup.”
- 2) Bright light helpsdirect sun can backfire
- 3) Water roots vs. soil roots: the awkward transition is real
- 4) Soil propagation succeeds when humidity is controlled, not when you drown it
- 5) The “tug test” saves sanity
- 6) Store-bought mint can work… if you choose the right stems
- 7) Containment isn’t optional if you like your other plants
- 8) Flavor is tied to care (and timing)
Mint is that friend who shows up “for one drink” and somehow ends up living on your couch for the next five years. The good news: that unstoppable energy makes mint ridiculously easy to propagate from cuttings. The other news: it’s also why your garden can turn into a mint-themed amusement park if you’re not careful.
In this guide, you’ll learn exactly how to grow mint from cuttings (in water or soil), what to do when things get weird and slimy, and how to keep your new plants lush, flavorful, and politely contained.
Why mint cuttings work so well
Mint (Mentha spp.) is a vigorous herb that naturally wants to root from stems and spread by underground runners. When you take a healthy stem cutting, you’re basically giving mint a new excuse to multiply. And it happily obliges.
Three reasons propagation beats buying another plant
- It’s fast: You can often see early root growth in days and transplant within a couple of weeks.
- It’s a clone: You keep the exact flavor of the parent plant (peppermint stays peppermint).
- It’s cheap: One thriving plant can supply cuttings for yearslike a mint subscription you don’t have to cancel.
Mint propagation keywords to know (without getting nerdy)
- Node: The “joint” where leaves attach to the stem. This is rooting central.
- Internode: The stem section between nodesless exciting, fewer roots.
- Cutting: A stem piece you root to create a new plant (your future mojito supplier).
What you’ll need
Basic supplies (water method)
- Healthy mint stems (4–6 inches is a sweet spot)
- Clean scissors or pruning snips
- A clear glass or jar
- Fresh water
- Bright, indirect light (a sunny room, not a scorching windowsill)
Basic supplies (soil method)
- Small pot with drainage holes (non-negotiable)
- Moist potting mix or a light rooting mix
- Optional: rooting hormone (nice, not required)
- Optional: clear plastic bag or humidity dome
Step 1: Choose the right mint cutting
Start with a mint plant that looks like it has its life together: upright stems, bright leaves, no spots, and no visible pests. Cuttings copy the parent plant, so don’t take material from a struggling or diseased plant.
How to take the cutting (the “do this, not that” version)
- Pick a soft, non-woody stem with several leaf sets. Avoid stems with flowers if possible. (If it’s flowering, you can still propagatejust remove buds/flowers so energy goes into rooting.)
- Cut just below a node using clean snips. That node is where root development loves to start.
- Strip the lower leaves from the bottom third to half of the stem. You want bare stem below and a leafy “tuft” on top.
- Keep leaves out of water/soil line to reduce rot. Leaves sitting in water are basically an open invitation for funk.
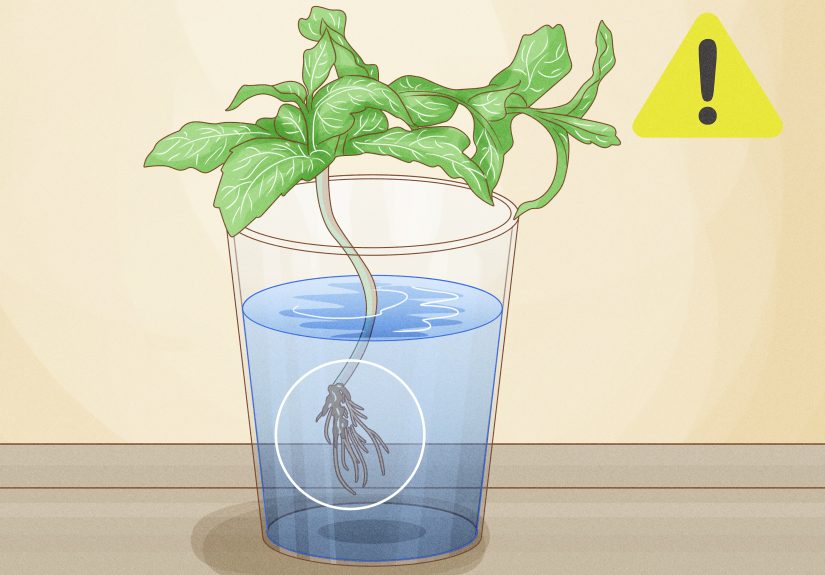
Method 1: How to grow mint from cuttings in water
Water propagation is the easiest method for beginners because you can literally watch the roots show up like, “Hello, we live here now.”
Water rooting steps
- Fill a jar with fresh water (room temperature is fine).
- Place the cutting in the jar so at least one node is submerged. Keep the top leaves above the water line.
- Set it in bright, indirect light. Too much direct sun can overheat the jar and stress the cutting.
- Refresh the water regularly. Every couple of days is ideal. Fresh water = less bacterial party.
What you should see (timeline)
- Days 3–7: The cut end may look slightly swollen; tiny white root hairs can begin.
- Week 1–2: Roots lengthen and multiply.
- Week 2–3: Many cuttings are ready to pot up (depending on light and warmth).
When to transplant water-rooted mint
Transplant when you have multiple roots that are at least 1–2 inches long. The goal is a small, stable root systemnot one heroic noodle. When you move it to soil, those water roots need time to adjust, so baby it a bit.
How to transplant without shocking the plant
- Use a pot with drainage holes and pre-moistened potting mix (evenly damp, not muddy).
- Make a hole and tuck the rooted stem in gently. Don’t mash the roots like you’re packing a suitcase.
- Firm lightly around the stem so it stands up.
- Water once to settle the soil, then keep it consistently moist for the first 1–2 weeks.
- Give indirect light at first. After it perks up and grows, you can increase sun gradually.
Method 2: How to propagate mint cuttings in soil
Soil propagation skips the “water roots learning to breathe soil” transition. It’s also great when you want multiple cuttings rooting at once in one container.
Pick a rooting medium that won’t drown the stem
Mint likes moisture, but cuttings hate soggy conditions. A light, airy mix (or a dedicated rooting mix) helps prevent rot. If you’re mixing your own, aim for something that drains well but stays evenly damp.
Soil rooting steps
- Fill a small pot with moistened mix. It should feel like a wrung-out sponge.
- Poke a starter hole with a pencil or chopstick so you don’t scrape off the stem tissue.
- Optional: Dip the cut end in rooting hormone. Mint usually doesn’t need it, but it can help consistency.
- Insert the cutting so at least one node is buried. Keep leaves above the soil line.
- Increase humidity by loosely covering with a clear bag/dome (don’t let plastic touch leaves).
- Bright, indirect light and warm temps help. Keep the medium evenly moist.
How to know if it rooted (without yanking it out like a dentist)
After about 7–14 days, do a gentle tug test. If you feel resistance, roots are forming. Another clue: you’ll see new growth at the top. Once it’s actively growing, gradually remove any humidity cover.
Aftercare: turning a rooted cutting into a mint machine
Light
Mint grows best with plenty of light. For newly transplanted cuttings, start with bright, indirect light for a week or two, then move toward more sun. Outdoors, full sun is great if you keep it watered; part shade also works.
Water
Keep the soil consistently moist, not swampy. Mint flavor and leaf production drop when it dries out too often. Containers dry faster than garden beds, so check more frequently in warm weather.
Pinching and pruning (a.k.a. “make it bushy, not leggy”)
Once your mint has several sets of new leaves, pinch off the top inch to encourage branching. Regular harvesting is basically mint’s love language: it responds with even more growth.
Feeding
Mint isn’t a heavy feeder. If it’s in a container long-term, a light, balanced fertilizer during active growth can help, but over-fertilizing can push leafy growth with weaker flavor. Think “snack,” not “all-you-can-eat buffet.”
How to keep mint from taking over your yard
Mint spreads by underground runners and can outcompete neighboring plants. If you want mint and also want peace, contain it from the start.
Best containment options
- Grow mint in a pot: Choose a container at least 12–14 inches wide so it has room to thrive.
- Sink a bottomless pot in the ground: This can slow runners, but mint may still find an escape route over time.
- Keep containers off soil: Set pots on a hard surface so roots can’t sneak out of drainage holes and re-root.
Troubleshooting: common mint cutting problems (and fixes)
Problem: The cutting turns black or slimy
- Cause: Rot from dirty water, submerged leaves, or too-wet soil.
- Fix: Start over with a fresh cutting. Remove leaves below the water/soil line and refresh water often. Use a draining mix.
Problem: No roots after 2–3 weeks
- Cause: Too little light, too cold, or cutting taken from stressed growth.
- Fix: Move to brighter indirect light, aim for warmer temps, and take a new cutting from vigorous stems.
Problem: The cutting wilts in soil
- Cause: Low humidity + not enough roots yet.
- Fix: Add a loose humidity cover, keep soil evenly moist, and reduce direct sun until new growth appears.
Problem: Leaves look pale or growth slows later
- Cause: Pot bound, depleted potting mix, inconsistent watering, or too much shade.
- Fix: Repot into fresh mix, water more consistently, and increase light.
Problem: Pests or disease show up
Mint can attract aphids and spider mites, and it’s susceptible to certain diseases. If you’re growing it to eat, start with non-chemical tactics: rinse with a strong spray of water (especially leaf undersides), improve airflow, and remove badly affected growth.
FAQ: quick answers for mint propagation
Can I grow mint from store-bought mint?
Often, yesif the stems are fresh and not dried out. Pick the healthiest sprigs, recut the ends below a node, strip lower leaves, and root them like any other cutting.
Is rooting hormone necessary?
Not usually. Mint roots easily without it, but rooting hormone can improve uniformity and speed in some setups (especially soil rooting with lower humidity).
What’s the fastest method?
Water rooting is typically the most foolproof for beginners because you can monitor progress. Soil rooting can be just as fast when humidity and moisture are well managed.
When’s the best time to take mint cuttings?
Any time you have healthy, active growth worksindoors year-round, outdoors during the growing season. Avoid taking cuttings from heat-stressed or heavily flowering stems if you can.
Conclusion
If you can snip a stem and put it in water, you can propagate mint. Choose healthy growth, cut below a node, remove the lower leaves, and give it bright, indirect light with steady moisture. Once roots are established, pot it up, pinch it back for bushiness, and keep it contained so your “tiny herb project” doesn’t become a full-time mint management job.
Start with one cutting today, and in a month you’ll have enough mint for tea, salads, cocktails, and that one neighbor who always “just needs a little.”
Extra: Real-world experiences & lessons (the stuff guides don’t always say out loud)
People often assume mint propagation is automaticlike the plant will root out of spite if you ignore it. The truth is, mint is easy, but it still follows a few rules. Here are practical, experience-based lessons gardeners commonly report when rooting mint cuttings at home.
1) “My cutting looked fine… until it turned into swamp soup.”
The #1 beginner mistake is letting leaves sit in water. A single submerged leaf can break down fast, cloud the water, and invite bacteria that soften the stem. The fix is boring but effective: strip the lower leaves and refresh the water regularly. If you want to feel extra professional, rinse the jar between water changes. It’s not glamorous, but neither is plant goo.
2) Bright light helpsdirect sun can backfire
A sunny window sounds ideal until you realize a glass jar can heat up like a tiny greenhouse. Warmth is good; overheating is not. Many gardeners get better results by placing cuttings near a bright window but not pressed against the glass, or by using bright indoor light where temperatures stay steadier. If your cutting droops dramatically midday and perks up at night, it’s probably getting cooked, not “dramatically expressing itself.”
3) Water roots vs. soil roots: the awkward transition is real
Water-rooted mint often grows long, delicate roots that look impressive but can stall briefly after transplanting. That’s normal. The plant is switching to soil-friendly roots and adjusting to different oxygen levels. The best “experience hack” is to transplant once you have several roots (not just one), keep the soil evenly moist, and give it indirect light for the first week. If it pouts, ignore the drama and maintain steady care.
4) Soil propagation succeeds when humidity is controlled, not when you drown it
Gardeners who struggle with soil rooting often water too much, thinking moisture equals success. For cuttings, air + moisture is the winning combo. A light mix that drains well, plus a humidity cover, usually beats a soggy pot. Think “moist sponge,” not “wet mop.” If the surface dries quickly, mist lightly or bottom-waterbut don’t keep the stem base submerged.
5) The “tug test” saves sanity
Curiosity kills cuttings. People pull them up to check roots, then wonder why the cutting collapses. A gentle tug tells you what you need: resistance means roots are forming. No resistance means wait. This one habit alone dramatically improves success because it keeps fragile new roots undisturbed.
6) Store-bought mint can work… if you choose the right stems
A common “kitchen counter experiment” is rooting mint from a grocery bundle meant for cooking. The best results usually come from firm, fresh stems with multiple nodes, not limp sprigs that have been drying in the fridge. Recutting the stem end below a node and stripping lower leaves makes a huge difference. If the bunch is old, take more cuttings than you need. Mint propagation has a high success rate, but grocery mint isn’t always harvested with rooting in mind.
7) Containment isn’t optional if you like your other plants
Gardeners who plant mint directly in open soil often describe the same plot twist: “It was cute at first.” Within a season or two, runners can pop up where you didn’t invite them. The most consistently happy mint growers use containers, keep pots off bare soil, and treat mint like a talented musician who should not be given the house key.
8) Flavor is tied to care (and timing)
People also notice flavor changes when mint is stressed. Consistent moisture and regular harvesting tend to keep leaves tender and aromatic. Letting it flower can shift the plant’s energy away from leaf production; many gardeners pinch flower spikes for better-tasting leaves. If you want mint for cooking, harvest in the morning and keep the plant trimmedmint responds with fresher growth and a steadier supply.
Bottom line: mint propagation feels like magic because it’s forgiving, not because it’s random. When you manage leaf removal, cleanliness, light, and moisture, mint becomes one of the most reliable “clone-and-go” herbs you can grow.