Table of Contents >> Show >> Hide
- Before You Start: Quick Setup Checklist
- The 13 Steps to Make a Video on Snapchat
- Step 1: Open Snapchat and land on the Camera screen
- Step 2: Choose your camera (front or back) and frame your shot
- Step 3: Pick a Lens (optional, but highly recommended for joy)
- Step 4: Record your video by pressing and holding the Capture button
- Step 5: Go hands-free with the Lock feature (so your thumb can retire)
- Step 6: Record a longer video using multi-clip recording (Long Snap)
- Step 7: Review your video and open the Timeline Editor (for multi-clip control)
- Step 8: Add text (captions that actually help people watch)
- Step 9: Add stickers (location, time, polls, and the occasional chaos gremlin)
- Step 10: Add music or sounds (without accidentally drowning out your voice)
- Step 11: Swipe through filters and effects (the finishing touches)
- Step 12: Save your video (Memories, Camera Roll, or both)
- Step 13: Share it (Friends, My Story, and other posting options)
- Troubleshooting: Common Problems (and Fixes That Don’t Require Crying)
- Mini Playbook: 5 Video Ideas That Work Great on Snapchat
- Conclusion: Your Snapchat Video Workflow in One Sentence
- Extra: Real-World Experiences Making Snapchat Videos (The “What I Wish I Knew” Section)
Snapchat is basically a camera app that moonlights as a social network. And yesmaking a video on Snapchat is “easy,”
in the same way assembling furniture is “easy” until you realize you put the shelf on upside down.
The good news: once you learn the flow (record → jazz it up → share), you can crank out clean, fun videos in minutes.
This guide breaks the process into 13 practical stepswith real tips on recording, editing, adding music,
saving to your phone, and posting to friends or your Story. No fluff, no weird internet rituals, and no “Step 14: become famous.”
Before You Start: Quick Setup Checklist
- Update Snapchat to the latest version (features change often).
- Allow camera + microphone permissions (or your “video” will be a silent slideshow).
- Clean your camera lens (fingerprint blur is not a filteralthough it does look “indie”).
- Pick your goal: quick snap to friends, a Story update, or a saved video you’ll reuse elsewhere.
The 13 Steps to Make a Video on Snapchat
Step 1: Open Snapchat and land on the Camera screen
When you open Snapchat, it usually drops you straight into the Camera. If you’re not there, tap the camera icon
until you see the live viewfinder. Congratulationsyou’re now one thumb away from content creation (or chaos).
Step 2: Choose your camera (front or back) and frame your shot
Tap the camera flip icon to switch between front-facing (selfie mode) and rear camera. Then frame your shot with intention:
keep your subject centered for quick snaps, or use the “rule of thirds” if you’re feeling cinematic.
Pro move: back camera for action; front camera for talking and reactions.
Step 3: Pick a Lens (optional, but highly recommended for joy)
Lenses are Snapchat’s secret sauceAR effects that can transform faces, environments, or both. Swipe through the Lens carousel
near the shutter button and tap one to preview it.
Example: filming a birthday message? Try a festive Lens. Recording your dog? Some Lenses work on pets too,
but your mileage may vary depending on your dog’s willingness to cooperate (and your phone’s ability to recognize “fluff” as a face).
Step 4: Record your video by pressing and holding the Capture button
To record, press and hold the Capture button. Snapchat records as long as you hold it down (up to the app’s current limits).
If you just tap quickly, you’ll take a photogreat if that’s what you wanted, mildly annoying if you didn’t.
Audio tip: keep the phone about an arm’s length away for clearer voice audio, and avoid windy outdoor spots
unless you’re going for “dramatic weather reporter.”
Step 5: Go hands-free with the Lock feature (so your thumb can retire)
Want to record without holding the button the whole time? Start recording, then slide your finger toward the on-screen
lock icon to keep filming hands-free. This is perfect for dance clips, cooking demos, workouts, or anything
where your thumb shouldn’t be doing overtime.
Mini warning: hands-free is powerful. Use responsibly. The world does not need a 47-second video of your ceiling fan
unless it’s wearing a Lens.
Step 6: Record a longer video using multi-clip recording (Long Snap)
Snapchat can record longer moments by stitching multiple clips together (often called a Long Snap).
You press and hold to record continuously, and Snapchat may split the video into segments behind the scenes.
This is great for events, quick tutorials, or “POV: you tried to film one thing and it became a whole documentary.”
Step 7: Review your video and open the Timeline Editor (for multi-clip control)
After recording, you’ll land on the preview screen. If your video includes multiple clips, look for editing options such as
a timeline-style editor. In the timeline view, you can:
- Trim the start/end of clips
- Split a clip into smaller parts
- Reorder clips for better pacing
- Adjust speed, volume, and more (availability can vary by device and app version)
Editing mindset: cut anything that doesn’t move the story forward. If it feels boring to you, it will feel
even boring-er to everyone else scrolling at lightning speed.
Step 8: Add text (captions that actually help people watch)
Tap the Text tool and add short captions. Keep them punchy and readable:
- Use 1–2 lines max per caption.
- Place text away from screen edges (some UI elements can cover it).
- Use text to clarify what’s happeningespecially if the audio is noisy.
Example: filming a recipe clip? Add “Step 1: sauté onions” rather than “yum.” (You can still add “yum,” but let’s be helpful first.)
Step 9: Add stickers (location, time, polls, and the occasional chaos gremlin)
Tap the Sticker icon to open the sticker drawer. Snapchat offers decorative stickers and “info stickers” like time, temperature,
and location-based options when available.
Best practice: use one “functional” sticker (like location or a poll) and one “fun” sticker (like an emoji),
rather than turning your video into a sticker yard sale.
Step 10: Add music or sounds (without accidentally drowning out your voice)
Snapchat lets you add music/sounds through its Sounds tools (feature names and menus may vary). You can also create your own sound
in some versions. Choose a track that matches your vibe, then trim/select a portion that hits at the right moment.
Example: If your video is a “before & after” room cleanup, sync the music beat to the transition for an instant upgrade.
Audio balance tip: if you’re speaking, keep the music subtle. If the music is the point, keep your commentary minimal
(or add captions so viewers can still follow along).
Step 11: Swipe through filters and effects (the finishing touches)
After recording, swipe to browse filters/effectsthese can change color tone, add overlays, or apply special playback effects.
Filter availability changes, but the concept stays the same: swipe, preview, and stop when it looks right.
Don’t overcook it: one strong filter beats three “maybe” filters. If your video looks like it time-traveled through five dimensions,
you might be doing too much.
Step 12: Save your video (Memories, Camera Roll, or both)
If you want to keep your masterpiece, save it before sendingespecially if you plan to reuse it for Instagram Reels, TikTok,
or a group chat where people actually respond.
- Memories keeps it inside Snapchat.
- Camera Roll saves it to your phone.
- Many users choose both for convenience and backup.
Tip: You can also manage how Snapchat saves by default in your settings (so you’re not manually saving every single time).
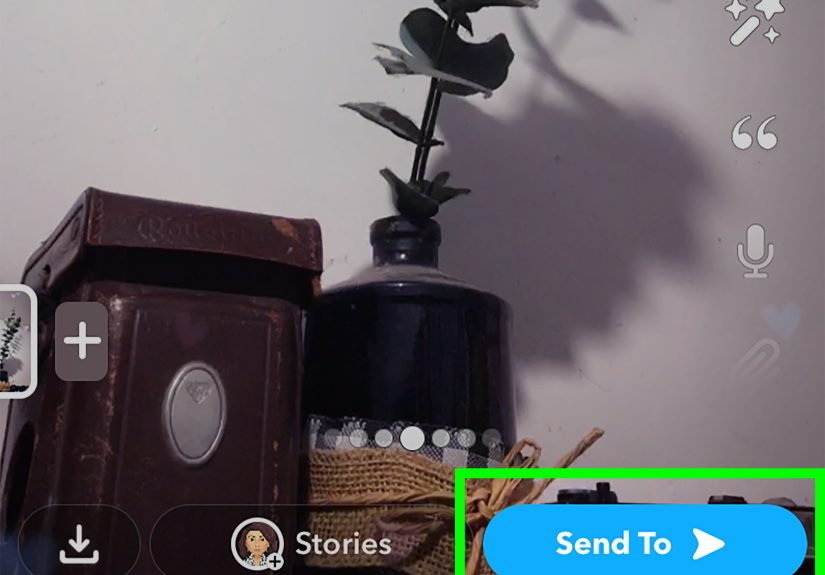
Step 13: Share it (Friends, My Story, and other posting options)
Tap Send To and pick where your video goes:
- Friends/Groups: best for casual, personal clips.
- My Story: best for updates you want visible for a day (unless your settings differ).
- Public/Discovery-style options: may appear depending on your account, region, and app version.
Final check before posting: watch once with sound on, once with sound off. If it still makes sense muted,
you’re ahead of the game.
Troubleshooting: Common Problems (and Fixes That Don’t Require Crying)
“My video has no sound.”
- Check microphone permission in your phone settings.
- Make sure your phone isn’t connected to a weird audio output (Bluetooth headphones you forgot about).
- If you added music, lower the music level so your voice can breathe.
“My video looks blurry or low quality.”
- Clean the lens (again, yesagain).
- Record in better light. Dim lighting makes phones panic and turn everything into mush.
- Avoid zooming too much; step closer instead.
- Check your connection if you’re uploading and it looks compressed afterward.
“I can’t find my saved video.”
- Swipe up to open Memories and look under the appropriate tabs.
- If you exported to your phone, check Camera Roll/Photos and search “Snapchat.”
- Confirm your save preferences in Snapchat settings for future saves.
Mini Playbook: 5 Video Ideas That Work Great on Snapchat
- The 5-second hook: start with the most interesting moment, then explain with captions.
- Quick tutorial: “Here’s how I do X in 3 steps” (cooking, makeup, study hacks).
- Behind-the-scenes: show the messy reality behind the polished result.
- Before/after: cleaning, organizing, art progress, fitness check-ins.
- Reaction + caption: film your face, add the context as text for easy watching.
Conclusion: Your Snapchat Video Workflow in One Sentence
Open the camera, record (hands-free if you want), edit with a light touch, add sound and captions that help, save it if it matters,
and share it where it makes sensethen repeat until you accidentally become the friend group’s unofficial documentarian.
Extra: Real-World Experiences Making Snapchat Videos (The “What I Wish I Knew” Section)
After you make a few Snapchat videos, you start noticing patternslike how the first clip is always your thumb covering the lens,
and how your best idea arrives exactly 12 seconds after you hit send. Here are a few real-world experiences and lessons that make
Snapchat video creation smoother (and more fun) over time.
First, lighting is everything. Snapchat videos look dramatically better in bright, natural lightnear a window,
outside in the shade, or in a well-lit room. The difference is wild: good light makes your video crisp and colorful; bad light makes
it look like you filmed in a candlelit cave during a power outage. If you’re recording at night, a simple lamp pointed toward a wall
(so the light bounces softly) can be a game-changer. Harsh overhead lighting can make faces look tired, so shifting the angle slightly
often helps.
Second, sound is sneaky. You don’t realize how much background noise exists until you record a video and suddenly your fan,
refrigerator, and distant motorcycle parade all demand a speaking role. When I record anything with talking, I instinctively pause for a second
before speakingjust to make sure the mic “settles” and I’m not capturing the sound of my hand sliding on the phone case like it’s a horror movie.
Captions also rescue clips that would otherwise be unwatchable in loud environments.
Third, the lock (hands-free) feature is a creativity unlock. Once you stop being glued to the record button, your videos get more dynamic:
you can demonstrate something with both hands, walk through a scene, or do a quick outfit check without turning it into a one-handed balancing act.
The first time you use hands-free, you’ll probably record too longeveryone does. But then you learn to film with intention: record in short bursts,
get multiple angles, and use the timeline editor (when available) to trim aggressively.
Fourth, less editing usually performs better. It’s tempting to add a Lens, a filter, stickers, music, text, and then another sticker
“because it felt lonely.” But the videos that feel most watchable are often the simplest: clean framing, one clear message, and one “fun element”
that supports the moment. If the Lens is the joke, you don’t need five stickers fighting for attention. If the story is emotional, keep the effects subtle.
Think of Snapchat tools like seasoningdelicious in the right amount, disastrous if you dump the whole jar.
Fifth, saving is underrated. Early on, I treated Snapchat like a one-way street: record, post, forget. But saving the best clips to
Camera Roll (or at least Memories) creates a personal highlight library you can reuse laterespecially for birthdays, travel recaps, or “throwback”
Stories when you have nothing new but still want to post. It also prevents the classic regret: “Wait… that was actually a great clip. Why didn’t I save it?”
Future-you will appreciate a simple habit: if it made you laugh, taught something useful, or captured a special moment, save it.
Finally, the biggest shift happens when you stop trying to make every Snapchat video perfect. Snapchat is built for quick, playful,
human moments. Sometimes the funniest part is the outtake. Sometimes your dog interrupts. Sometimes your friend says something absurd off-camera.
If you can capture the moment cleanly and make it easy to understand (with sound or captions), you’re already doing it right.