Table of Contents >> Show >> Hide
- Before You Start: Why Toilet Seats Get Loose
- Tool & Supply Checklist (Grab These Once, Use Them Forever)
- The 5 Simple Steps to Tighten a Toilet Seat
- Step 1: Identify Your Hardware Type (Bottom-Mount vs. Top-Mount)
- Step 2: Re-Center the Seat Before Tightening Anything
- Step 3: Tighten the Bolts From the Top (While Controlling the Nut Below)
- Step 4: Tighten From Below (The “Deep Socket Saves the Day” Move)
- Step 5: Test, Fine-Tune, and Close Everything Back Up
- Troubleshooting: Common Problems and Quick Fixes
- Maintenance Tips: Keep It Tight Without Making It a Hobby
- Quick FAQ
- Real-World Experiences: What People Actually Run Into (and How They Fix It)
A loose toilet seat is the bathroom equivalent of a wobbly restaurant table: it turns a normal experience into a
tiny adrenaline sport. The good news? Most toilet seats can be tightened in about 10 minutes with basic tools and
zero plumbing wizardry. The even better news? You don’t need to remove the toilet, shut off water, or negotiate
with your household about “who used it last.”
In this guide, you’ll learn exactly how to tighten a toilet seat (top-mount or bottom-mount),
how to fix the classic “the bolt just spins” problem, and when it’s smarter to replace the hardware instead of
rage-tightening the same sad wing nut for the 12th time.
Before You Start: Why Toilet Seats Get Loose
Toilet seats loosen for a handful of totally normal reasonsnone of which involve your toilet being “broken.”
Most seats are held in place by two bolts through the bowl’s mounting holes. With daily use, the seat shifts
slightly, the fasteners relax, and suddenly you’re sitting on what feels like a poorly trained office chair.
- Vibration + movement: Sitting, shifting, and standing create tiny repeated forces that back nuts off over time.
- Oversized mounting holes: Many bowls have holes that leave a bit of wiggle room around the bolts, especially if gaskets/anchors aren’t snug.
- Plastic hardware fatigue: Plastic nuts and bolts are common because they don’t corrode, but they can strip if over-tightened.
- Moisture and cleaners: Harsh cleaners can degrade rubber parts; moisture can make metal parts corrode and seize.
Translation: tightening is maintenance, not a moral failing. Let’s fix it.
Tool & Supply Checklist (Grab These Once, Use Them Forever)
Most tightening jobs need only one tool, but having a couple options makes life easierespecially if your seat has
hidden hinges or hard-to-reach nuts.
Tools
- Phillips screwdriver (most common) and/or flathead screwdriver (some seats use slotted screws)
- Adjustable wrench or ratchet with a deep socket (great for tightening from underneath)
- Pliers (helpful for gripping a spinning nut or stubborn plastic fastener)
- Flashlight (because bathrooms love dramatic shadows)
Optional but Handy
- Rubber washers / gaskets (reduce wiggle and help keep hardware tight)
- Toilet seat stabilizers (small bumpers that limit side-to-side movement)
- Replacement hardware kit (if bolts are stripped, rusted, or missing parts)
Quick reality check: if the toilet itself rocks at the floor, that’s a different fix (toilet base bolts,
wax ring, shimming). This article is strictly about a loose toilet seat.
The 5 Simple Steps to Tighten a Toilet Seat
These steps work for most standard seats, including soft-close and quick-release styles. Your only job is to
identify whether your seat is tightened from below (classic) or from above (top-mount anchors).
If you’re not sure, don’t worryStep 1 solves that.
Step 1: Identify Your Hardware Type (Bottom-Mount vs. Top-Mount)
Start at the back of the seat where it meets the bowl. Most toilet seats have two hinge “caps” that flip up or
pop off. Open them gently with your fingers or a small flathead screwdriver.
- Bottom-mount: You’ll see a bolt head up top, and underneath the bowl you’ll find a nut (often a plastic wing nut).
- Top-mount: You may still see bolt heads up top, but underneath you might not see accessible nutsinstead the bolts tighten into expanding rubber anchors in the holes.
- Quick-release seat: Some seats pop off with a button or latch for easier cleaning. You can still tighten the hinges the same way once the caps are open.
Take 20 seconds to check both sides. If one side is loose, the other often isn’t far behindlike friends who
always show up together.
Step 2: Re-Center the Seat Before Tightening Anything
This is the step people skipand then wonder why the seat looks crooked forever. With the hinge caps open, sit
or stand in front of the toilet and align the seat so it’s centered on the bowl. You want an even gap on both
sides and a natural overhang at the front (not hanging off like it’s trying to escape).
Hold the seat in position with one hand while you start tightening. If you tighten first and align later, you
may lock it into an awkward angle that will annoy you for years. (Yes, years. You will remember. Humans are
like that.)
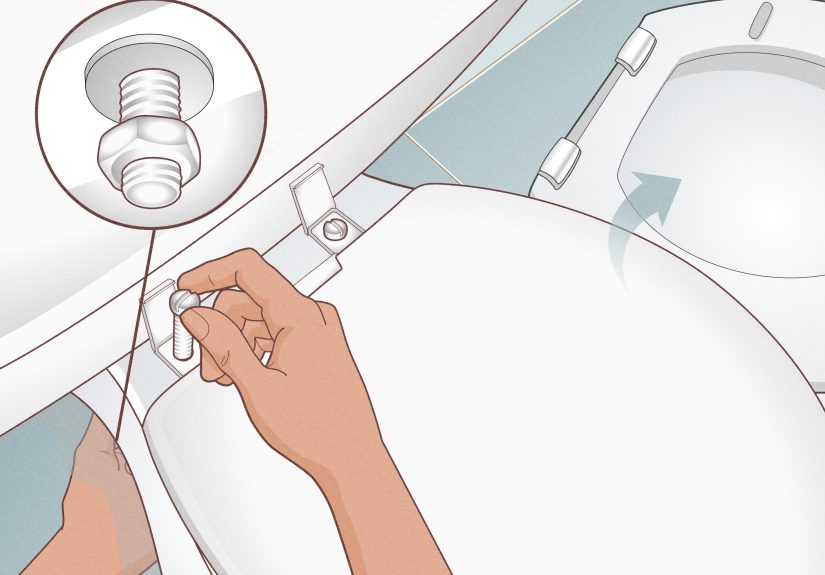
Step 3: Tighten the Bolts From the Top (While Controlling the Nut Below)
For many seats, the best method is to tighten from the top with a screwdriver while keeping the nut underneath
from spinning. If you can reach under the bowl, this is straightforward:
- Place your screwdriver into the bolt head at the hinge.
- With your other hand, grip the nut under the bowl (wing nut by hand, or pliers if it’s slippery).
- Turn the screwdriver clockwise until snug.
Go slowly. The goal is snug and stable, not “I have become one with the torque.” Over-tightening can
strip plastic hardware or crack porcelain. If you feel strong resistance, pause and reassess.
If your seat includes rubber washers or gaskets, make sure they sit between the hinge and the bowl as designed.
These help reduce movement and keep the seat from loosening again.
Step 4: Tighten From Below (The “Deep Socket Saves the Day” Move)
If the bolt head up top won’t move much, or you get a better angle from underneath, tighten the nut from below:
- Wing nuts: turn clockwise by hand until snug.
- Regular nuts: use an adjustable wrench or a ratchet with a deep socket for easier turning.
Pro tip: a deep socket can be a game-changer because toilet seat bolts are long, and shallow sockets can bottom
out before they grip properly.
Keep checking alignment as you tighten. A good rhythm is: tighten a little, wiggle-test, re-center if needed,
tighten a little more.
Step 5: Test, Fine-Tune, and Close Everything Back Up
Now do a simple stability check:
- Grip the seat near the front and gently move it side-to-side.
- Press down lightly on each side near the hinges.
- Lift and lower the lid/seat to confirm smooth hinge movement.
If the seat still shifts, tighten each side another quarter-turn (alternating sides to keep even pressure). Once
it feels stable, snap the hinge caps back down.
Congratulations: your toilet seat is now behaving like a respectable piece of household equipment.
Troubleshooting: Common Problems and Quick Fixes
Problem: The Bolt Spins and Never Tightens
This is the classic “infinite spin” situation. Usually, the nut underneath is turning along with the bolt.
- Fix: Hold the nut firmly (hand pressure for a wing nut, pliers for a smooth nut) while turning the bolt from above.
- If it’s top-mount: The rubber anchor may not be seated correctly. Press the anchor in so it grips the hole, then tighten again.
- If threads are stripped: Replace the bolt/nut set. Stripped plastic threads won’t magically “heal.”
Problem: I Can’t Reach Under the Bowl (One-Piece Toilets, Skirts, or Tight Spaces)
Some toilets hide the underside hardware. In those cases:
- Look for top-mount hardware (expanding rubber anchors) designed for hard-to-reach installs.
- Consider a toilet seat hardware kit labeled “top-mount” or “no access from below.”
- If your seat is quick-release, remove the seat first to improve access to hinge bolts (often easier than working around the lid).
Problem: The Seat Tightens… Then Loosens Again a Week Later
If you’re tightening the same seat repeatedly, you likely have movement at the hinge area that loosens the fasteners.
Try one of these long-term helpers:
- Add or replace rubber washers/gaskets: they create friction and reduce micro-movement.
- Use seat stabilizers/bumpers: these support the seat on the bowl and limit side-to-side rocking.
- Upgrade the hardware: some systems include “snap-off” nuts that break away at the correct torque so you don’t under- or over-tighten.
Problem: The Hardware Is Rusted, Frozen, or Falling Apart
If bolts are corroded or the nut won’t turn without sounding like it’s grinding sand, tightening may not be worth it.
In that case, replacing the hardware (or the entire seat) is often faster and cheaper than fighting a rusted fastener.
When replacing, choose corrosion-resistant materials (stainless steel or quality plastic). Many modern seats use
plastic hardware specifically to avoid corrosionan underrated act of kindness from the manufacturing world.
Maintenance Tips: Keep It Tight Without Making It a Hobby
- Do a 10-second wiggle check monthly (or whenever someone mentions “the seat feels weird”).
- Clean gently around hinges and avoid harsh chemicals that can degrade rubber parts.
- Re-tighten in small increments instead of one dramatic crank that strips plastic threads.
- Keep spare hardware in your tool drawerbecause the only thing worse than a loose seat is realizing the nut is missing entirely.
Quick FAQ
How tight should a toilet seat be?
Tight enough that the seat doesn’t shift during normal use, but not so tight that you stress the porcelain or strip
plastic threads. Think “snug,” not “bench press.”
Do I need to remove the toilet seat to tighten it?
Usually no. You typically just open the hinge caps and tighten the bolts. Some quick-release seats pop off easily,
which can make tightening simpler, but it’s not always required.
What if my toilet seat is soft-close?
Soft-close seats tighten the same way, but be extra careful not to overtightensome hinges can be damaged if forced.
Real-World Experiences: What People Actually Run Into (and How They Fix It)
Let’s talk about the part nobody puts on the package: the human experience of tightening a toilet seat. Not the
perfectly lit tutorial versionthe real one, where you’re half-crouched in a bathroom, holding a flashlight with
your chin, wondering how a simple seat can have the personality of a shopping cart with a squeaky wheel.
One of the most common “aha” moments happens when you realize the seat wasn’t truly looseit was
misaligned. Maybe it shifted gradually until the lid started closing crooked. People often tighten it as-is,
locking in the crookedness like a permanent reminder of that one rushed Saturday morning. The fix is simple: loosen
slightly, re-center carefully, then tighten again. It’s a tiny step, but it’s the difference between “fixed” and
“fixed… but annoying.”
Another familiar situation: you tighten the bolts, the seat feels solid, and you declare victoryuntil a week later
it starts wiggling again. That’s usually because the problem isn’t your effort; it’s physics. The bowl’s mounting
holes can leave space around the bolt, and if your seat doesn’t have a good rubber gasket (or it’s flattened with age),
the hinge can still move slightly. People who finally end the cycle usually do one of two things: add/replace
rubber washers or install seat stabilizers (those little supports that reduce rocking). The feeling
afterward is borderline heroic, like you just solved a household mystery that’s been quietly trolling your family.
Then there’s the “infinite spin” problemwhen the bolt turns forever and nothing gets tighter. This one tricks a lot
of folks because from the top it looks like progress. Underneath, the nut is just spinning along for the ride. The
most practical fix is also the least glamorous: hold the nut firmly with your hand or pliers while you tighten from above.
People are often surprised how little force is needed once the nut stops freewheeling.
If your bathroom setup is tight (one-piece toilets, skirted toilets, or a vanity crowding the side), the experience
becomes a puzzle: “Where are the nuts, and why do I feel like I’m defusing a device in a spy movie?” In those cases,
switching to top-mount hardware can be a real quality-of-life upgrade. It’s not “cheating”it’s choosing a setup that
matches your toilet’s design. People who do this often say the best part isn’t just the tighter seat; it’s not having to
contort into a yoga pose every time something loosens.
Finally, there’s the emotional arc of encountering old, tired hardware. If the nuts are stripped, the bolts are warped,
or the rubber parts are crumbling, tightening becomes a losing game. Plenty of DIYers waste time trying to “make it work”
before realizing that replacing the hardware (or the entire seat) is faster and less frustrating. The experience lesson
here is solid: maintenance is smart, but replacement is sometimes the real fix.
If you take anything from these lived-in scenarios, let it be this: a steady, centered tighten-up with the right
washers (and a little patience) beats aggressive torque every time. Your toilet seat should feel boring. In the bathroom,
boring is the dream.