Table of Contents >> Show >> Hide
- Before You Paint: Should You Paint This Tile?
- The Easy Way Starts With the Right System
- Tools & Materials Checklist
- How To Paint Tile The Easy Way: The Step-by-Step Method
- Step 1: Pick your finish (and be honest about your room)
- Step 2: Remove obstacles and protect everything you like
- Step 3: Deep-clean like you’re prepping for surgery (but with more sarcasm)
- Step 4: Repair chips, cracks, and sad grout
- Step 5: Sand to dull the glaze (this is the secret handshake)
- Step 6: Vacuum, wipe, rinse, and dry (yes, again)
- Step 7: Prime with a real bonding primer
- Step 8: Paint in thin coats (foam roller = your best friend)
- Step 9: Decide on sealing (only if your system calls for it)
- Dry Time vs Cure Time: The Part Everyone Underestimates
- Grout Lines: Three Ways to Handle Them Without Losing Your Mind
- Common Problems (and How to Fix Them Fast)
- How Long Will Painted Tile Last?
- Cleaning & Maintenance (So Your Hard Work Doesn’t Get Bullied by a Scrub Brush)
- Quick FAQ
- Real-World Experiences: What Actually Makes Painting Tile “Easy” (and What Doesn’t)
Tile is wonderful when it’s new. Tile is less wonderful when it’s beige, busy, cracked in one corner,
and somehow always looks “slightly damp” even when it’s bone dry.
If you want a cleaner look without a full demo (a.k.a. dust season), painting tile can be a legit, budget-friendly
makeoveras long as you do the boring prep that makes the “easy way” actually work.
This guide walks you through an “easy but durable” method: clean like you mean it, dull the shine, use a true
bonding primer, then finish with a paint made for tile (often epoxy or tile-specific coatings).
You’ll also get real-world tips on grout, cure times, and what to do when your first coat looks like regret.
Before You Paint: Should You Paint This Tile?
Painting tile is mostly a cosmetic upgrade. It can look fantastic, but it won’t be as bulletproof as brand-new
tile with color fired into the glaze. The trick is choosing a spot where paint has a fighting chance.
Great candidates
- Backsplashes that aren’t constantly scrubbed with harsh cleaners
- Bathroom wall tile and shower surrounds (with the right epoxy/tub-and-tile product and cure time)
- Low- to moderate-traffic floors (guest bath, laundry room, entry that isn’t basically a mud wrestling arena)
- Tile in good condition: firmly set, not loose, minimal cracking, grout not crumbling
Not-so-great candidates (translation: “easy way” becomes “why did I do this”)
- Loose tile or failing grout (paint won’t fix movementonly highlight it)
- Constant water immersion areas (think pools/hot tubs; also very wet, always-soaked zones)
- Near extreme heat (like right behind a stovetop) where coatings can discolor or fail
- Highly textured tile (paint will cling to the highs and ignore the lows like a cat ignoring your texts)
If your tile is badly damaged, consider repair or replacement. If it’s just dated, glossy, or “2004 Tuscan,”
paint can buy you time and style.
The Easy Way Starts With the Right System
“Tile paint” is not one magical can. It’s usually one of these approaches:
Option A: Bonding primer + tile/epoxy paint
This is the classic method for backsplashes, walls, and some floors: a bonding primer designed
for slick surfaces, then a durable topcoat (often epoxy or tile-specific paint).
Option B: A tub-and-tile refinishing kit (two-part epoxy acrylic)
These kits are made for high-moisture bathroom surfaces like tubs, sinks, and tile surrounds. They often cure hard
and glossygreat for wet areas when you follow the instructions (especially ventilation and cure time).
Option C: Floor-specific enamel/epoxy + optional sealer
Floors take abuse. Choose a floor-rated product (epoxy/enamel/floor paint), and only seal if your product system
calls for it. Some epoxies don’t need a clear coat; others benefit from a compatible urethane.
Tools & Materials Checklist
- Cleaner/degreaser: TSP or TSP-substitute, plus a scrub sponge or non-scratch pad
- Mildew killer (if needed): bleach solution or a mold/mildew cleaner
- Sandpaper: 220 grit for general dulling; 320–400 for finer scuffing; wet/dry 400/600 for some refinishing kits
- Repair supplies: acrylic caulk for small chips/edges, or two-part epoxy for chips/cracks; grout repair if needed
- Bonding primer: high-adhesion primer made for glossy/tile surfaces
- Tile paint/topcoat: epoxy/tile-specific paint or a tub-and-tile kit
- Applicators: angled brush, foam roller (great on tile), and a small brush for grout lines
- Prep protection: painter’s tape, drop cloths/plastic, masking paper
- Safety gear: gloves, eye protection, and a respirator rated for fumes/dust (especially in bathrooms)
- Optional: clear polyurethane or water-based urethane sealer (only if your system recommends it)
How To Paint Tile The Easy Way: The Step-by-Step Method
The goal is simple: remove grime, remove shine, then build a coating that can actually stick.
Here’s the approach that most consistently produces “wow, this looks new” instead of “why is it peeling already?”
Step 1: Pick your finish (and be honest about your room)
Bathrooms and kitchens are humid, greasy, and cleaned often. Choose a coating made for that reality.
If you’re painting a shower surround or tub area, a tub-and-tile refinishing kit is often the safest bet.
For backsplashes and wall tile, bonding primer + epoxy/tile paint is common.
For floors, go floor-rated.
Step 2: Remove obstacles and protect everything you like
Take off outlet covers, towel bars, and anything that will make your roller do weird yoga poses.
Tape edges cleanly and cover counters, floors, and fixtures. Paint splatter has a gift for finding
the one thing you forgot to cover.
Step 3: Deep-clean like you’re prepping for surgery (but with more sarcasm)
Degrease is non-negotiable. Use TSP (or a substitute) and scrub the tile and grout thoroughly.
Rinse with clean water and let everything dry completely. Any grease, soap scum, or cleaner residue
can cause “fisheyes” (tiny craters) and adhesion failure.
If you have mildew, treat it firstpaint does not magically “seal away” mold problems under loose grout or
behind tile. Fix the cause (ventilation/leaks) before you paint.
Step 4: Repair chips, cracks, and sad grout
Paint highlights damage the way sunlight highlights dust. Patch chips and hairline cracks with an appropriate
filler (often acrylic caulk for tiny imperfections; two-part epoxy for sturdier repairs).
Re-grout or repair grout where needed, and let repairs cure fully.
Step 5: Sand to dull the glaze (this is the secret handshake)
Tile is often glazed, which is fantastic for water resistance and terrible for paint adhesion.
Lightly sand to remove the gloss and create a surface the primer can grip.
For many projects, 220 grit works well; some methods use finer grits (320–400) after repairs.
Wipe away dust as you go so you can see your progress: you want “dull,” not “destroyed.”
Step 6: Vacuum, wipe, rinse, and dry (yes, again)
Dust is the enemy of smooth finishes. Vacuum thoroughly, wipe with a microfiber cloth, then use a damp cloth
to remove remaining dust. Let everything dry completely before priming.
Step 7: Prime with a real bonding primer
This is where many “peeling paint” stories begin: skipping primer or using the wrong one.
Use a bonding primer designed for hard, glossy surfaces. Apply a thin, even coat.
Use a brush to work primer into grout lines and corners first, then roll the flat areas.
If the instructions recommend two coats, do two.
Let primer dry fully. If it feels tacky, wait. Rushing primer is like baking cookies at “eh, close enough”
temperaturestechnically it’s food, but nobody’s happy.
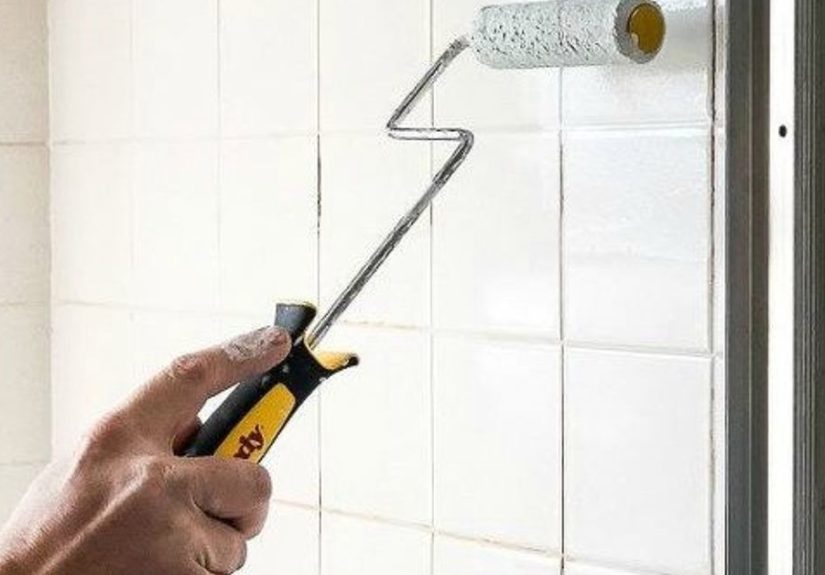
Step 8: Paint in thin coats (foam roller = your best friend)
Use a brush to cut in edges and grout lines first. Then roll the surface with a foam roller using light pressure.
Work in small sections and keep a wet edge to avoid lap marks. Thin coats cure harder and look smoother than one
thick coat.
Expect two coats. Sometimes you’ll need a third for bold color changes or heavy grout texture.
Follow your paint’s recoat windowespecially with two-part products where mixing starts the clock.
Step 9: Decide on sealing (only if your system calls for it)
Some painted tile projects benefit from a compatible clear topcoat (often a polyurethane/urethane) for extra
protectionespecially on backsplashes that get wiped often or floors that see frequent traffic.
But not every epoxy system wants a clear coat, and mismatched products can cause peeling or cloudiness.
If you seal, wait until the paint is fully dry, then apply the sealer in thin, even coats.
Dry Time vs Cure Time: The Part Everyone Underestimates
“Dry” means you can touch it without paint on your finger. “Cured” means it’s hardened enough for real life:
water, scrubbing, foot traffic, and your uncle who refuses to take his shoes off indoors.
- Between coats: depends on product (often hours; some kits allow recoat after about an hour)
- Light use: sometimes 24 hours for very gentle contact (read your label)
- Wet areas: many bathroom refinishing systems require about 48–72 hours before water exposure
- Floors: can take up to a week to fully cure before heavy furniture and normal wear
If you only do one “easy way” thing, do this: plan your cure time like it’s part of the project.
Painting Friday night and showering Saturday morning is a classic plot twist.
Grout Lines: Three Ways to Handle Them Without Losing Your Mind
1) Paint over grout (fastest, most common)
Rolling right over grout is the simplest and often looks modern and cleanespecially on backsplashes and walls.
It’s also what many how-to guides recommend for sanity preservation.
2) Keep the grout lines (most time-consuming, but can look “original tile”)
You can paint each tile face carefully and avoid grout lines, but it takes patience and a steady hand.
This method works best for decorative backsplashes where you really want that tiled look.
3) Embrace pattern (stencil it)
Stenciling can turn plain painted tile into faux cement tile or geometric pattern magic.
Practice on cardboard first, then stencil one tile at a time, and seal if recommended for your surface.
Common Problems (and How to Fix Them Fast)
“My paint is peeling at the edge.”
Usually a prep or adhesion issue: leftover grease, gloss not sanded, or no bonding primer.
Fix by scraping loose paint, sanding the area smooth, re-priming with bonding primer, and repainting.
“It looks streaky / roller marks everywhere.”
Use thinner coats, don’t overload the roller, and consider a second coat with a microfiber roller for smoothing.
Foam rollers reduce texture and help coatings level.
“It’s tacky days later.”
This can happen with thick coats, cold/humid conditions, or incompatible products.
Increase ventilation, raise temperature (safely), and give it more time.
If it never cures, you may need to remove and redo with a compatible system.
“My backsplash gets gross fast.”
Painted backsplashes can be more sensitive to harsh scrubbing and strong cleaners.
Use gentle cleaners, soft cloths, and consider a compatible protective topcoat if your paint system allows it.
If you cook a lot (hello, splatter zone), this is where paint can wear sooner.
How Long Will Painted Tile Last?
The honest answer: it depends on prep, product choice, and abuse level.
In lower-traffic areas, painted tile can look good for a while; in busy floors, it may be more temporary.
Consider it a “fresh look now” solution that can buy you time until a bigger renovation makes sense.
Cleaning & Maintenance (So Your Hard Work Doesn’t Get Bullied by a Scrub Brush)
- Clean with mild soap and water and a soft sponge or microfiber cloth.
- Avoid abrasive pads, scouring powders, and harsh chemicals that can dull or scratch the finish.
- Wipe spills sooner rather than later (especially on floors).
- Use felt pads under furniture and avoid dragging heavy items across painted tile.
Quick FAQ
Can you paint porcelain or ceramic tile?
Yesif you prep properly and use a bonding primer plus a coating made to stick to slick surfaces.
The glaze is the main challenge, which is why sanding + bonding primer matters.
Can you paint shower tile?
Many people paint shower surrounds and bathroom wall tile successfully with the right epoxy/tub-and-tile product,
plus strict cure time and ventilation. Floors and constantly soaked areas are tougher and may fail sooner.
Do you have to use primer?
In most cases, yes. A bonding primer creates the adhesion layer that keeps paint from chipping and peeling.
Some epoxy systems claim primer isn’t necessaryfollow the exact instructions for your product.
When in doubt, a bonding primer is often the safer choice.
Real-World Experiences: What Actually Makes Painting Tile “Easy” (and What Doesn’t)
Let’s talk about what usually happens in real homesbecause the internet loves a “1-hour makeover,” and tile paint
loves a “72-hour cure.” From common DIY patterns (and many a before-and-after timeline), the biggest difference
between an easy win and a peeling mess comes down to three things: prep, patience, and picking the right
product for the location.
First: the cleaning step is where optimism goes to die. You start with confidence. Then you scrub
and realize your “clean” tile was actually wearing a thin sweater made of cooking grease, soap scum, and
mystery film. The good news: once you truly degrease, everything that follows gets dramatically easier. The bad
news: you may develop a passionate personal feud with the grout line behind your faucet.
Second: sanding feels optional until it isn’t. People who skip sanding often get that heartbreaking
moment where the paint lifts like a sticker. People who sand lightlybut thoroughlyusually get a finish that
looks like it belongs. The best “easy” approach is to sand just enough to dull the shine, not enough to turn your
bathroom into a dust-themed snow globe. A handheld sanding sponge can be less intimidating than a power sander,
especially on a backsplash or small wall area.
Third: foam rollers are the unsung heroes of painted tile. They keep texture down and help paint
level out. A common experience is that coat one looks streaky, and panic arrives earlyusually around minute 14.
Coat two is where the magic happens. Thin coats, light pressure, and keeping a wet edge is the difference between
“smooth and glossy” and “why does this look like corduroy?” If your tile has deep grout lines, brushing the grout
first and rolling after can prevent that “shadowed grout” look.
Another big one: tape removal timing. If you rip tape off too early, paint can slump. If you wait
too long, the tape can pull paint edges. The sweet spot is usually after the paint sets up but before it becomes
rock-hardcheck your product guidance, score the edge with a utility blade if needed, and pull tape back on
itself at an angle for a crisp line.
And finally: cure time is where the easy way earns its “easy”. People who treat “dry” as “done”
often end up with fingerprints, dents, or a finish that stays soft. People who plan around cure time (fan, open
windows, no showers, no traffic, no “just one quick rinse”) usually get a much harder, longer-lasting surface.
If you can, schedule this project when you can let it sitlike a long weekend or a time you can use another
bathroom. Your future self will be thrilled. Your impatient self will be annoyed. That’s normal.
The takeaway? Painting tile can truly be the easy way if you define “easy” as “simple steps done well,”
not “fast.” Do the prep, use a bonding primer, choose a durable tile-safe coating, and respect cure timesand
you’ll get that satisfying moment where you walk in and think, “Wait… is this the same room?”


