Table of Contents >> Show >> Hide
- What Modeling Paste Actually Is (And Why It’s Not Just “Thick Paint”)
- Why I Add Clay to My 3D Paintings
- My Go-To Supply List for 3D Paintings
- Start With the Right Surface (Your Texture Needs a Backbone)
- My Step-by-Step Process for a 3D Painting
- 7 Specific 3D Painting Ideas You Can Try
- Troubleshooting: The Problems I’ve Actually Had (And Fixed)
- Safety and Care (Because Your Art Should Outlive Your Wi-Fi Router)
- Conclusion: Texture Is a Skill, Not a Talent Lottery
- My 3D Painting Experiences (An Extra of Real Life, Real Mess)
The first time I tried to make a “3D painting,” I assumed I could just slap on a heroic amount of paint and call it texture.
The canvas disagreed. It sagged, it cracked, and it looked like a dried lake bed auditioning for a documentary.
That’s when I met my two favorite troublemakers: modeling paste and clay.
Together, they let me build real heightridges, petals, waves, raised lettering, tiny sculpted detailswithout turning my artwork into a structural engineering case study.
If you’ve ever wanted your painting to have the kind of depth you can feel (and not just emotionally), this is for you.
What Modeling Paste Actually Is (And Why It’s Not Just “Thick Paint”)
Modeling paste is an acrylic-based medium that dries hard and can be shaped while wet. Think of it like the frosting of the art worldexcept it’s not edible,
and it won’t make your dentist cry. Most modeling pastes dry to a matte, opaque surface that you can paint over once cured.
Here’s what makes modeling paste perfect for 3D paintings:
- It holds peaks and tool marks (palette knife grooves, trowel swipes, stencil edges).
- It’s paintable once dryacrylics love it, and other media often behave well on it when properly sealed.
- It builds relief without needing an entire sculpture armature (most of the time).
- It can be tinted for colored texture, not just white texture.
Modeling Paste vs. Texture Paste vs. Gel Medium
People use these terms interchangeably, but they’re not identical. “Texture paste” is often a general label for thick, textured acrylic mediums.
“Modeling paste” is usually smoother (though it can come in coarse varieties) and is commonly used for sculptural buildup and relief.
“Gel mediums” can be thick too, but they’re often more translucent and flexiblegreat for impasto effects and building body without the same chalky opacity.
Why I Add Clay to My 3D Paintings
Modeling paste gives me landscape-level texture: dunes, waves, rocky ridges, bark, stucco, and abstract peaks.
Clay gives me specific forms: a flower petal with a crisp edge, a tiny mushroom cap, a raised heart, a miniature seashell, a clean letterform.
Clay is especially useful when I want repeating elements (like a row of blossoms) or a focal detail with sharp definition that’s harder to carve into paste.
It’s also a great workaround if you want a chunky element but don’t want to build it in 10 paste layers like you’re paying rent per coat.
What Kind of Clay Works Best?
- Air-dry clay: Great for quick projects and lighter details. Let it dry fully before attaching or sealing.
- Polymer clay: Strong and detailed after baking, excellent for durable elements. (Follow the brand’s baking directions.)
- Epoxy clay: Super tough and adhesive, ideal for small add-ons and repair-like details, but it can be less forgiving while working.
My Go-To Supply List for 3D Paintings
You don’t need a studio full of gadgets. You need a small, dependable toolkitlike a good sandwich, not a 12-course tasting menu.
Materials
- Modeling paste (regular or light)
- Acrylic paints (heavy body or fluidboth work)
- Clay (air-dry or polymer) for sculpted elements
- Acrylic gesso (for priming)
- Acrylic medium/gel (for adhesion and sealing)
- Varnish or protective topcoat (optional but helpful)
Tools
- Palette knives (at least one large, one small)
- Silicone shapers or clay tools (great for crisp grooves and petals)
- Stencils (optional, but dangerously fun)
- Sandpaper (fine grit for smoothing a cured surface)
- A rigid surface: wood panel, cradled panel, or sturdy board
Start With the Right Surface (Your Texture Needs a Backbone)
If you plan on building real heightespecially with thick paste or lots of clayuse a rigid support.
Stretched canvas can flex, and flexing is the enemy of thick, brittle texture layers over time.
I’m not saying canvas is “bad.” I’m saying it’s like building a brick patio on a trampoline.
My favorites:
- Cradled wood panels for bigger textures
- Hardboard/MDF panels when I want super smooth results
- Thick mixed-media boards for smaller pieces and practice
Quick Prep
- Prime with gesso (2 coats if the surface is thirsty).
- Lightly sand if you want a smoother base.
- Tape edges for clean borders (optional, but satisfying).
My Step-by-Step Process for a 3D Painting
Step 1: Sketch the “Height Map”
Before I spread paste, I do a quick sketch of where the tall areas will live.
I’m not drawing every detailjust planning the peaks, focal points, and negative space.
Think of it as a topographic map for your future masterpiece.
Step 2: Build Texture with Modeling Paste (Thin Layers Win)
If there’s one rule I follow like it’s the law of gravity: build texture in thin layers.
Thick applications can crack as they dry, especially if the outside skins over faster than the inside.
I typically spread paste with a palette knife, then shape it with a smaller knife or silicone tool.
- For smooth hills: use the flat of the knife and “butter” it on.
- For ridges: pull the knife up to create peaks.
- For stone texture: tap and lift with the knife edge.
- For patterned relief: stencil paste, then peel the stencil carefully.
Step 3: Dry Like You Mean It
Drying is where patience pays rent. If I rush with strong airflow or heat, cracking becomes more likely.
For thicker textures, I let each layer dry fully before adding another. If I’m building height, I do it in multiple passes:
texture, dry, texture, dry, repeatlike a responsible adult, but with more palette knives.
Step 4: Tint the Paste (Optional, But Gorgeous)
White paste is great, but tinted paste can make your texture look richer and more intentionalespecially if small gaps appear in later layers.
I mix in a bit of acrylic color to tint, keeping the paste’s structure intact.
A soft, tinted base also helps if you want a stone, sand, or plaster vibe before you even touch your paint.
Step 5: Add Clay Elements for Crisp 3D Details
Once my paste texture is dry (or at least stable), I add clay elements in one of two ways:
-
Embed while paste is wet: Press small clay pieces gently into wet paste so they “seat” into the surface.
This works well for lightweight elements and creates a natural transition. -
Attach after everything is dry: This is my preferred method for heavier or detailed pieces. I use acrylic gel/medium
(or a strong adhesive compatible with both materials) and press firmly.
If I’m using air-dry clay, I let it dry completely and seal it (especially if it will be handled or displayed in humid areas).
For polymer clay, I bake it properly first, then lightly scuff the back so the adhesive has something to grip.
Step 6: Paint the 3D Surface (Where It All Comes Alive)
Painting a textured surface is wildly satisfying because the light does half the work.
I usually start with a base coat thinned slightly for flow, then build highlights and shadows.
- Dry brushing is my secret weapon for raised texturelight paint on the brush, skim the peaks.
- Washes/glazes settle into crevices and instantly create depth.
- Metallic accents on high points can make textures pop without screaming “craft store aisle 7.”
Step 7: Finish and Protect
For wall art, I often finish with an acrylic varnish (matte, satin, or gloss depending on the vibe).
Heavy texture can collect dust, so I choose finishes that make gentle cleaning easier.
If you skip varnish, that’s finejust handle the piece carefully and keep it away from grime and kitchen splatter zones.
7 Specific 3D Painting Ideas You Can Try
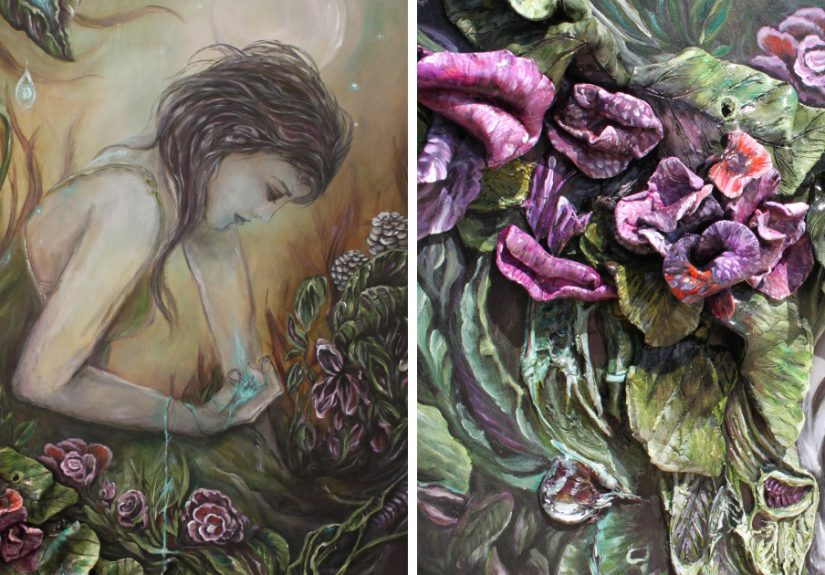
- Botanical relief: clay petals + paste leaves + subtle dry-brushed highlights.
- Ocean wave: sweeping paste ridges, deep blue glaze, white foam dry brush.
- City skyline: clay building silhouettes + paste “fog” texture behind them.
- Topographic map: layered paste contour lines, tinted in earthy gradients.
- Geode slice: paste build-up, painted crystal edges, metallic accents.
- Cloud study: soft paste textures, gentle shading, tiny clay birds.
- Raised typography: clay letters on a paste background, painted like vintage signage.
Troubleshooting: The Problems I’ve Actually Had (And Fixed)
“My modeling paste cracked!”
- Cause: layer too thick, dried too fast, or surface flexing.
- Fix: sand loose flakes, fill cracks with a thinner paste layer, and rebuild gradually.
- Prevention: thin layers, slow drying, and rigid supports.
“My clay piece popped off.”
- Cause: smooth surfaces + weak adhesion + gravity doing push-ups.
- Fix: reattach with acrylic gel/medium or a stronger compatible adhesive; add paste around edges to “seat” it.
- Prevention: lightly scuff the back of clay pieces and avoid placing heavy elements on flexible canvas.
“My texture looks muddy once painted.”
- Cause: heavy opaque paint layers filling the details.
- Fix: shift to glazes and dry brushing; wipe back highlights before they dry if needed.
- Prevention: paint in stagesbase, shadow, highlightletting texture stay the star.
Safety and Care (Because Your Art Should Outlive Your Wi-Fi Router)
Safety
- Work in a ventilated space, especially if sanding or using sprays.
- Wear a dust mask when sanding cured paste (fine particles are not a snack).
- Choose products with clear safety labeling and follow the manufacturer’s instructions.
Care
- Keep finished acrylic works away from high heat and direct sun.
- Dust gently with a soft brush; avoid aggressive scrubbing on heavy texture.
- If you frame, consider spacing so the surface doesn’t touch glass.
Conclusion: Texture Is a Skill, Not a Talent Lottery
Creating 3D paintings with modeling paste and clay isn’t about “being naturally good at art.”
It’s about learning how materials behavehow paste dries, how supports flex, how shadows form on raised texture,
and how clay details can elevate a piece from “nice” to “whoa, can I touch that?”
Start small. Make a little textured study panel. Try one clay flower. Play with tinted paste.
Then level up. Because once you see your brush catch a raised ridge of texture like sunlight on a mountain,
it’s hard to go back to flat.
My 3D Painting Experiences (An Extra of Real Life, Real Mess)
I learned 3D painting the same way most people learn anything: by confidently doing it wrong first.
My earliest “masterpiece” involved a stretched canvas, a palette knife, and the kind of optimism normally reserved for lottery tickets.
I piled on modeling paste like I was icing a wedding cake for a giant. It looked amazing for about fifteen minutes.
Then the canvas started to bow slightly, which I ignored because denial is free and plentiful.
The next day, a network of cracks appearedthin at first, then dramatic, like my painting had developed its own soap opera plotline.
That flop taught me two important lessons: (1) thick texture needs patience, and (2) a rigid panel is not optional if you’re building serious height.
When I switched to a cradled wood panel, my texture suddenly behaved like it had manners.
The paste stayed where I put it, the surface didn’t bounce, and my confidence returnedquietly, like a cat that pretends it never knocked anything over.
Next came the “speed drying era,” which is what I call the week I thought a fan would help. Spoiler: it helped… the outside dry faster.
That meant the inside was still shrinking while the surface was already set, and cracking came back with a vengeance.
Now, when I build up texture, I do it in smaller layers and let each one dry properly.
If I’m working on a thicker area, I’ll even slow the drying a bit so it cures more evenly.
It’s the least exciting part of the process, but it’s also the part that keeps my paintings from looking like desert geology.
Clay added a whole new adventure. I started with air-dry clay petals because I wanted clean botanical shapes.
The first flower looked greatuntil I painted it and realized I’d attached it to a slightly dusty surface.
That petal popped off later like it was trying to escape responsibility.
Now I lightly scuff the back of clay elements, clean the surface, and use a reliable acrylic gel/medium to attach.
For heavier details, I’ll blend paste around the edges so the piece feels “built in,” not “stuck on at the last second.”
The biggest surprise? Painting the texture is where the magic really happens. A simple dry brush across raised areas can turn “white lumps”
into “stone cliffs.” A glaze in the crevices can make a flat color suddenly feel like depth.
These days, I plan my textures with lighting in mindwhere highlights will hit, where shadows will settle, and how the surface will read from across a room.
And yes, I still occasionally get paste on my elbow. I consider it a badge of honor. Or at least proof that I was actually making something.