Table of Contents >> Show >> Hide
- Why Reusing Plastic Bottles in the Garden Is So Smart
- Choosing and Preparing Plastic Bottles for Garden Use
- Genius Ways to Reuse Plastic Bottles in the Garden
- Step-by-Step: Build a Simple Self-Watering Bottle Planter
- Safety and Sustainability Tips
- Troubleshooting Your Plastic Bottle Garden Projects
- Experience-Based Tips for Reusing Plastic Bottles in the Garden
If your recycling bin is overflowing with plastic bottles, your garden is quietly raising its hand and saying, “I’ll take those!” Reusing plastic bottles in the garden is one of those brilliantly simple ideas that saves money, cuts waste, and solves real gardening problems like dry soil, fragile seedlings, and cluttered patios.
Inspired by the creative spirit you see on Hometalk-style projects, this guide walks you through practical, good-looking ways to turn everyday bottles into garden tools. From drip irrigation and self-watering planters to mini greenhouses and vertical gardens, you’ll learn how to transform trash into plant-loving treasure.
We’ll cover how to choose and prepare bottles, step-by-step projects you can start today, safety tips, and real-life experience-based advice to help your upcycled garden thrive. Grab a few empties from the kitchen, a pair of scissors, and let’s turn your plastic stash into your garden’s new best friend.
Why Reusing Plastic Bottles in the Garden Is So Smart
Before we start cutting and drilling, it’s worth understanding why reusing plastic bottles in the garden is such a popular hack with home gardeners and DIY fans.
1. You save serious money
Garden gear adds up fast: drip irrigation kits, fancy self-watering pots, cloches, and planters can be surprisingly pricey. Reusing plastic bottles in the garden lets you mimic many of those features with tools you already own. Soda bottles become mini greenhouses, milk jugs turn into watering cans, and water bottles become slow-drip irrigators.
2. You reduce plastic waste
Billions of plastic bottles are used each year. Many are recyclable, but not all make it through the system. Giving bottles a second life in your backyard keeps them in use longer and supports a more circular, eco-friendly lifestyle. In other words, your tomato plants are helping fight plastic waste. Heroes, all of them.
3. You conserve water and protect plants
Many plastic bottle garden ideas focus on getting water exactly where it’s needed: the root zone. DIY drip irrigation and self-watering containers reduce evaporation, cut down on runoff, and keep plants hydrated more consistently. Clear bottle cloches also protect seedlings from cold nights, wind, and hungry pests while creating a warm microclimate.
4. Perfect for small spaces and renters
If you’re gardening on a balcony, in a rental, or in a tiny yard, plastic bottles are a flexible, lightweight way to grow more in less space. Vertical bottle gardens, hanging planters, and rail-mounted containers make it easy to squeeze in herbs, strawberries, and flowers without permanent construction.
Choosing and Preparing Plastic Bottles for Garden Use
Not all bottles are equal, but most household containers can be repurposed with a little creativity.
Best types of bottles to reuse
- Clear soda and water bottles (16 oz–2 liter): Great for mini greenhouses, seed starters, drip irrigation, and self-watering planters.
- Gallon milk jugs and larger juice bottles: Perfect as watering cans, larger cloches, or vertical planters.
- Wide-mouth bottles and tubs: Handy for seed trays, small planters, or scoops.
Avoid reusing bottles that previously held harsh chemicals like motor oil or bleach. Stick to containers that originally held food, drinks, or household-safe products.
Cleaning and prepping your bottles
- Rinse the bottle thoroughly with warm water.
- Add a drop of mild dish soap, shake, and rinse again until clean.
- Remove labels if possiblethey can trap moisture, harbor mold, and look messy.
- Let bottles dry completely before cutting or filling.
Cutting and drilling safely
Use a sharp craft knife or sturdy scissors for cutting. Start with a small starter hole, then widen it carefully. For drip irrigation holes, a heated nail or small drill bit works welluse pliers to hold any heated metal, and always work in a well-ventilated area.
Genius Ways to Reuse Plastic Bottles in the Garden
1. DIY drip irrigation with plastic bottles
One of the most popular plastic bottle garden ideas is a simple drip system that slowly delivers water right to the roots.
- Take a 1–2 liter bottle and remove the label.
- Use a small drill bit or heated nail to poke several tiny holes in the lower half of the bottle (concentrating on one side).
- Dig a hole near the plant and bury the bottle so the holed side faces the roots, leaving the top of the bottle above soil level.
- Fill with water and cap loosely. The water will seep out slowly, keeping soil evenly moist.
This works especially well for thirsty crops like tomatoes, peppers, cucumbers, and squash, and it’s a lifesaver during hot spells or when you’ll be away for a day or two.
2. Self-watering bottle planters
Self-watering planters are a favorite among extension services and home gardeners alike because they reduce watering stress for both you and the plants. You can recreate a simple version using just one bottle and a fabric wick.
- Cut a clean bottle about two-thirds of the way up.
- Drill or poke a small hole in the cap.
- Thread a strip of cotton fabric or thick string through the cap so a few inches hang out each side.
- Screw the cap back on, invert the top portion, and nest it inside the bottom half.
- Fill the bottom with water and the top with potting mix, making sure the wick is buried in the soil.
- Plant herbs, leafy greens, or flowers in the top section.
The wick draws water up from the base, keeping the soil evenly moist without constant attention. Line up several of these on a sunny balcony for a compact herb garden that practically waters itself.
3. Mini greenhouses and frost-protecting cloches
Clear plastic bottles make fantastic mini greenhousesalso called clochesfor seedlings and tender plants. They hold in warmth, block wind, and keep curious critters from nibbling your baby lettuce to stubs.
- Cut the bottom off a clear bottle and remove the cap.
- Place the bottle over the seedling, gently pressing it into the soil.
- On very cold nights, keep the cap on for extra warmth; on sunny days, remove or loosen it to prevent overheating and allow ventilation.
Use these cloches for cool-season crops like lettuce, brassicas, and early flowers, or to protect transplants when nights are still chilly.
4. Seed starters, trays, and terrariums
If you love starting plants from seed, plastic bottles can replace a lot of single-use plastic trays.
- Bottom halves as seed pots: Cut off the top third of the bottle, poke drainage holes in the base, fill with seed-starting mix, and sow seeds directly.
- Multi-cell seed trays: Rectangular juice or salad containers can be filled with soil and divided into rows or sections for sowing multiple varieties.
- Self-watering terrarium: Use an intact clear bottle as a mini ecosystem. Add pebbles, soil, and a small plant, then water lightly and cap. Condensation will cycle moisture inside, reducing the need for frequent watering.
Terrarium-style projects are especially fun for kids and new gardeners, because they make plant growth visible and low-maintenance.
5. Handy garden tools from plastic bottles
With a few strategic cuts, plastic bottles can replace several small garden tools:
- Watering cans: Drill holes in a milk jug cap to turn it into a gentle shower for seedlings and containers.
- Soil scoops and funnels: Cut the bottom off a jug at an angle to create a scoop. Use the top half as a funnel for potting mix or compost.
- Seed and fertilizer spreaders: Drill small holes in a bottle lid, fill the bottle, and shake gently over the garden for controlled distribution.
- Seed storage: Label small bottles for different seeds to keep them dry and organized.
6. Plant ties, labels, and pest protection
Even the flat sides of bottles are useful. Cut them into strips and you have:
- Flexible plant ties: Soft plastic strips are gentler on stems than wire and can be reused.
- Durable plant labels: Cut rectangles, punch a small hole, and write plant names with a permanent marker.
- Slug and cutworm guards: Rings cut from bottles can be placed around seedlings to block crawling pests.
Step-by-Step: Build a Simple Self-Watering Bottle Planter
Let’s put it all together with a single, easy project. This self-watering planter is perfect for basil, mint, lettuce, or compact flowers.
What you’ll need
- One 1–2 liter plastic bottle
- Sharp knife or scissors
- Strip of cotton fabric or thick string (about 8–10 inches long)
- Potting mix
- Seeds or a small transplant
Instructions
- Cut the bottle in half about two-thirds of the way up.
- Drill or poke a small hole in the center of the cap.
- Thread the fabric strip through the hole and tie a knot on the outside so it won’t pull through.
- Screw the cap back on the bottle.
- Flip the top half upside down and place it inside the bottom half.
- Fill the bottom with water until it’s about three-quarters full.
- Moisten your potting mix, fill the top half, and plant seeds or a starter plant.
- Set the planter in a bright spot. Refill the bottom with water whenever the reservoir runs low.
This design keeps roots consistently moist without waterlogging the soil, so plants grow steadily even if you occasionally forget to water.
Safety and Sustainability Tips
Upcycling plastic is helpful, but a little common sense keeps your garden healthier in the long term.
- Rotate and retire bottles: Sun, temperature swings, and physical stress can make plastic brittle over time. If a bottle cracks or breaks down, replace it and recycle the old one if accepted locally.
- Skip chemical containers: Don’t reuse bottles that held automotive fluids, pesticides, or strong cleaners. Residues can linger and may harm plants or soil life.
- Prevent mosquito breeding: For drip systems and reservoirs, keep openings covered or use narrow-neck bottles so mosquitoes can’t easily access standing water.
- Combine with healthy soil practices: Plastic bottle hacks are helpers, not magic wands. Pair them with compost, mulch, and good plant spacing for best results.
Troubleshooting Your Plastic Bottle Garden Projects
Problem: Bottles drain too fast
If your drip irrigation bottle empties in an hour, the holes are too large or too many. Seal a few with waterproof tape, or start over with fewer, smaller holes. You want a slow seep, not a water slide.
Problem: Soil is staying soggy
In self-watering containers, soggy soil usually means the wick is too thick, or the soil mix is too dense. Switch to a lighter potting mix with perlite or coco coir and use a narrower wick.
Problem: Algae growth in bottles
Clear bottles exposed to direct sun can grow algae in the water. It’s usually harmless to plants but can look messy. You can:
- Wrap the reservoir in fabric or paper to block light.
- Switch to more opaque bottles for reservoirs.
- Rinse and refill periodically.
Problem: Plants still look thirsty
If leaves are drooping and soil is pulling away from the sides of containers, your system may not be delivering enough water. Increase reservoir size, add a second drip bottle, or water deeply by hand once or twice a week as backup.
Experience-Based Tips for Reusing Plastic Bottles in the Garden
Once you’ve tried a few of these Hometalk-style hacks, you’ll discover that the real magic is in the small tweaks you make for your own climate, schedule, and plants. Here are some experience-based insights many home gardeners share after a season or two of reusing plastic bottles in the garden.
Start small and observe
It’s tempting to overhaul your entire yard with DIY irrigation and mini greenhouses overnight. In practice, it works better to start with just a few beds or containers. Set up drip bottles for your thirstiest plantsusually tomatoes, cucumbers, or hanging basketsand compare them to similar plants you water by hand. Most people notice that the bottle-fed plants stay more consistently hydrated, especially in hot, dry weather.
Adjust for your climate
In very hot, arid regions, gardeners often increase bottle size or add extra drip points because soil dries out quickly. A single 2-liter bottle might be enough for one tomato plant in a mild climate, but in a scorching summer, you may need two bottles per plant or a larger buried container. In wetter climates, the same setups may need fewer holes or slightly smaller wicks to avoid oversaturation.
Use cloches as seasonal training wheels
Mini greenhouses made from clear bottles can make you feel like a plant wizard in early spring. Many gardeners use them not just to protect seedlings, but as “training wheels” for hardening off. Seedlings started indoors can be planted out with bottle cloches for a week or two, then gradually weaned by opening caps during the day and eventually removing the bottles. This gentle transition often means less transplant shock and fewer casualties.
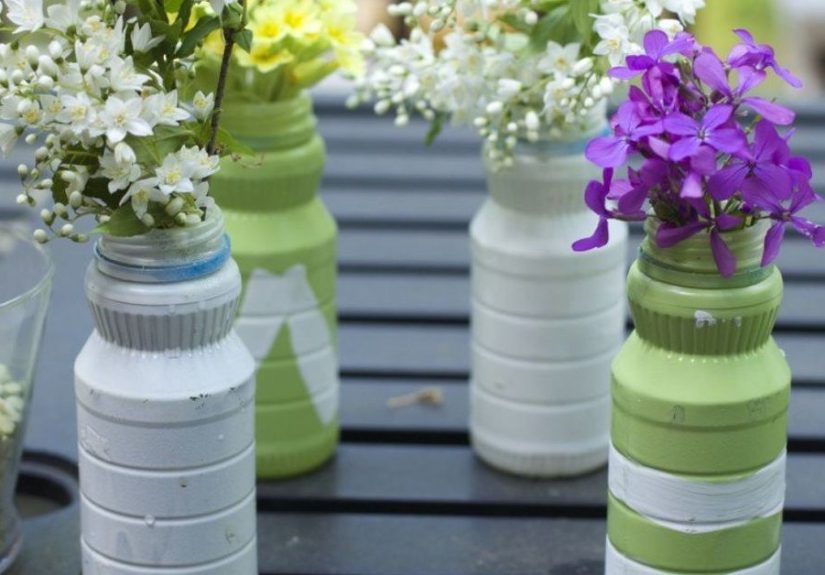
Keep looks in mind (your future self will thank you)
One honest piece of experience: a yard full of random plastic can start to look chaotic if you’re not intentional. Gardeners who stick with these hacks long-term usually find ways to make them visually pleasing. They cut bottles to similar heights, group them by color, or hide reservoirs behind plants and edging. Some even spray-paint the lower portion of bottles or wrap them in burlap or scrap fabric so they blend into the landscape.
Label everything
Once bottles are cut up, it’s surprisingly easy to forget which is which. Make a habit of labeling self-watering planters with plant names and dates, and note which drip systems worked best. Next season, those notes will save you from reinventing every setup from scratch.
Know when to upgrade
Many gardeners end up using plastic bottle systems as prototypes. After a season or two, you may decide certain ideas are worth upgrading to more permanent materialslike a manufactured drip system or ceramic watering spikeswhile other bottle hacks remain perfectly fine as long-term solutions. Think of plastic bottles as a low-risk way to test layouts, water needs, and plant spacing before you invest in more expensive gear.
Most importantly, reusing plastic bottles in the garden is a reminder that good gardening doesn’t have to be complicated, expensive, or wasteful. With a little curiosity, a pair of scissors, and a pile of bottles you already have, you can create a garden that’s more resilient, more sustainable, and a lot more fun to experiment in.