Table of Contents >> Show >> Hide
- Before You Start: What “Replacing Brakes” Usually Means
- Tools and Parts You’ll Likely Need
- The 15-Step Guide to Replacing Road Bike Brakes
- Step 1: Identify Your Brake Type and Compatibility
- Step 2: Inspect What Actually Needs Replacing
- Step 3: Secure the Bike and Prepare the Work Area
- Step 4: Remove the Wheel
- Step 5: Remove the Old Pads
- Step 6: Decide Whether You’re Replacing Just Pads or the Entire Caliper
- Step 7: Remove the Old Caliper
- Step 8: Clean the Brake Area Before Installing New Parts
- Step 9: Install the New Caliper Loosely (If Replacing It)
- Step 10: Install the New Pads Correctly
- Step 11: Reset Pistons or Route Cable/Hose
- Step 12: Reinstall the Wheel and Set Initial Pad Position
- Step 13: Align and Center the Brake Caliper
- Step 14: Torque Everything and Perform a Safety Check
- Step 15: Bed In the New Brakes Before a Real Ride
- Common Mistakes to Avoid
- When to Call a Bike Shop
- Real-World Garage Experiences and Lessons Learned (Extended)
- Conclusion
Replacing road bike brakes sounds like one of those jobs that requires a race mechanic, a secret handshake, and a wall full of expensive tools. Good news: it doesn’t. In most cases, you can replace worn brake pads or even swap a full brake caliper at home with a few basic tools, a little patience, and one very important skill: not panicking when a tiny retaining pin falls on the floor.
This guide walks you through a practical 15-step process for replacing road bike brakes, whether you ride rim brakes, mechanical disc brakes, or hydraulic disc brakes. It combines simple garage-friendly steps with pro-level safety checks, so your bike stops when you want it tonot two houses later.
You’ll also see tips for choosing the right brake pads, avoiding contamination, aligning calipers, and bedding in new pads. If your bike is modern road or gravel, this guide covers the most common setups. If your brakes are older or unusual, the same principles still apply: match the parts, install carefully, align precisely, and test before riding.
Before You Start: What “Replacing Brakes” Usually Means
The phrase replace road bike brakes can mean a few different jobs:
- Replacing brake pads only (most common)
- Replacing the brake caliper (rim or disc)
- Replacing cable and housing (mechanical brakes)
- Replacing a hydraulic caliper or hose (usually requires a bleed)
This article is written so you can follow it for any of those jobs. When a step applies only to rim brakes or only to disc brakes, it says so clearly.
Tools and Parts You’ll Likely Need
- Hex keys (commonly 2.5mm, 3mm, 4mm, 5mm)
- Torx key (often T25 for rotors)
- Needle-nose pliers
- Cable cutters (for mechanical systems)
- Clean rag and isopropyl alcohol (for disc rotors)
- Plastic tire lever or piston press tool (for disc pistons)
- Replacement pads and/or caliper (correct brand/model compatibility)
- New cable/housing if needed (mechanical)
- Manufacturer bleed kit and fluid if opening a hydraulic line
- Torque wrench (strongly recommended)
Pro tip: put a towel under the bike. It catches dropped parts and makes your workspace look like a serious workshop instead of a “what happened in here?” situation.
The 15-Step Guide to Replacing Road Bike Brakes
-
Step 1: Identify Your Brake Type and Compatibility
Start by identifying exactly what you have: rim brake, mechanical disc, or hydraulic disc. Then identify the brand and model (Shimano, SRAM, TRP, etc.). This matters because brake pads, retention pins, mounting hardware, and hose fittings are not universal.
For rim brakes, check whether you have cartridge pads (pad inserts slide out) or one-piece pads. For disc brakes, check pad shape and caliper model. Buying “close enough” parts is the fastest way to create a very expensive paperweight.
-
Step 2: Inspect What Actually Needs Replacing
Don’t replace everything just because the braking feels weak. Weak braking can come from worn pads, dirty rotors, cable friction, misalignment, or air in hydraulic lines.
On rim brakes, look for worn-out grooves or wear indicators on the pad surface. On disc brakes, inspect pad thickness and rotor condition. If the caliper itself is cracked, leaking, or badly corroded, replace the caliper too.
-
Step 3: Secure the Bike and Prepare the Work Area
A repair stand is ideal, but not mandatory. If you don’t have one, you can work with the bike upright, or carefully flip it over (protect your shifters and saddle with towels). Good lighting helps a lot, especially when you’re trying to spot a tiny retaining clip that suddenly became invisible.
-
Step 4: Remove the Wheel
For rim brakes, open the caliper quick-release first, then remove the wheel. For disc brakes, remove the wheel normally.
Important for disc brakes: avoid squeezing the brake lever once the wheel is out (unless you’ve inserted a pad spacer/bleed block). If you squeeze the lever with no rotor between the pads, the pistons can close up and make wheel reinstallation annoying.
-
Step 5: Remove the Old Pads
Rim brakes: remove the small set screw or retaining pin on the brake shoe, then slide the pad insert out (usually toward the rear). Some systems use a threaded stud and whole-pad assembly, while others use cartridge inserts.
Disc brakes: remove the retaining pin (hex, screwdriver, or clip style depending on brand), then pull the pads and spring out. Keep track of the spring orientation if your new pads don’t include one.
-
Step 6: Decide Whether You’re Replacing Just Pads or the Entire Caliper
If you’re only doing pads, skip to Step 8. If you’re replacing the whole brake caliper, continue here.
Replace the caliper if the threads are damaged, pistons are sticky beyond repair, the body is cracked, or the hydraulic caliper is leaking. If braking is just weak or noisy, pads and alignment usually fix it.
-
Step 7: Remove the Old Caliper
Rim or mechanical disc: loosen the cable anchor bolt and remove the cable from the caliper. Then remove the caliper mounting bolt(s).
Hydraulic disc: if you are replacing the caliper only and disconnecting the hose, be ready for a brake bleed afterward. Hydraulic systems are sealed, and opening the hose usually introduces air. Follow your exact manufacturer’s procedure and use the correct fluid and fittings.
-
Step 8: Clean the Brake Area Before Installing New Parts
This is the “don’t skip me” step. Dirt and oil are the villains in almost every brake story.
Rim brakes: wipe the brake track and inspect for gouges, cracks, or damage (especially on carbon rims).
Disc brakes: clean the rotor with isopropyl alcohol and a clean rag. Avoid touching the braking surfaces with bare fingers. Oil from skin, chain lube, or sprays can contaminate pads and kill braking power.
-
Step 9: Install the New Caliper Loosely (If Replacing It)
Mount the new caliper but leave the mounting bolt(s) slightly loose so you can align it later.
For rim brakes, make sure the caliper reach matches your frame and wheel (road calipers vary by reach). For disc brakes, confirm mount type (flat mount or post mount) and use the correct hardware, spacers, and bolt lengths.
-
Step 10: Install the New Pads Correctly
Rim brakes: check left/right markings and directional arrows on the pad insert. Use the correct compound for your rim surface (alloy, carbon, or ceramic-specific pads). Slide the pad in fully and reinstall the retention screw or pin.
Disc brakes: if you pushed the pistons back, install the new pads and spring, align the holes, and reinstall the retention pin/clip. Avoid touching the pad material with your fingers. Handle pads by the backing plate whenever possible.
-
Step 11: Reset Pistons or Route Cable/Hose
Disc brakes (pads only): before installing new pads, reset the pistons using a plastic tire lever or piston press. New pads are thicker, so the pistons need to go back in.
Mechanical brakes (new caliper): route fresh cable and housing if the old cable is frayed, sticky, or rusty. A clean cable path improves braking more than many riders expect.
Hydraulic brakes: reconnect the hose with the correct olive/barb or fitting, then bleed the brake using the manufacturer’s kit and method. No shortcuts herehydraulic brakes reward precision and punish improvisation.
-
Step 12: Reinstall the Wheel and Set Initial Pad Position
Reinstall the wheel and close the axle/quick release correctly.
Rim brakes: set pad height so the pad contacts the rim brake track evenly, without touching the tire and without hanging below the rim edge.
Disc brakes: make sure the rotor sits cleanly between the pads. If you feel resistance, the caliper is probably not centered yet (that’s next).
-
Step 13: Align and Center the Brake Caliper
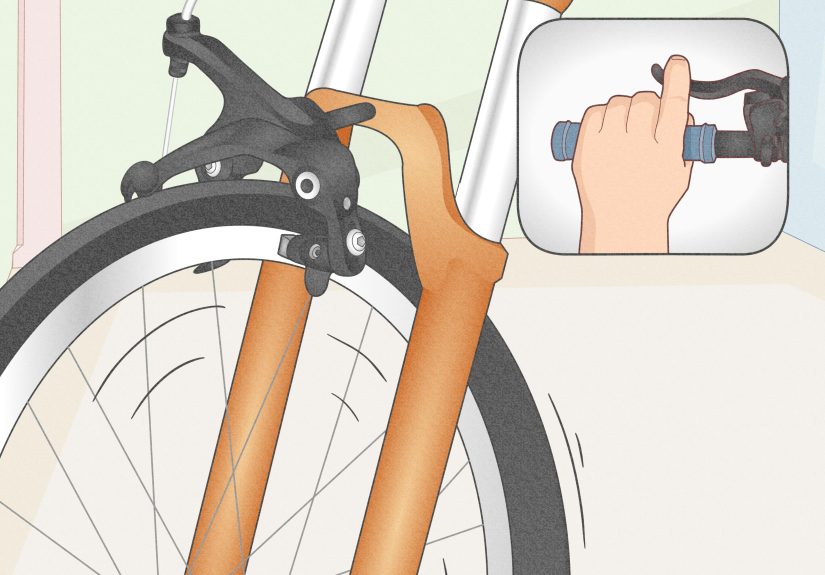
Rim brakes: center the caliper so both pads move evenly. Use the centering screw (if present) and cable tension/barrel adjuster to dial in lever feel. You want strong braking with a little clearance, not a constant hiss of pad rub.
Disc brakes: the classic method is simple: loosen the caliper mounting bolts slightly, squeeze and hold the brake lever, then tighten the bolts evenly. Spin the wheel and fine-tune if needed. If the rotor still rubs, recheck rotor straightness and pad seating.
-
Step 14: Torque Everything and Perform a Safety Check
Tighten all bolts to the manufacturer’s torque specs (caliper bolts, pad pin, cable anchor, hose fittings, rotor bolts if touched). If you don’t have a torque wrench, this is a great time to get one.
Then check:
- Lever feel (firm, not mushy)
- No visible leaks (hydraulic)
- No cable fraying or kinks (mechanical)
- No pad rubbing or only minimal light rub
- Pads are secure and correctly oriented
-
Step 15: Bed In the New Brakes Before a Real Ride
New pads (and especially new rotors) need a bedding-in process. This transfers a thin, even layer of pad material to the braking surface and improves power, consistency, and noise control.
A simple method: in a safe area, accelerate to a moderate speed and do a series of firm slow-downs without fully stopping. Repeat several times. Don’t mash the brakes while standing still right away, and don’t expect “full race braking” after one squeeze.
Think of bedding in like preheating an oven. Could you skip it? Technically yes. Will the results be disappointing? Also yes.
Common Mistakes to Avoid
- Mixing incompatible pads: pad shape and compound must match your caliper and rim/rotor setup.
- Touching disc pad surfaces: skin oils can contaminate pads.
- Using the wrong brake fluid: DOT and mineral oil are not interchangeable.
- Skipping cable/housing replacement: a sticky cable can make a new caliper feel terrible.
- Ignoring caliper reach on rim brakes: incorrect reach means poor pad alignment and unsafe braking.
- Not checking for leaks: hydraulic leaks are a stop-riding-now issue.
When to Call a Bike Shop
Home brake work is very doable, but there are times when a pro mechanic is the smart move:
- You’re replacing a hydraulic hose and don’t have a bleed kit
- You can’t get rid of a spongy lever after bleeding
- Your rotor is badly bent or cracked
- The caliper threads are damaged
- You’re not confident the brake is safe
Brakes are a safety system, not a “good enough” system. If something feels off, get a second set of eyes on it.
Real-World Garage Experiences and Lessons Learned (Extended)
One of the most common experiences riders have when replacing road bike brakes is discovering that the hardest part is not the wrenchingit’s diagnosing the real issue. A rider might assume the whole brake system is bad because the lever feels soft, but once the wheel comes off, the real problem is obvious: the pads are worn to the point where the grooves are gone, or the rotor is lightly glazed and dirty. In other words, the brake wasn’t “dead”; it was just asking for basic maintenance in the most dramatic way possible.
Another common garage moment happens with disc brakes: someone removes the wheel, absentmindedly squeezes the lever, and suddenly the wheel won’t go back in. It feels like a disaster the first time, but it’s usually fixable. Resetting the pistons carefully with a clean plastic tool solves it. After that happens once, riders tend to become very loyal to pad spacers and very suspicious of anyone who touches the brake lever while the wheel is off.
On rim-brake road bikes, a lot of riders are surprised by how much better the bike feels after replacing not just the pads, but also the cable and housing. Old housing adds friction, and friction steals braking force. The improvement can feel bigger than expected: the lever gets smoother, braking feels more direct, and the “why do my brakes feel mushy?” mystery disappears. It’s a good reminder that brakes are a system, not just a caliper.
First-time mechanics also learn quickly that pad alignment is where patience pays off. With rim brakes, getting the pad to hit the brake track perfectlywithout touching the tire and without rubbingcan take a couple of tries. With disc brakes, caliper centering sometimes works perfectly on the first squeeze-and-tighten attempt, and sometimes it turns into a ten-minute negotiation. That’s normal. Small adjustments, spinning the wheel between tweaks, and not overtightening bolts too early usually wins.
Pad contamination is another real-world lesson. Riders often don’t realize how easy it is to contaminate disc pads. A little chain lube overspray, greasy fingers, or the wrong cleaner can cause squealing and weak braking. Once riders go through that once, they become meticulous: clean rag, alcohol only, no touching the pad surface, and no random sprays near the rotor. It sounds obsessive, but it saves time and money.
Then there’s the bedding-in experience. Many riders install new pads, squeeze the brakes once, and think something is wrong because the stopping power is underwhelming. After a proper series of controlled slow-downs, the brakes suddenly “wake up.” That moment feels like magic the first time. It isn’t magic, of courseit’s just good brake setup doing what it’s supposed to do.
The biggest takeaway from real home-mechanic experiences is simple: brake work becomes easy fast. The first job feels slow and nerve-racking. The second is smoother. By the third, you’ll be the person telling a friend, “It’s not hardjust keep everything clean, use the right parts, and don’t lose the tiny clip.” Which is honestly the most accurate brake-replacement advice on the internet.
Conclusion
Replacing road bike brakes is one of the best maintenance skills a rider can learn. It improves safety, saves money, and gives you confidence in your bike every time you descend, corner, or stop at a light. Whether you’re working on classic rim calipers or modern hydraulic discs, the winning formula is the same: choose compatible parts, install carefully, align precisely, and test thoroughly.
Take your time, keep things clean, and don’t skip the final safety check. Your future selfespecially the one flying downhillwill be very grateful.