Table of Contents >> Show >> Hide
- Why Measurements Are the Real “Trust Signal” in Clothing Resale
- The App Idea: Measure, Save, Share (Without Re-Doing the Same Work)
- Set Up Your Measuring Station Once, Then Fly Through Listings
- The “Must-Measure” List Buyers Actually Care About
- How the App Speeds Up Reselling on Every Platform
- A Copy-and-Paste Measurement Template That Doesn’t Feel Like an AI Form
- Accuracy: The Honest Truth About Phone-Based Measuring
- Bonus: Measuring Shipping Boxes So You Don’t Get Surprise Postage
- What This Looks Like in Real Listings (Specific Examples)
- of “Reseller Experiences” (the Stuff Sellers Learn the Hard Way)
- Conclusion: The Small Habit That Makes Reselling Feel 10x Easier
Reselling clothes is supposed to be the fun kind of “side hustle chaos.” You know: thrifting, treasure-hunting,
photographing, and watching your closet become a tiny, well-lit boutique. But there’s one part of the process that
can turn even the most motivated seller into a human sigh: measurements.
Buyers ask for them. Platforms quietly reward detailed listings. Returns and “item not as described” disputes get
messy when sizing is vague. And if you’ve ever tried to measure a pair of wide-leg pants with a curling tape
measure while your phone camera is also trying to focus and your cat is also trying to sit on the pants… you
already know why this matters.
Here’s the good news: a clothing measurement appspecifically one designed to capture, store, and share
garment measurementscan make reselling faster, cleaner, and way more consistent. In this guide, I’ll walk you
through exactly how to use a measurement app to speed up listings, reduce buyer questions, and make your closet
listings feel more “pro seller” than “I’m guessing and hoping.”
Why Measurements Are the Real “Trust Signal” in Clothing Resale
In resale, the size tag is helpfulbut it’s not the whole story. Two “Medium” shirts can fit like totally
different species. Vintage sizes can be wildly different from modern sizing. Denim stretches. Knitwear
slouches. And brands change their patterns over time like they’re updating the software on a hoodie.
That’s why measurements matter more than people realize. A buyer can compare your numbers to a favorite item they
already own. They can check their body measurements. They can make a confident decision without sending you five
messages that start with “Hi! Quick question…” and end with you measuring the inseam at 11:47 p.m.
Platforms also encourage detail because it reduces friction and complaints. When your listing includes clear,
consistent measurements (and ideally a photo showing where you measured), you’re not just being helpfulyou’re
building credibility. In resale, credibility sells.
The App Idea: Measure, Save, Share (Without Re-Doing the Same Work)
The measurement app that changes everything is the one that doesn’t just “measure stuff,” but helps you:
- Capture garment measurements quickly (often by scanning or by guiding you through the key points).
- Store measurements per item so you don’t have to re-measure when you cross-list.
- Share measurements as a clean image or copyable set of numbers.
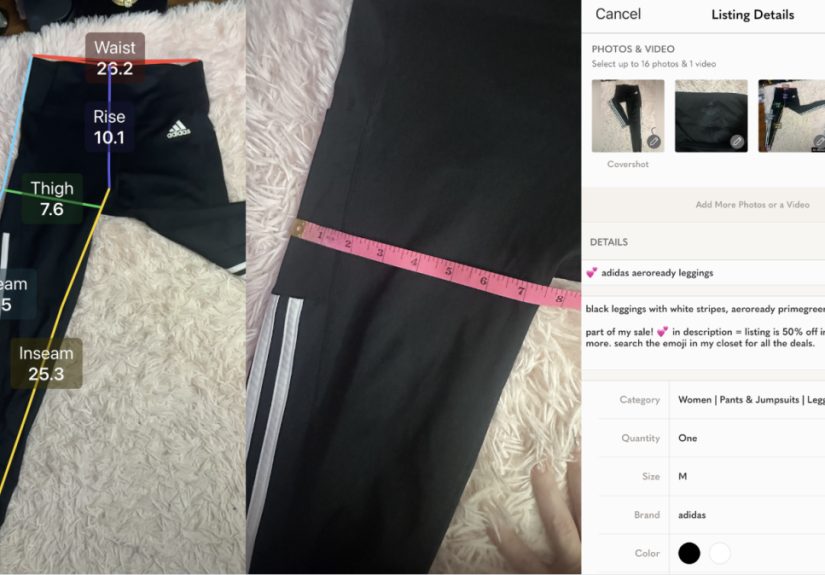
One example of a clothing-focused measurement app is Smartsizer – Measure Clothing, which is built around
scanning garments and generating the relevant dimensions for that item type, then storing and sharing them in a
tidy format. The “magic” here isn’t that it replaces all tools foreverit’s that it organizes measurement work
into a repeatable system you can use across Poshmark, eBay, Mercari, Depop, Etsy, and more.
If you’ve been relying on a Notes app full of random numbers like “jeans?? 15.5/10/31??” this is your upgrade.
Set Up Your Measuring Station Once, Then Fly Through Listings
1) Pick one surface and stick with it
Consistency beats perfection. Use a flat surface (table, floor, bed if it’s firm). The goal is to measure items
the same way every time so your numbers are comparable across listings.
2) Use good light and a high-contrast background
Apps that use scanning or photo-based measurement work best when edges are visible. Even if you’re measuring
manually and just using the app to store/format your numbers, good lighting helps when you add tape photos.
3) Keep one “measurement kit” in a small bin
Here’s the minimalist kit that makes you feel like a professional reseller (without buying a label printer the
size of a microwave):
- Soft measuring tape (fabric tape)
- Two binder clips (to hold hems or keep tape straight on slippery fabric)
- Chalk or small clips (to mark midpoints on waistbands)
- Your phone with the measurement app
The “Must-Measure” List Buyers Actually Care About
You don’t need to measure every seam like you’re building a spaceship. You need the measurements that help
someone decide if it will fit. Below are the high-impact numbers that show up again and again across resale
platforms.
Tops (tees, blouses, sweaters, jackets)
- Pit-to-pit (chest width): measured flat, armpit seam to armpit seam
- Length: shoulder seam to hem
- Sleeve length: shoulder seam to cuff (or center-back to cuff for raglan)
- Shoulder width: seam to seam across the back (optional but helpful)
Pants & jeans
- Waist: measured flat across the waistband
- Rise: crotch seam to top of waistband (front rise is most common)
- Inseam: crotch seam to hem along the inside leg
- Leg opening: flat across the hem
- Thigh: measured flat a few inches below the crotch (optional but useful)
Dresses
- Bust (pit-to-pit)
- Waist (flat at the narrowest point or seam)
- Hip (if fitted)
- Length (shoulder to hem)
Skirts
- Waist
- Hip (if fitted)
- Length
Shoes (bonus category that sells better with data)
- Insole length (especially helpful for vintage or unisex sizing)
- Heel height (for boots/heels)
- Shaft height & calf opening (for tall boots)
A measurement app makes this faster because you can store “standard measurement sets” by category, then fill them
in quicklyno reinventing the wheel each time.
How the App Speeds Up Reselling on Every Platform
Cross-listing stops being measurement déjà vu
If you sell on multiple platforms, measurements usually get repeated: Poshmark listing, then eBay listing, then
Mercari listing, then you consider Depop and suddenly you’re in a measurement time loop.
With a measurement app, you measure once, save the measurements with the item, then re-use them everywhere. Many
clothing-focused tools also let you export or share a measurement imageperfect for attaching to listings so the
numbers are visible even when buyers skim.
Buyer questions drop (and so do returns)
A surprising number of buyer messages are just measurement requests. When your listing already includes clear
numbers (plus a tape photo or measurement graphic), the buyer’s question becomes: “Do I want this?” instead of
“Can you measure this?”
Your listings look more professionalwithout sounding like a robot
Measurements make a listing feel complete. Not stiff. Not corporate. Just complete. It tells buyers: “I know what
I’m doing, and I’m not hiding the ball.” That confidence can be the difference between a like and a sale.
A Copy-and-Paste Measurement Template That Doesn’t Feel Like an AI Form
Here’s a listing-friendly format you can use anywhere (and store as a template inside your phone). It’s simple,
readable, and doesn’t scream “spreadsheet energy.”
For tops
Measurements (laid flat, approx.):
Pit-to-pit: __ in
Length: __ in
Sleeve: __ in
For pants/jeans
Measurements (laid flat, approx.):
Waist: __ in
Rise: __ in
Inseam: __ in
Leg opening: __ in
Add one sentence that helps interpret the numbers:
“Fabric has stretch,” “waistband is elastic,” “vintage sizing runs smaller than modern,”
or “compare to a similar item you own.”
Accuracy: The Honest Truth About Phone-Based Measuring
If your app measures using scanning, AR, or photo interpretation, remember: lighting, camera angle, wrinkles, and
fabric drape can affect results. That doesn’t make the app uselessit just means you should treat measurements as
approximate and use a simple workflow to keep them trustworthy.
Best practices that keep you safe (and buyers happy)
- Say “laid flat, approx.” in your listing.
- Add a tape photo for the key measurement (pit-to-pit or waist/inseam).
- Measure at seams and edges, not “somewhere around the vibe of the armpit.”
- Note stretch and elasticity (especially for denim and knits).
- Be consistent: same method, same points, every time.
If you want maximum confidence for premium items (designer, formalwear, collectibles), use the app for speed and
organization, then confirm the main measurements with a physical tape. It takes seconds and saves headaches.
Bonus: Measuring Shipping Boxes So You Don’t Get Surprise Postage
While garment measurements sell the item, package measurements protect your profit. Carriers care about size and
weightand certain services price based on “length + girth.”
A general rule of thumb for sanity: keep a cheap ruler or tape near your shipping supplies, and measure the box
once before you buy postage. Some sellers also use a phone measuring tool for quick estimates, but for shipping
costs, physical measurement is the safer bet.
If you ship larger boxes (coats, boots, bundles), learning the basics of length and girth can help you avoid
accidentally selecting a package size that triggers higher rates.
What This Looks Like in Real Listings (Specific Examples)
Example 1: Vintage Levi’s jeans (aka “Why is size 30 not always size 30?”)
Instead of relying on the tag, you list:
Waist (flat): 15 in (approx. 30 in around), Rise: 11 in,
Inseam: 30 in, Leg opening: 8 in.
You add one tape photo showing the waistband measurement. Result: fewer sizing questions, fewer returns, more
confidence.
Example 2: Oversized sweater with “Medium” tag
You list pit-to-pit and length and add: “Intentionally oversized fitcompare measurements to a sweater you love.”
The buyer who wants cozy slouch buys; the buyer who needs a fitted silhouette scrolls past. That’s a win for both
parties.
Example 3: Tall boots
You include insole length, heel height, shaft height, and calf opening. Boots are a category where missing
measurements can stall a sale for weeks. Provide the numbers, and suddenly your listing feels like a retailer’s
product page (but with way better pricing).
of “Reseller Experiences” (the Stuff Sellers Learn the Hard Way)
If you’ve ever sold clothes online, you know there are two types of listings: the ones that glide to checkout,
and the ones that attract questions like a porch light attracts moths. Measurements are the difference more often
than people admit.
A common reseller “experience” goes like this: you list a pair of jeans with the tag size and a few photos. A
buyer messages: “What’s the waist and inseam?” You grab the jeans, measure the waist, then realize you’re not
sure if you should measure “across” or “around.” You send a number anyway. The buyer asks about rise. Then thigh.
Then whether the fabric has stretch. By the time you’re done, you’ve basically written a denim biographyand the
buyer disappears like they were never real in the first place.
Sellers who build a measurement habit early tend to describe a totally different reality: they measure once,
save the numbers, and re-use them when they cross-list. When a buyer does message, it’s usually about something
specific (“Is the color closer to cream or bright white?”) instead of “Please recreate an entire fitting room.”
The difference isn’t that those sellers have more time. It’s that their listings do more work for them.
Another thing resellers run into is “fit surprise.” Vintage items especially can have sizing that doesn’t match
modern expectations. A buyer sees a size 10 vintage dress and assumes modern size 10. Measurements prevent that
mismatch. Experienced sellers often learn to add a single friendly sentence“Vintage sizing can run smaller; please
compare measurements”and it saves them from misunderstandings that can turn into returns or disputes.
Measurement apps help because they reduce the mental load. Instead of thinking, “What do I measure for a blazer
again?” you follow the app’s category prompts or your saved checklist: pit-to-pit, shoulders, sleeve, length.
Instead of hunting for last week’s measurements in a sea of Notes, you tap the saved item and copy what you need.
It’s not glamorous, but it feels like moving from “random effort” to “system.”
And then there’s the photo proof moment. Many sellers say the first time they started adding a tape photo (or a
clean measurement graphic), the tone of buyer messages changed. People stopped debating sizes in DMs and started
asking purchase-ready questions like, “Would you bundle these two items?” or “Could you ship today?” That’s the
resale sweet spot: less back-and-forth, more checkout.
The funniest part is that the “experience” isn’t about measuring moreit’s about measuring smarter. When you
build measurements into your workflow (especially with an app that stores and shares them cleanly), reselling
starts feeling easier in a way that’s hard to explain until you live it. Your closet gets quieter. Your listings
get sharper. And your tape measure stops being that thing you only remember exists when someone messages you at
midnight.
Conclusion: The Small Habit That Makes Reselling Feel 10x Easier
A measurement app won’t photograph your items, steam your wrinkles, or stop a buyer from offering you $8 for a
wool coat. But it will make your listings clearer, faster to create, easier to cross-list, and more
trustworthy to buyers.
The winning formula is simple: measure the key points, store them once, share them consistently, and add one
photo that proves where the numbers came from. That’s how you turn “Can you measure this?” into “I just bought
it.”