Table of Contents >> Show >> Hide
- Why Sweater Mountain Pillows Are Worth Making
- Before You Start: Pick the Right Sweaters
- Tools and Supplies Checklist
- Step-by-Step: How to Make Cute Mountain Pillows
- Step 1: Wash, dry flat, and prep your sweaters
- Step 2: De-pill for a cleaner finish
- Step 3: Decide your pillow size and mountain layout
- Step 4: Stabilize stretchy knits
- Step 5: Cut your front and back panels
- Step 6: Build the mountain applique
- Step 7: Add optional “cute” details
- Step 8: Sew front to back
- Step 9: Insert pillow form and close
- Step 10: Make a no-sew version (quick weekend option)
- Mountain Pillow Design Recipes You Can Copy
- Common Mistakes (And How to Avoid Them)
- How to Style Your Mountain Pillows So They Look Expensive
- Cost and Time Breakdown
- Care Tips to Keep Sweater Pillows Looking Great
- Conclusion
- 500-Word Experience Section: Real-Life Notes From Making Sweater Mountain Pillows
If your closet is holding onto “maybe someday” sweaters, this is your sign from the cozy gods: turn them into mountain pillows. You’ll save money, reduce textile waste, and get the kind of soft, textured decor that makes your couch look like it has a ski pass. This tutorial-style guide walks you through every stepfrom choosing sweaters and shaping mountain silhouettes to sewing (or no-sewing) your way to a cabin-core masterpiece.
Editorial synthesis note: This article is built from real, practical guidance commonly shared across trusted U.S.-based home, craft, and care publications and organizations, including EPA, HGTV, Martha Stewart, Better Homes & Gardens, The Spruce Crafts, Good Housekeeping, Real Simple, Apartment Therapy, Country Living, House Beautiful, Southern Living, Architectural Digest, SINGER, Brother USA, and JOANN.
Why Sweater Mountain Pillows Are Worth Making
Let’s start with the obvious: they’re adorable. But the real magic is in the mix of sustainability, texture, and personality. Old knits already have depth, warmth, and visual interest, so even simple pillow shapes feel “designer.”
And unlike fast decor buys, upcycled sweater pillows are one-of-a-kind. A cable knit from a thrifted cream pullover can become snowy peaks. A charcoal cardigan can become a moody alpine ridge. A green sleeve can turn into a tiny pine forest accent. You are not just decoratingyou are storytelling with fabric.
SEO keyword focus used naturally in this guide
upcycle old sweaters, DIY mountain pillows, sweater pillow tutorial, sustainable home decor, cozy cabin decor, throw pillow styling, no-sew sweater pillow.
Before You Start: Pick the Right Sweaters
Not every sweater behaves the same when cut and sewn. Choose with intention so you don’t end up wrestling a stretchy noodle at midnight.
Best materials for beginner success
- Wool blends: Great texture and shape retention, especially if lightly felted.
- Cotton knits: Easy to cut, breathable, and less itchy for sensitive skin.
- Cashmere blends: Luxe feel for accent pillows, but use interfacing for stability.
- Chunky cable knit: Perfect for “snowcap mountain” texture.
What to avoid
- Sweaters with severe thinning at elbows or side seams.
- Super loose knits that ladder when cut (unless fully stabilized first).
- Very embellished fronts if you want a minimal mountain silhouette.
Tools and Supplies Checklist
- Old sweaters (2–4 for color mixing)
- Pillow inserts (16×16, 18×18, or lumbar sizes)
- Fabric scissors or rotary cutter
- Pins or sewing clips
- Measuring tape + ruler
- Tailor’s chalk or washable fabric marker
- Sewing machine (helpful, not required)
- Ballpoint/stretch needle (for knits)
- Thread (polyester all-purpose)
- Fusible interfacing or knit stabilizer (optional but recommended)
- Zipper or envelope-closure fabric overlap
- Fabric glue (for no-sew accents only)
Step-by-Step: How to Make Cute Mountain Pillows
Step 1: Wash, dry flat, and prep your sweaters
Start clean. Hand wash or gentle-cycle wash according to care labels, then lay flat to dry. Don’t wring or tumble dry delicate knits. This prevents weird post-project shrinking and keeps the fibers happy.
Step 2: De-pill for a cleaner finish
Use a fabric shaver lightly. Your final pillow will look more “boutique mountain lodge” and less “this survived three winters in a backpack.”
Step 3: Decide your pillow size and mountain layout
Choose one insert size and design around it. Sketch simple triangular peaks on paper first. Think in layers:
- Background sky/base fabric
- Main mountain range
- Snowcaps, trees, moon, or tiny stitched stars
Step 4: Stabilize stretchy knits
If your sweater is floppy or very elastic, apply lightweight fusible interfacing to the wrong side before cutting. This one step saves you from stretched edges and wavy seams.
Step 5: Cut your front and back panels
For a snug look, cut your cover close to insert size. If you prefer easier stuffing, add seam allowance generously. If using a shirt-style or envelope front, plan overlap panels at the back.
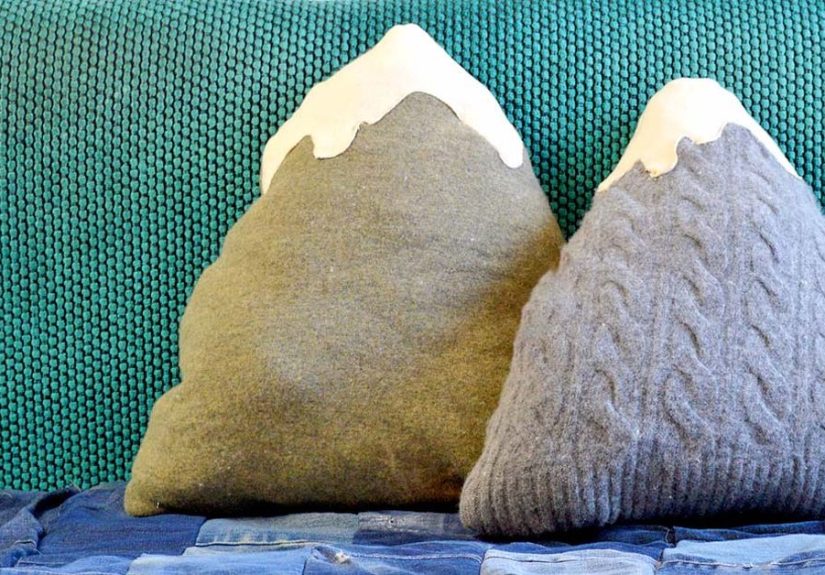
Step 6: Build the mountain applique
Cut mountain shapes from contrasting sweater pieces. Example palette:
- Base mountain: heather gray knit
- Second range: charcoal ribbed knit
- Snowcaps: cream cable knit
- Trees: dark green sleeve scraps
Pin in place, then topstitch with a narrow zigzag or stretch stitch. Hand whipstitch works beautifully for a rustic look.
Step 7: Add optional “cute” details
- Mini felt moon in top corner
- French-knot stars (white embroidery floss)
- Blanket stitch around mountain edges
- Tiny pom-pom “snowballs” at bottom seam
Step 8: Sew front to back
Place right sides together and sew around edges, leaving a turning gap (or install zipper). Trim corners and turn right side out. Use a chopstick or point turner for crisp corners.
Step 9: Insert pillow form and close
Stuff in the insert and adjust corners. Hand stitch the gap with a ladder stitch if needed. Fluff and admire your alpine masterpiece.
Step 10: Make a no-sew version (quick weekend option)
If sewing isn’t your thing, use iron-on hem tape and fabric glue for applique accents. Keep no-sew pillows decorative (not heavy-use) for longest life.
Mountain Pillow Design Recipes You Can Copy
1) Minimalist Alpine
One large mountain silhouette in tonal grays. No extra embellishments. Perfect for modern neutral homes.
2) Snow Day Cabin
Cream cable-knit snowcaps, evergreen trees, and warm beige base. Add a tiny stitched moon for storybook charm.
3) Sunset Ridge
Use rust, mauve, and deep navy for a sunset-over-peaks vibe. Great for fall styling.
4) Nordic Night
Charcoal base with white hand-stitched stars and a cold-blue mountain range. Looks amazing on leather sofas.
5) Kids’ Adventure Peak
Add bright felt flags on top of mountains. Optional name initials for personalized gifts.
6) Heritage Patchwork Mountain
Piece together sweater scraps from multiple garments for a sentimental, memory-rich pillow front.
Common Mistakes (And How to Avoid Them)
| Mistake | What Happens | Fix |
|---|---|---|
| Skipping stabilizer on loose knit | Wavy seams, stretched shape | Fuse lightweight interfacing before cutting |
| Using universal needle on thick knit | Snags, skipped stitches | Switch to ballpoint/stretch needle |
| Cutting without layout planning | Awkward mountain proportions | Sketch and pin layers first |
| Overstuffing pillow cover | Distorted applique and seams | Choose insert size intentionally and test fit |
| Machine drying finished cover | Shrinkage or warping | Spot clean or gentle wash, air dry flat |
How to Style Your Mountain Pillows So They Look Expensive
Good styling is the difference between “cute craft” and “did you hire a designer?” Here’s the formula:
- Use mixed textures: Pair sweater pillows with linen, boucle, or velvet.
- Anchor with neutrals: Let mountain pillows be the hero piece.
- Vary scale: One large mountain pillow + two smaller solids works well.
- Keep a cohesive palette: 2–3 key tones max for a polished look.
- Seasonal swap: Dark alpine shades in winter, soft sage/cream in spring.
Cost and Time Breakdown
- Thrifted sweaters: $4–$12 each
- Pillow insert: $8–$20 each
- Notions/interfacing/thread: $10–$25 total (multi-project use)
- Time per pillow: 45–120 minutes depending on detail level
If you already have old sweaters and basic sewing tools, this is one of the highest-impact, lowest-cost DIY decor upgrades you can make.
Care Tips to Keep Sweater Pillows Looking Great
- Use removable covers when possible for easier cleaning.
- Spot clean first; avoid aggressive scrubbing.
- Hand wash cold or gentle cycle in a mesh bag when needed.
- Reshape and air dry flatnever high heat dry.
- Store off-season covers in breathable cotton bags.
Conclusion
Upcycling old sweaters into cute mountain pillows is the perfect crossover of sustainability, comfort, and style. You reduce waste, give sentimental textiles a second life, and create custom cozy decor no big-box store can replicate. Whether you sew full applique scenes or make a quick no-sew version, the result is the same: your home feels warmer, more personal, and way more charming.
Start with one pillow this weekend. If it turns out slightly lopsided, congratulationsyou made artisanal mountain weather. Make a second one, and call it a range.
500-Word Experience Section: Real-Life Notes From Making Sweater Mountain Pillows
The first time I made a mountain pillow, I was convinced I’d finish in 30 minutes. Two and a half hours later, I was sitting on the floor surrounded by sweater sleeves, thread snippets, and exactly one confused cat who had decided the unfinished pillow form was now her legal property. But that “first messy attempt” taught me more than any perfect tutorial could. I learned that knits are wonderfully forgiving in look but not always in behaviorespecially when you skip stabilizing fabric because you’re feeling brave and impatient. (Spoiler: brave and impatient is not a recognized sewing technique.)
My second attempt was smarter. I picked a medium-weight wool blend sweater with a tight knit and paired it with a soft cream cable-knit scrap for snowcaps. I pre-washed everything, laid each piece flat overnight, and used a ballpoint needle. Night-and-day difference. The seams were smoother, the mountain edges were cleaner, and the pillow held its shape instead of looking like it had survived an avalanche. That was the first one I actually displayed in the living roomand friends immediately asked where I bought it. There is no better DIY compliment than someone assuming you paid boutique prices.
One of my favorite experiences came from a “craft swap night” with friends. Everyone brought one old sweater they couldn’t wear anymore. One friend had her grandfather’s fisherman sweater with a torn cuff, and we used the intact cable sections for two matching mountain pillows. Another brought a bright red cardigan that became tiny applique cabins at the foot of a gray mountain range. We ended up with wildly different results: minimalist, maximalist, neutral, colorful. But every pillow had personality because the source fabric already had a story. It felt less like crafting and more like memory editingin a good way.
I also tested a no-sew version for beginners in my family. It worked surprisingly well for decorative pillows that won’t be constantly hugged, wrestled, or used in family pillow fights. Iron-on tape handled the seams fine, and fabric glue kept small snowcap details in place. The trick was patience between steps: let adhesive cure fully before stuffing. If you rush, pieces shift, and your mountain can drift into “abstract triangle mood.” Not a tragedy, but maybe not what you planned.
After making about a dozen sweater mountain pillows across two seasons, here’s what consistently creates the best result: prep your fabric, stabilize stretch, keep your palette tight, and let texture do the heavy lifting. You don’t need complicated shapes or fancy embroidery to make these look high-end. A simple two-peak silhouette in tonal knits can look stunning. And if one corner comes out a little quirky, keep it. Handmade decor should feel handmade. In fact, those tiny imperfections are usually what make guests pick it up, smile, and ask the best question in DIY: “Wait…you made this?”