Table of Contents >> Show >> Hide
- What Makes a Cross Stitch Kit Beginner-Friendly?
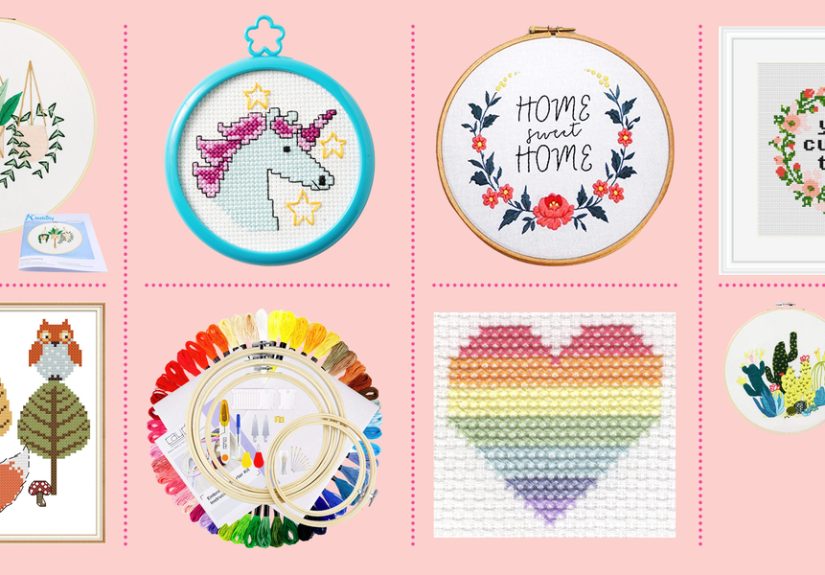
- 10 Cross Stitch Kits for Beginners: Best Options on Amazon and Etsy
- How to Start Your First Cross Stitch Kit (Without Rage-Quitting)
- Common Beginner Mistakes (and Easy Fixes)
- Optional Tools That Make Beginners Feel Like Pros
- Conclusion
- Extra: of Real Beginner Cross Stitch Experience (So You Can Learn From My “Creative Choices”)
Cross stitch is basically “paint-by-number,” except the paint is thread, the numbers are tiny symbols,
and you’ll develop an oddly specific pride in making two diagonal lines look identical 4,000 times.
If you’re brand-new, the fastest way to fall in love (instead of rage-quit) is to start with a beginner-friendly kit:
everything included, instructions that don’t assume you were raised by a Victorian seamstress, and a design that finishes
before your enthusiasm does.
Below you’ll find a practical buyer’s guide, a beginner-proof “how to start” walkthrough, and 10 great starter kits
you can easily find on Amazon and Etsyplus a bonus 500-word “I learned this the hard way” experience section at the end.
What Makes a Cross Stitch Kit Beginner-Friendly?
1) Counted vs. Stamped (a.k.a. “Do you like puzzles?”)
Counted cross stitch uses a blank gridded fabric (usually Aida). You follow a chart and “count” squares.
It’s satisfying, flexible, and the most common style on Amazon and Etsy.
Stamped (sometimes called “printed”) means the design is printed on the fabric, so you stitch right over it.
If you want the easiest on-ramp, stamped kits can feel like training wheelsin a good way.
2) Fabric count you can actually see
For beginners, 14-count Aida is a sweet spot: the holes are easy to find, the finished look is crisp,
and it’s widely used in beginner kits. If your eyes want a spa day, consider 11-count Aida (bigger squares).
If your eyes are superheroes, you can try 16-count later.
3) A kit that includes the “big four”
A true beginner kit should include:
- Aida fabric (often 14-count)
- Floss (commonly cotton embroidery thread, frequently pre-sorted)
- Tapestry needle (blunt tip so you don’t stab the fabricor yourself)
- Chart + instructions (preferably with clear symbols and color guidance)
Bonus points if it includes a hoop, a thread organizer, and a design small enough to finish in a weekend.
Because finishing your first piece is the hobby’s best marketing.
4) A design that forgives beginner behavior
Look for:
- Full stitches only (avoid backstitching and confetti-heavy patterns at first)
- Chunky color blocks instead of 47 single stitches scattered like confetti
- Smaller finished size (4–7 inches is a confidence builder)
10 Cross Stitch Kits for Beginners: Best Options on Amazon and Etsy
These picks are beginner-appropriate because they commonly feature easy-to-see Aida fabric (often 14-count),
include the essentials, and keep the project size manageable. Availability varies, so treat kit names like you treat
a cat: you can’t control where it goes, but you can usually find it again if you search calmly.
Amazon Picks (Beginner-Approved, Fast Shipping Energy)
1) Dimensions “I Can’t Adult Today” Beginner Kit (Hoop Finish)
If you enjoy crafts that double as emotional truth-telling, this one is a classic. The finished piece fits neatly in a hoop,
which makes displaying it hilariously easy.
- Why it’s great: Everything you need comes in the box, and the hoop-as-frame finish is beginner-friendly.
- Best for: First-time stitchers who want a quick win and a fun quote for a wall, office, or gift.
- Pro tip: Keep your stitches all leaning the same direction. Consistency makes even simple designs look polished.
2) Dimensions “Merry Little Christmas” Counted Kit (14-count Aida + Hoop)
Holiday kits are sneaky motivational. You start in October thinking, “I have time,” and finish in December thinking,
“I am a seasonal crafting wizard.”
- Why it’s great: Small-to-medium design, clear theme, and often packaged with hoop and easy instructions.
- Best for: Beginners who want décor they’ll actually put up (or give away) every year.
- Pro tip: When you pause a project, park the needle in the fabric edge or a needle minder so it doesn’t vanish into the carpet dimension.
3) Dimensions “Mermaid” Beginner Counted Kit (Compact, Cute, Not Too Intense)
A smaller square design is perfect when you’re learning. It’s enough stitches to practice rhythm without
feeling like you enrolled in a four-year degree program.
- Why it’s great: Typically includes the essentials and keeps the finished size friendly.
- Best for: Anyone who wants a whimsical first project (and a strong chance of finishing).
- Pro tip: Use shorter floss lengths (about the length of your forearm). It reduces tangles and fraying.
4) DMC “Stitch Kit” Petite Series (Unicorn / Cat / Cactus Styles)
These petite hoop kits are designed to be approachable: small hoop size, curated colors, and a design that won’t
take over your entire personality (unless you want it to).
- Why it’s great: The small format helps beginners build confidence fast.
- Best for: Gift-stitching, dorm décor, and “I just want to learn the basics” energy.
- Pro tip: If you’re stitching on 14-count Aida, a size 24 tapestry needle is a common comfortable match.
5) Bucilla “My 1st Stitch” Mini Kits (Tiny, Quick, Confidence-Boosting)
These mini kits are basically cross stitch’s version of a tutorial level. Small frame, small design, low commitment,
high dopamine.
- Why it’s great: Short project time and a clear “finished object” moment.
- Best for: Absolute beginners and anyone who wants to test-drive the hobby before buying a bigger kit.
- Pro tip: Don’t stress about the back being messy. Nobody is grading you. (And if they are, stop inviting them over.)
Etsy Picks (Handpicked Vibes, Great Instructions, Often Adorable Packaging)
6) “Easy Beginner Cross Stitch Kit” (Small Hoop + Aida + DMC Floss Style Listings)
Etsy is full of beginner kits curated by makers who remember what it felt like to be new. Many include a hoop,
pre-cut fabric, floss, needle, and a beginner-readable pattern (sometimes with color + symbols).
- Why it’s great: Clear instructions and thoughtful extras (felt backing, nicer packaging, tips).
- Best for: First projects, gifts, and anyone who wants a “boutique kit” experience.
- What to look for: Listings that explicitly say beginner, include a hoop, and use 14-count Aida.
7) DMC-Inspired “Stitch Kit XS” Style Kits on Etsy (Hoop + Aida + Needle + Floss)
Some Etsy sellers offer compact “stitch kit” bundles (often 6-inch hoop size) that are beginner-friendly,
especially if they include a simple chart and a limited color palette.
- Why it’s great: Small finish, manageable colors, and a polished hoop-art look.
- Best for: People who want a modern design and an easy display method.
- Pro tip: Read reviews for notes about pattern clarity and whether thread is pre-sorted.
8) Stamped Beginner Cross Stitch Kits (Printed Fabric = Less Counting)
If counting feels like doing math recreationally (no thank you), stamped kits can be a smooth entry point.
You stitch where the design is printed, which reduces “Wait… is this square the right square?” moments.
- Why it’s great: Easier navigation and a calmer beginner experience.
- Best for: Visual learners, casual crafters, and anyone who wants the simplest path to a finished piece.
- What to check: Whether the print washes out (if needed) and whether floss colors are labeled clearly.
9) Beginner “Mini Motif” Kits (Cactus / Flowers / Icons, Often 3–4 Inches)
Tiny motifs are excellent training wheels. You learn the stitch, finish quickly, and end up with something you can frame,
patch onto a bag, or turn into a magnetbecause crafts love a second career.
- Why it’s great: Fast finish and low risk if you make beginner mistakes.
- Best for: People who want to practice without committing to a large project.
- Pro tip: Choose designs with large blocks of a few colors for your first attempt.
10) “Gift-Ready Beginner Kits” (Thread Organizer + Hoop + Guide + Box)
Many Etsy kits are designed to be gifted: neatly packaged, often with pre-sorted thread, a hoop, and a
beginner guide that feels like a friendly human wrote it (because one probably did).
- Why it’s great: Great instructions, thoughtful extras, and a more guided experience than big-box kits.
- Best for: Anyone buying a first kit as a giftor gifting it to themselves (which is valid and encouraged).
- What to look for: “Beginner,” “full stitch,” “14-count Aida,” and photos of the chart/instructions.
How to Start Your First Cross Stitch Kit (Without Rage-Quitting)
Step 1: Prep your fabric and find the center
Many charts are centered. A common beginner method: fold your Aida in half, then in half again, lightly crease the center,
and start stitching near the center of the design. It helps avoid finishing your piece and realizing it’s… artistically drifting off the edge.
Step 2: Separate floss strands like a civilized person
Most beginner patterns use two strands of standard embroidery floss on 14-count Aida. Floss usually comes as six strands twisted together.
Pull one strand at a time (yes, it feels slow; yes, it prevents knots).
Step 3: Make your X stitches consistent
Cross stitch is made of X-shaped stitches. The secret sauce is consistency:
make sure the top leg of every X goes the same direction across your whole project.
Your future self will thank you when the finished piece looks smooth instead of “wind-swept.”
Step 4: Park thread ends neatly
Beginners often start with knots. Many stitchers eventually switch to “waste knots” or weaving ends under stitches on the back.
If your kit instructions tell you how, follow them. If not, the simple rule is: secure it so it doesn’t slip, and don’t create a bulky lump.
Step 5: Finish it like you meant to finish it
If your kit comes with a hoop, you can often display it right there. Otherwise, gentle washing (if needed), pressing from the back,
and framing turns “a project” into “look, I made art.”
Common Beginner Mistakes (and Easy Fixes)
-
“My thread keeps knotting.”
Use shorter lengths, separate strands gently, and let the needle dangle to untwist occasionally. -
“I lost my place on the chart.”
Highlight completed symbols, work in small sections, and consider starting from the center. -
“My fabric is wrinkly.”
Keep it taut in the hoop (drum-tight), and remove it from the hoop when you’re done for the day if creases are forming. -
“My stitches look messy.”
Double-check that you’re using the suggested number of strands, and keep the top leg direction consistent.
Optional Tools That Make Beginners Feel Like Pros
You can absolutely start with just a kit. But if you want to upgrade your experience from “I am wrestling thread”
to “I am a calm woodland artisan,” these help:
- Embroidery scissors: small, sharp, and satisfying.
- Needle minder: a tiny magnet that prevents needle teleportation.
- Good lighting: your eyes deserve it.
- Extra tapestry needles: because the one from the kit will eventually try to disappear.
- Highlighter or digital chart app: reduces “where was I?” spirals.
Conclusion
The best cross stitch kits for beginners have three things in common: easy-to-see fabric (often 14-count Aida),
clear instructions, and a design that lets you finish before your motivation runs out. Amazon is great for quick,
reliable starter kits from brands like Dimensions, DMC, and Bucilla. Etsy shines when you want thoughtful packaging,
friendly instructions, and modern designs from independent makers.
Start small, keep your X’s consistent, and remember: if you mess up, you’re not failingyou’re just adding
“customization” (which sounds way fancier than “oops”).
Extra: of Real Beginner Cross Stitch Experience (So You Can Learn From My “Creative Choices”)
My first cross stitch kit taught me two things immediately: (1) I love the rhythm of making X’s, and (2) I had been
wildly overconfident about my ability to count tiny squares while watching TV. The good news? You don’t need
superpowers. You need a decent kit and a few habits that keep the hobby relaxing instead of chaotic.
The biggest “aha” moment was realizing that thread has a personality. A long piece of floss looks innocent at firstsmooth,
cooperative, practically angelic. Ten minutes later it’s twisted, tangled, and making little knots that feel personal.
Switching to shorter lengths (forearm size) instantly made everything calmer. I also learned to separate strands slowly,
like I was handling a delicate pastry. When I rushed, the floss punished me with knots. When I treated it gently,
it behaved like a polite guest.
Next came the “chart confidence” phase. I started out trying to stitch wherever my eyes landed, which is how you end up
with a flower that slowly migrates across the fabric like it’s searching for a better neighborhood. Starting in the center
helped a lot. So did working in small chunkslike finishing one color in a small area instead of bouncing around the chart.
I began highlighting completed symbols and suddenly my project stopped feeling like a Where’s Waldo book.
Then there was stitch direction. At first, I didn’t understand why people cared which way the top leg of the X went.
“It’s an X,” I thought, “the vibes are symmetrical.” Reader, the vibes are not symmetrical. Once I kept the top leg
consistent across the whole piece, the finished design looked smoother and more “intentional,” like I knew what I was doing
(which is the highest compliment a beginner can receive).
Finally: finishing. I used to think finishing meant “stop stitching.” Turns out finishing is the glow-up stage.
Pressing from the back (gentle heat), framing in the hoop, and trimming threads neatly made my first kit look like something
I’d actually display. And that little momentholding a completed piecewas what made me want to start the second kit.
That’s the beginner secret: choose a kit you can finish, because finishing is what turns “I tried cross stitch once”
into “okay wait, I’m a cross stitch person now.”