Table of Contents >> Show >> Hide
- What Are Barefoot Sandals, Exactly?
- Choose Your Style Before You Buy Supplies
- Materials and Tools You May Need
- How to Measure for Barefoot Sandals
- Step-by-Step: How to Make Easy Beaded Barefoot Sandals
- Step 1: Plan your design
- Step 2: Cut your cord
- Step 3: Make the toe loop
- Step 4: Add the center connector section
- Step 5: Build the foot design symmetrically
- Step 6: Continue toward the ankle
- Step 7: Test the fit before finishing
- Step 8: Secure the ends
- Step 9: Repeat for the second sandal
- Step 10: Wear them smartly
- How to Make Them Look Better Than a First Draft
- Macramé Barefoot Sandals: The Boho Option
- If You Actually Meant Sole-Style Barefoot Sandals
- Common Mistakes to Avoid
- How to Care for Barefoot Sandals
- Beginner Experiences: What Making Barefoot Sandals Usually Feels Like
- Conclusion
- SEO Tags
If regular sandals feel a little too sensible for your beach-day alter ego, barefoot sandals might be your craft project soulmate. They are part foot jewelry, part boho accessory, and part “Wait, you made those yourself?” conversation starter. Best of all, they can be as simple or as fancy as you want. You can make a pair with stretch cord and seed beads in one afternoon, go full goddess mode with macramé knots, or even build minimalist sole-style barefoot sandals if you mean the practical kind instead of the pretty kind.
This guide walks you through the whole thing in plain English: what barefoot sandals are, which materials work best, how to measure your feet, how to make an easy beginner pair, and how to avoid the classic mistakes that turn a dreamy DIY into a tiny ankle tantrum. We will focus mainly on jewelry-style barefoot sandals, because that is what most crafters mean by the term. Still, if you came here hoping for a minimalist leather-and-lace version, do not worry. There is a section for that, too.
Grab your beads, your cord, and your patience. Not a saint-level amount of patience. Just enough to keep your beads from launching themselves onto the floor like microscopic rebels.
What Are Barefoot Sandals, Exactly?
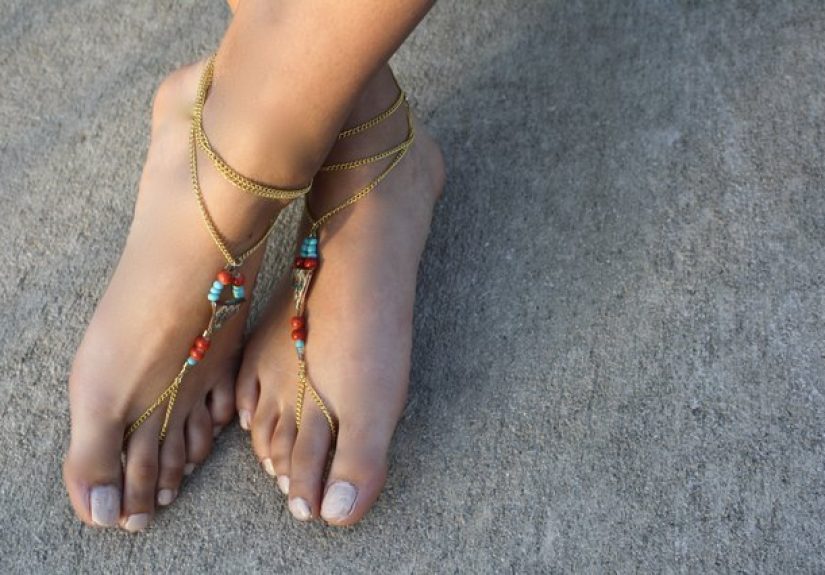
Most barefoot sandals are decorative pieces that sit on the foot without a sole. They usually include a toe loop, a beaded or knotted section that runs up the top of the foot, and an anklet or tie that wraps around the ankle. Think of them as a mash-up between a toe ring and an anklet, with enough flair to make a swimsuit, sundress, or beach wedding outfit look instantly more styled.
There is also another meaning of barefoot sandals: minimalist sole-style sandals, often inspired by huaraches, that use a thin sole and simple lacing system. Those are made more like footwear. Jewelry-style barefoot sandals are made more like accessories. Same phrase, very different vibe.
Choose Your Style Before You Buy Supplies
1. Stretch-cord beaded barefoot sandals
This is the easiest place to start. Stretch cord is forgiving, beginner-friendly, and comfortable to wear. You string the beads, tie secure knots, hide the knot if possible, and call yourself crafty before dinner. If you want a quick DIY barefoot sandals project, this is the one.
2. Beading-wire sandals with a clasp
These look a little more polished and jewelry-like. Instead of stretch cord, you use flexible beading wire, crimp beads, jump rings, and a clasp. This style is great for dressier designs, especially beach wedding sandals with crystals, pearls, or metallic accents.
3. Macramé barefoot sandals
If your ideal accessory looks like it wandered in from a music festival and somehow became fabulous, go with macramé. Square knots, braided ties, and a few carefully placed beads create a softer, more textile-heavy look. This style works especially well for boho outfits and lace details.
4. Minimalist leather barefoot sandals
If you want something you can actually walk around in for more than a pretty photo, this is the practical option. It involves tracing a pattern, cutting a sole, punching lace holes, and adjusting the laces for fit. It is more work, but it is real footwear instead of foot jewelry pretending to be footwear. No judgment. Pretending beautifully is still a talent.
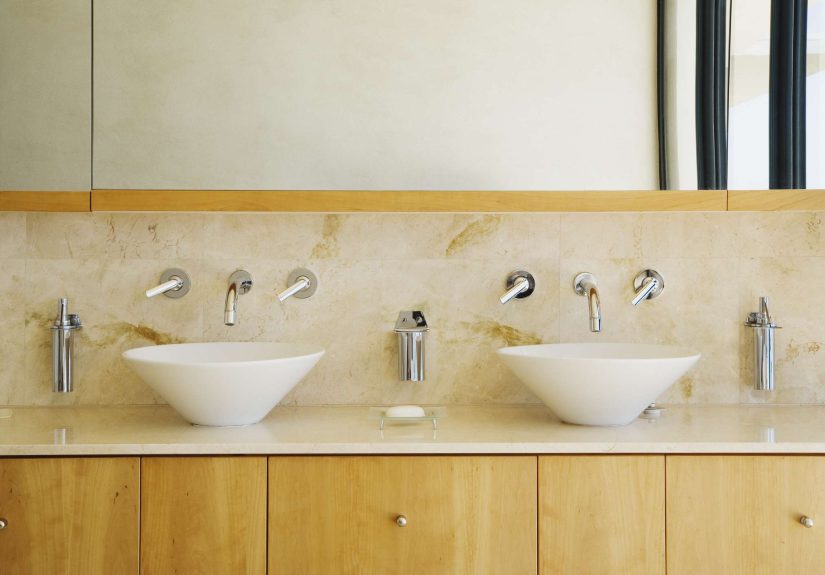
Materials and Tools You May Need
The exact supply list depends on the style you choose, but most beginner projects use some version of the following:
- Seed beads for the toe loop area
- Larger accent beads for the top of the foot
- Stretch cord, jewelry elastic, nylon cord, or beading wire
- Crimp beads or crimp tubes if you are using beading wire
- Jump rings and a clasp for a removable ankle closure
- Macramé cord or hemp cord for knotted designs
- Scissors
- Jewelry pliers or crimping pliers
- Ruler or soft measuring tape
- Clear jewelry glue or clear nail polish for securing elastic knots
- A bead mat, towel, or felt surface so your beads do not roll away like tiny escape artists
One small but important rule: use your smallest, smoothest beads for the section that sits between your toes. That area gets grumpy fast if you put chunky, scratchy beads there.
How to Measure for Barefoot Sandals
Good fit is the difference between “I made these!” and “Why is my toe negotiating with me?” Before you cut anything, measure your foot in four parts:
- Toe loop: Measure gently around the toe you want the loop to sit on, usually the second toe.
- Top-of-foot length: Measure from the toe loop area up the center of your foot to the point where the design should split or reach the ankle.
- Ankle: Measure around your ankle if you want a clasped anklet closure.
- Tie length: If you are making wrap-style or macramé ties, add extra length so you can knot or wrap them comfortably.
Do not pull the tape too tightly. Your sandal should feel secure, not cling to your foot like it pays rent there. It is also smart to test the fit as you go, especially after building the toe loop and the center section.
Step-by-Step: How to Make Easy Beaded Barefoot Sandals
This beginner version uses stretch cord, which makes it one of the simplest ways to learn how to make barefoot sandals at home.
Step 1: Plan your design
Choose a color palette before you start stringing. This sounds obvious, but many DIY projects have been emotionally damaged by the sentence, “I’ll just wing it.” Pick one focal bead, one small bead, and one spacer style. That is enough to make the design feel intentional without making your bead tray look like a tiny craft tornado.
Step 2: Cut your cord
Cut a generous length of stretch cord for each sandal. Beginners should always cut more than they think they need. Extra cord is mildly annoying. Running out halfway through is a dramatic plot twist nobody asked for.
Step 3: Make the toe loop
Find the center of your cord and start stringing small seed beads. Check the loop against your toe before you continue. The loop should slide on comfortably and stay put without pinching. This is the foundation of the whole sandal, so do not rush it.
Step 4: Add the center connector section
Once the toe loop is the right size, add your next set of beads moving up the top of the foot. Many good designs place smaller beads near the toe and gradually introduce larger beads as the sandal moves upward. That helps with comfort and gives the piece a balanced shape.
Step 5: Build the foot design symmetrically
After the center point, begin working outward so both sides match. You can use the same sequence on each side or create mirrored sections with spacer beads, faceted beads, or decorative connectors. Symmetry makes the sandal look more polished, even if you are crafting at the kitchen table next to a cup of coffee and a questionable life plan.
Step 6: Continue toward the ankle
As the design reaches the ankle area, switch back to lighter, more flexible beading. You want enough structure to look pretty, but enough softness to move with your foot. If you are making a slip-on stretch version, continue the bead pattern until it fits around the ankle. If you are making a tie version, stop earlier and leave enough cord to knot or wrap.
Step 7: Test the fit before finishing
Try the sandal on before tying the final knots. This is not optional. This is the part that saves you from making a sandal for a foot that exists only in your imagination. Check the toe loop, the center tension, and the ankle fit. If the top section pulls too tightly, add a little length. If it droops, remove a few beads.
Step 8: Secure the ends
Tie multiple tight knots in the same place. Then add a tiny amount of jewelry glue or clear nail polish to help keep the knot secure. Let it dry fully before trimming the ends. Better yet, hide the knot inside a larger bead if your design allows it. Hidden knots look neat and save you from staring at your own shortcuts later.
Step 9: Repeat for the second sandal
Yes, you do have to make two. Tragic, but true. The easiest way to keep the pair consistent is to lay the finished one beside your work as a reference while you make the second.
Step 10: Wear them smartly
Jewelry-style barefoot sandals are best for photos, beach lounging, poolside styling, bridal looks, and light walking on soft surfaces. They are not built for power-walking across a parking lot in July. Your feet deserve better, and hot pavement is not a personality test.
How to Make Them Look Better Than a First Draft
If you want your beaded barefoot sandals to look elegant instead of homemade in the suspicious sense, keep these design tips in mind:
- Use tiny beads between the toes and save larger accents for the top of the foot.
- Repeat shapes and colors in a simple rhythm so the design looks intentional.
- Limit yourself to one standout feature, such as pearls, crystals, floral beads, or a center charm.
- Choose soft neutrals for bridal sandals, bright glass beads for beachwear, or metallic accents for a dressier finish.
- Set up your beads on a towel or felt mat first so you can preview the pattern before stringing.
In other words, edit your beads the way you would edit a great outfit: if five things are trying to be the main character, nobody wins.
Macramé Barefoot Sandals: The Boho Option
If beads are not your thing, macramé barefoot sandals are a great alternative. The basic process is simple: create a toe loop, build the center section with square knots, thread beads into selected knots if you want extra detail, then split the strands and braid or wrap the ankle ties.
This style looks especially nice with cotton cord, hemp cord, or waxed cord. It feels softer and more organic than a full beaded design, and it is easy to customize. You can keep it plain and earthy, add a line of metallic beads, or finish the ankle ties with tiny charms. A macramé version also gives you more room to play with texture, which is great if you love the handmade, slightly undone aesthetic.
If You Actually Meant Sole-Style Barefoot Sandals
Maybe you clicked this article hoping to make minimalist sandals you can wear outdoors. Fair enough. Here is the short version.
- Trace your foot or an existing sandal onto paper.
- Adjust the pattern until it fits the shape you want.
- Trace that pattern onto your sole material, such as leather and rubber.
- Cut the sole carefully and trim it cleanly.
- Punch lace holes where the straps or cords will pass through.
- Thread the laces and test different tying methods for comfort and security.
- Walk indoors first and adjust the lacing before taking them outside.
Minimalist barefoot sandals require more precision than jewelry-style ones, because now you are building actual footwear. But the tradeoff is useful: you get something you can wear for real-life movement, not just for looking like the main character in a beach photo shoot.
Common Mistakes to Avoid
- Using large beads at the toe loop: pretty, yes; comfortable, not always.
- Choosing the wrong cord thickness: if the cord is too thick, it will fight the bead holes. If it is too thin, the whole thing may feel flimsy.
- Skipping the mid-project fitting: this is how sandals become decorative regrets.
- Trimming elastic too early: wait until the glue is fully dry and the fit is confirmed.
- Making the ankle too tight: remember that feet swell a little in heat.
- Forgetting the use case: jewelry-style sandals are accessories, not marathon gear.
How to Care for Barefoot Sandals
Store them flat, preferably in a soft pouch or small box so the beads do not snag on other jewelry. Keep them away from salt water, chlorine, and sunscreen residue when possible, especially if you used glued knots or plated metal findings. If they get sandy, wipe them gently with a soft cloth and let them dry completely before storing them. Barefoot sandals are tiny divas. Treat them kindly and they will keep being photogenic.
Beginner Experiences: What Making Barefoot Sandals Usually Feels Like
The first time most people make barefoot sandals, there is a very predictable emotional timeline. It starts with confidence. You look at some beads, a roll of cord, maybe a pair of pliers, and think, “How hard can this be?” This is adorable. Keep that optimism. It will help you through the next stage, which is dropping approximately fourteen beads and discovering that seed beads are scientifically designed to flee in opposite directions.
Then comes the surprisingly fun part: choosing the design. This is where you realize barefoot sandals are not just a craft project. They are a styling decision. Suddenly you are not merely picking beads. You are choosing a mood. Are you making something bridal and delicate? Beachy and colorful? Boho and knotted? Slightly dramatic in a way that says, “Yes, I did make jewelry for my feet, and I stand by that decision”?
Once you start building the toe loop, the project becomes more personal. You are not making a generic bracelet. You are making something that needs to fit your actual foot, which means you begin paying attention to comfort in a whole new way. Tiny beads that looked innocent on the table suddenly reveal themselves as either soft and wearable or weirdly sharp and uncooperative. Most beginners learn very quickly that the top of the foot can handle a lot of sparkle, but the space between the toes is a place for diplomacy, not chaos.
There is usually a small breakthrough moment when the first sandal finally starts to look like a sandal instead of an ambitious string of beads. That is the magic point. The toe loop is done, the center line is taking shape, and the ankle section starts to make visual sense. You try it on halfway through and think, “Oh. This is actually cute.” That moment alone is worth the project.
Of course, the second sandal is where the real character development happens. The first one was discovery. The second one is discipline. Now you have to match what you already made, which turns out to be harder than your earlier, more carefree self believed. This is why experienced makers line up beads in order, count patterns, and keep the first sandal nearby. Future-you always ends up cleaning up after excited beginner-you.
What people often enjoy most about the experience is that it feels calm without being boring. It is repetitive enough to be relaxing, but creative enough to stay interesting. You can make a pair in your favorite colors, match them to a vacation outfit, build a bridal accessory for a beach ceremony, or just make something whimsical because regular accessories seem too committed to staying above the ankle.
And when the project is finished, there is a weirdly satisfying kind of pride in wearing something that makes people ask where you got it. Saying “I made them” about something on your feet feels unexpectedly powerful. Also slightly theatrical. In the best way.
Conclusion
Learning how to make barefoot sandals is one of those DIY wins that gives you a lot of style for a relatively small amount of effort. Start with a simple stretch-cord design if you are new, move up to wire-and-clasp styles if you want a more polished finish, and try macramé if you love texture and a handmade look. If your goal is actual footwear, minimalist sole-style sandals are a different build, but still a rewarding one.
The secret is not fancy tools or expert-level skill. It is smart measuring, comfortable materials, and a design that knows when to stop before turning into a craft-store hostage situation. Keep the toe area soft, test the fit before finishing, and let the style do the talking. Your feet have waited long enough for their jewelry era.