Table of Contents >> Show >> Hide
- What You’ll Learn
- A Quick Reality Check (Permits, Height, and Safety)
- Planning a Wall That Won’t Lean Like It’s Tired
- Materials & Tools (And What Actually Matters)
- Build Overview: The Core Steps That Make a Wall Last
- Step 1: Call before you dig and mark your layout
- Step 2: Excavate for a stable footing and base
- Step 3: Build the base like you’re laying railroad track
- Step 4: Lay the first course perfectly level
- Step 5: Add drainage and backfill as you go
- Step 6: Reinforce and grout where required
- Step 7: Finish the top and control surface water
- Drainage Details (The Part Most Walls Fail)
- Reinforcement & Grout: When “Hollow Blocks” Stop Being Hollow
- Common Mistakes (And How to Avoid Them)
- Cost, Timeline, and When to Call a Pro
- Experience Notes: Real-World Lessons People Learn Building CMU Retaining Walls (Extra 500+ Words)
- Lesson 1: The first day is mostly “invisible progress”
- Lesson 2: A tiny out-of-level error becomes a big personality trait
- Lesson 3: Drainage is not an accessoryit’s structural
- Lesson 4: Handling blocks is a workoutand teamwork changes everything
- Lesson 5: Finishing touches are what make it look professional
- Conclusion
Building a cinderblock retaining wall is a little like making lasagna: layers matter, sauce (a.k.a. drainage) is
non-negotiable, and if you rush the foundation, everything slumps in a way that makes you question your life choices.
The good news? When you plan it right, a concrete masonry unit (CMU) wall can be strong, tidy, and satisfyingly
“I did that” every time you walk past it.
One important note before we get into the fun stuff: retaining walls hold back soil, and soil is heavy. Add water,
and it gets heavier and pushier. That’s why good retaining walls are less about “stacking blocks” and more about
managing forcesespecially water pressure behind the wall.
A Quick Reality Check (Permits, Height, and Safety)
Most “backyard” retaining wall disasters don’t happen because someone used the wrong block. They happen because the wall
was built too tall for a DIY approach, built without drainage, or built where the soil and water conditions needed an
engineered design.
Height is not just a number
Many U.S. jurisdictions use a common rule of thumb: once a retaining wall is around 4 feet high (often measured
from the bottom of footing to top of wall), permits and/or engineering may be requiredespecially if the wall supports
extra loads like a driveway, slope surcharge, or structures nearby. Always check local requirements before you dig.
Safety matters more than bragging rights
CMU blocks are heavy, and excavation work can be risky. If you’re under 18 or not experienced with this kind of work,
involve a qualified adult and consider hiring a pro for excavation, drainage tie-ins, or structural reinforcement.
Even if you do the “stacking,” a professional consult can save you from rebuilding it next season.
Planning a Wall That Won’t Lean Like It’s Tired
A retaining wall is basically an argument between gravity and soil pressure. Your job is to help gravity win without
turning your yard into an engineering thesis.
Know what type of wall you’re building
-
Low garden wall (short, mostly decorative): Think edging, small elevation changes, and planting beds.
Still needs drainage and a good base. -
Structural retaining wall (holds a slope back): Needs real drainage, stable footing, and often reinforcement.
If tall or near anything important, get an engineer’s input.
Measure the site like you’re betting money on it
Sketch your wall length, height, and where water currently flows. Look for:
- Downspouts that dump near the wall line
- Low spots where water collects after rain
- Clay-heavy soil that stays wet and sticky
- Nearby trees (roots can push and soils can shift)
- Any slope above the wall that adds extra pressure
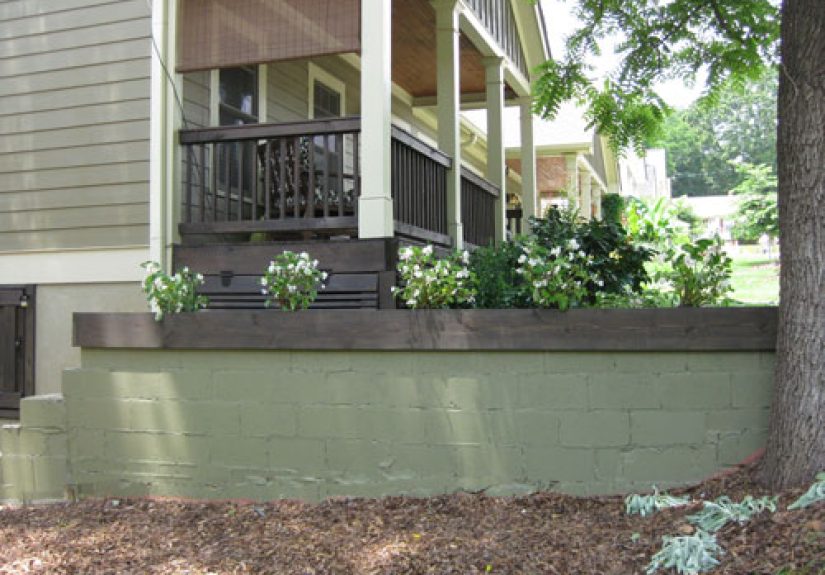
Decide on your look: bare block, veneer, or cap-and-clean
Cinderblock can look modern and minimal with a good cap and crisp lines, or it can be faced with stone/brick veneer
for a more finished look. The structure comes first; the pretty part comes later.
Materials & Tools (And What Actually Matters)
If you take only one idea from this article, make it this: your base and your drainage do most of the heavy lifting.
The blocks are just the visible part of the system.
Core materials
- Concrete masonry units (CMU): Standard “cinderblocks” (usually concrete, not actual cinders).
- Mortar: Commonly Type S for stronger masonry applications (follow local specs and product guidance).
- Crushed stone base: Angular crushed stone compacts well and drains better than random “pit gravel.”
- Drainage aggregate: Clean, free-draining gravel behind the wall.
- Geotextile/landscape fabric: Helps keep soil from clogging the drainage stone.
- Perforated drain pipe: Often 4-inch perforated pipe behind the base, sloped to daylight or an approved outlet.
- Rebar & grout (if reinforced): Vertical rebar in cores, grout to lock it together, bond beam units where needed.
Tools (high-level)
- String line, stakes, tape measure, line level
- Shovel, digging bar, wheelbarrow
- Hand tamper (or compaction tool operated by an experienced adult)
- Mason’s trowel, jointer, masonry brush
- Safety gear: gloves, eye protection, dust mask (especially around dry mortar and stone dust)
Tip: If you think you can “eyeball level,” congratulationsyour wall will be the first retaining wall to defeat physics.
Spoiler: physics does not lose.
Build Overview: The Core Steps That Make a Wall Last
This is an overview intended for general education and planning. Exact dimensions, reinforcement patterns, footing depth,
and drainage routing depend on soil, height, and local code. For taller walls or tricky sites, get professional guidance.
Step 1: Call before you dig and mark your layout
Before excavation, contact local utility locating services (often “811” in the U.S.) and mark your wall line with
stakes and string. Use a gentle curve if you cancurves improve stability and look great.
Step 2: Excavate for a stable footing and base
Your trench needs to accommodate the wall thickness plus working room, and it needs to be deep enough for:
- A compacted crushed-stone base layer
- A concrete footing if your design calls for it (common for CMU retaining walls)
- At least part of the first course below grade for stability and to reduce sliding
If your area has freeze-thaw cycles, footing depth may need to consider frost conditions. In any case, the goal is
a base that won’t settle unevenly.
Step 3: Build the base like you’re laying railroad track
Add crushed stone, level it, and compact it in layers. Many reliable guides emphasize starting with a solid crushed-stone
foundation because it drains and compacts well. The base is where walls either earn their long life… or start drafting
their apology letter.
Step 4: Lay the first course perfectly level
The first course is the boss level of the project. If it’s out of level, everything above it will be out of level.
Use a mortar bed if you’re building a mortared CMU wall, and check level front-to-back and side-to-side.
Step 5: Add drainage and backfill as you go
Don’t build the whole wall and then dump backfill behind it like you’re frosting a cake. Backfill in stages, compact
in lifts, and keep your drainage zone clean and free-draining. This reduces pressure and helps the wall stay put.
Step 6: Reinforce and grout where required
For structural retaining walls, reinforcement (rebar) and grouted cores are common strategies. This is where CMU stops
behaving like a stack of hollow blocks and starts behaving like a single reinforced masonry system.
Step 7: Finish the top and control surface water
Cap the wall (cap units or formed concrete), and grade the top area so surface water sheds away from the wall rather
than racing straight to the backfill. Think of it as teaching rain to mind its business.
Drainage Details (The Part Most Walls Fail)
Retaining walls don’t usually fail because dirt is mean. They fail because water gets trapped behind the wall,
increasing pressure and weakening the backfill.
The basic drainage “stack” behind a wall
- Free-draining gravel zone directly behind the blocks
- Filter fabric between native soil and the gravel to keep fines from clogging the stone
- Perforated drain pipe at the base, surrounded by gravel, sloped to an outlet
Where the drain pipe goes matters
A pipe that “has nowhere to go” is basically a decorative tube. The pipe needs a real outletdaylight at a downslope
location, tie-in to an approved drainage system, or another permitted discharge route. The point is to give water an
easy exit so it doesn’t press on your wall.
Weep holes: old-school, still useful
Some masonry retaining walls also include weep holes to let water escape. If your wall design uses weeps, place them
consistently and keep them clear. (A weep hole clogged with mud is just a wall decoration.)
If you’re wondering whether drainage is “really necessary,” here’s the blunt answer: if you want the wall to last,
drainage is the price of admission.
Reinforcement & Grout: When “Hollow Blocks” Stop Being Hollow
Many cinderblock (CMU) retaining walls rely on reinforcement and grout to create a stronger, unified structure. In
reinforced masonry construction, grout bonds the reinforcement to the masonry so loads can be resisted more reliably.
Common reinforcement concepts (design-dependent)
- Vertical rebar in selected cores: Often placed in specific cells on a repeating pattern.
- Bond beam courses: Horizontal reinforcement in special units near the top or at intervals.
- Grouted cells: Cores filled with masonry grout to lock rebar and block together.
Grout isn’t just “wet concrete”
Masonry grout is designed to flow into cores without segregating, and it’s used to fully surround reinforcement in
grouted cells. Different grout types exist depending on core size and specification.
Translation: if your wall needs reinforcement, treat grout and rebar as part of the structural system, not an optional
upgrade like heated seats.
Common Mistakes (And How to Avoid Them)
1) Skipping drainage because “my yard seems dry”
Your yard might be dryuntil it isn’t. Heavy storms, seasonal groundwater, and irrigation can all build pressure behind
a wall. Drainage is cheap compared to rebuilding.
2) Using rounded gravel where crushed stone is needed
Rounded stones don’t lock together as well as angular crushed stone, which makes compaction weaker and settlement more likely.
For bases and drainage zones, clean, angular stone is usually the better performer.
3) Building tall walls without engineering
Taller walls experience much higher lateral forces, and site conditions (clay soils, steep slopes, nearby loads) can make
“rules of thumb” unreliable. If your wall is approaching typical permit/engineering thresholds, don’t guess.
4) Backfilling all at once
Dumping all the soil behind a wall at the end invites uneven compaction and pressure. Backfill gradually, compact in
layers, and keep the drainage zone clean.
5) Ignoring surface water
Even perfect behind-the-wall drainage can be overwhelmed if you funnel roof runoff or slope water straight into the backfill.
Extend downspouts and grade surfaces to shed water away.
Cost, Timeline, and When to Call a Pro
Cinderblock retaining walls can be budget-friendly on materials, but they’re labor-intensive. Costs vary by height, site
access, soil, drainage complexity, and whether reinforcement is required.
Where budgets usually go
- Excavation and hauling: The “hidden” costmoving dirt is the whole game.
- Base and drainage materials: Crushed stone, gravel, pipe, fabric.
- Mortar, rebar, grout: More important as the wall becomes structural.
- Finishing: Caps, veneer, waterproofing coatings (if used), landscaping repair.
When it’s smart to hire help
- Walls near or above common permit/engineering thresholds (often around 4 feet)
- Walls supporting driveways, patios, structures, or steep slopes
- Clay soils, wet areas, or sites with known drainage problems
- Any project where you can’t create a safe, reliable drainage outlet
There’s no shame in hiring pros for the high-risk parts (layout, excavation, drainage tie-in, engineering) and doing the
finishing work yourself. That’s not “cheating.” That’s “having a wall that still exists in five years.”
Experience Notes: Real-World Lessons People Learn Building CMU Retaining Walls (Extra 500+ Words)
People who’ve built cinderblock retaining walls tend to agree on one thing: the project is never as “small” as it looks
when you’re staring at the slope with a coffee in hand. It’s not just stacking blocks; it’s digging, hauling, leveling,
compacting, and making peace with the fact that your weekend will involve more gravel than you thought gravel even
existed.
Lesson 1: The first day is mostly “invisible progress”
One of the most common first-timer surprises is how long it takes before the wall starts to look like a wall. The early
effortlayout, trenching, compacting basedoesn’t photograph well. There’s no dramatic “before/after” moment when you’re
staring at a carefully leveled trench and thinking, “Did I just spend six hours making a rectangle in the ground?”
But that rectangle is the reason the wall won’t settle unevenly later. Experienced DIYers will tell you the base work
is where you earn longevity.
Lesson 2: A tiny out-of-level error becomes a big personality trait
A wall doesn’t politely “stay slightly off.” If your first course is out of level by even a little, every course above
it magnifies that problem until the top looks like it’s trying to escape. Builders often learn to slow down early:
check level, check straightness, and re-check after you adjust. The time you spend getting the first course perfect is
repaid when the rest of the wall stacks cleanly instead of turning into a constant correction battle.
Lesson 3: Drainage is not an accessoryit’s structural
People who’ve had to repair a leaning wall get religion about drainage. Even if you live in a place that “doesn’t get
much rain,” irrigation, runoff, and seasonal groundwater can still load the back of the wall with pressure. Experienced
builders talk about drainage like it’s part of the wall, not something “behind” it: clean gravel, fabric separation,
pipe that actually drains somewhere, and surface grading so you’re not feeding water into the system. They also learn
that a clogged drainage zone is a slow-motion problemyou might not notice it immediately, but one wet season later the
wall starts telling on itself with cracks, bulges, or movement.
Lesson 4: Handling blocks is a workoutand teamwork changes everything
CMU blocks are heavy enough that “I’ll just move these real quick” becomes “Why is my back sending me angry emails?”
Many DIYers say the project got dramatically easier once they planned the workflow: staging blocks close to the wall,
mixing mortar in manageable batches, and using a helper for lifting and alignment. The same people often say they’d
rather pay for block delivery and a helper than pay later for a chiropractor and regret.
Lesson 5: Finishing touches are what make it look professional
Even a structurally sound wall can look rough if joints are messy, caps aren’t aligned, and the surrounding grade is
uneven. People who love their finished wall usually mention the same details: clean joint tooling, consistent lines,
a tidy cap, and landscaping that hides the “construction zone” scars. The wall becomes part of the yard instead of a
thing that looks like it was dropped there by a cement truck with attitude.
The overall takeaway from real-world experience is comforting: the project is very doable when kept to the right size
and planned carefully, but it rewards patience and punishes shortcuts. If you build it like water exists and gravity is
watchingbecause they areyou’ll end up with a wall that feels solid, looks sharp, and doesn’t slowly creep forward like
it’s trying to join you for dinner.