Table of Contents >> Show >> Hide
- 1) Start With the “Fixed Elements” You Can’t Easily Change
- 2) Keep the Palette Simple: Two Colors Plus an Accent
- 3) Choose a Siding Color That Plays Nice With Sunlight
- 4) Updating Exterior Trim: Where the “New House” Feeling Comes From
- 5) Choose an Accent Color That Looks Intentional All Year
- 6) Siding Material & Climate: The Practical Stuff That Saves Regret
- 7) Test Colors the Right Way (So Sunlight Doesn’t Humiliate You)
- 8) Don’t Ignore Sheen: It Changes the Whole Look
- Six Siding + Trim Combos That Usually Work
- 1) Warm greige siding + soft white trim + black accents
- 2) Creamy off-white siding + warm white trim + natural wood door
- 3) Muted sage siding + creamy trim + bronze hardware
- 4) Navy siding + clean white trim + brass or wood accents
- 5) Charcoal siding + low-contrast trim + bold door
- 6) Light gray siding + white trim + red or deep green door
- Final Check Before You Commit
- Conclusion
- Our Experience: Picking A New Siding Color & Updating Our Exterior Trim
- SEO Tags
Picking a new siding color sounds like a fun weekend project until you realize you’re choosing the backdrop for every delivery photo, every “we’re home!” selfie, and every neighborly wave you’ll ever make. It’s not just paint or sidingit’s curb appeal, resale value, and your daily mood when you pull into the driveway.
The secret to getting it right is boring (in a good way): start with what can’t change, narrow choices with a few science-y shortcuts, and test in real outdoor light. Do that, and your exterior trim update won’t look like a last-minute cover-upit’ll look like a thoughtful refresh that fits your home’s style.
1) Start With the “Fixed Elements” You Can’t Easily Change
Before you fall in love with a color name like “Storm Cloud Whisper” or “Dramatic Owl,” take a quick inventory of your home’s fixed elementsroof, brick, stone, hardscape, and window frames. These aren’t accents; they’re the supporting cast that either makes your new siding color look expensive or makes it look like it showed up to the wrong party.
Fixed-element checklist
- Roof: warm brown, cool charcoal, black metal, clay tile, weathered cedar
- Masonry: brick/stone undertones (pink/orange vs. taupe/gray vs. blue/green)
- Hardscape: driveway, porch, pavers, steps, retaining walls
- Windows & gutters: white, bronze, black, “almond,” or painted wood
Quick rule: if your roof and stone read warm, choose siding colors that are warm or truly neutral. If your roof and masonry read cool, choose cooler or truly neutral siding. “Warm vs. cool” matters more than you thinkespecially in full sun, where undertones get loud.
2) Keep the Palette Simple: Two Colors Plus an Accent
Most great-looking exteriors stick to a small palette: a body color (your siding), a trim color (fascia, window trim, columns), and an accent (front door, shutters, maybe the garage door). When you add too many colors, the house can look busyeven if each color is “nice” on its own.
A practical way to think about it: body color does most of the work, trim supports it, and the accent gets to be the main character for about 10% of the exterior. If you want to be bold, go bold on the door first. Doors are cheap to repaint; entire houses are not.
3) Choose a Siding Color That Plays Nice With Sunlight
Undertones: the reason “gray” turns purple at dusk
Two colors can both be labeled “gray” and still behave completely differently outside. One gray may lean blue, another green, another violet. These undertones get amplified by your surroundingsgreen lawns reflect green, red brick reflects warmth, and shade can pull out cooler tones.
Fast undertone test: compare your sample against a clean white and a true gray. Then hold it next to your brick or stone. If the masonry suddenly looks muddy or oddly pink, that’s your undertone problem saying hello.
LRV: a shortcut for controlling how light or dark you go
LRV (Light Reflectance Value) is a 0–100 scale describing how much light a color reflects0 is black, 100 is white. Higher LRV colors look brighter (and can make a home feel larger). Lower LRV colors look richer and more dramatic, but they can absorb more heat and may fade faster in harsh sun.
If your home is heavily shaded, a mid-tone or slightly lighter color can keep it from feeling gloomy. If your home sits in strong, open sunlight, ultra-light colors can read stark, and ultra-dark colors can look intense (and show dust, pollen, and water spots like it’s their hobby).
4) Updating Exterior Trim: Where the “New House” Feeling Comes From
Fresh trim color is one of the fastest ways to modernize an exterior. Old trim often drifts into a creamy-yellow zone over time, especially against newer windows or roofing. Updating trim makes edges sharper, proportions cleaner, and details look intentional.
Two trim strategies that work almost everywhere
- Crisp contrast: lighter trim against a darker or mid-tone body color. Great for traditional styles and homes with nice window proportions.
- Low-contrast modern: trim close to the body color (slightly lighter or darker). Great for simplifying busy elevations and making the home feel contemporary.
Trim targets that matter most
- Window trim: frames the “eyes” of the house
- Fascia & soffit: cleans up rooflines and overhangs
- Columns & railings: controls first impressions at the entry
- Gutters & downspouts: paint to match body or trim so they visually disappear
If you’re replacing siding and trim boards, consider whether you want a thicker, more substantial trim profile. Slightly wider trim can make windows feel larger and the home feel more customespecially on simple facades.
5) Choose an Accent Color That Looks Intentional All Year
Your accent color is usually the front door and (if you have them) shutters. This is where you can add personality without committing your entire exterior to a trend.
Accent colors that age well
- Deep green: classic, nature-friendly, and surprisingly flexible
- Navy: tailored and timeless when paired with clean trim
- Black or charcoal: crisp, modern, and works with most neutrals
- Warm wood: adds organic warmth, especially with stone
Shutters are optional. If your shutters are undersized, flimsy, or purely decorative in a way that looks off, removing them can be more modern than repainting them. The goal is “designed,” not “added because the catalog had them.”
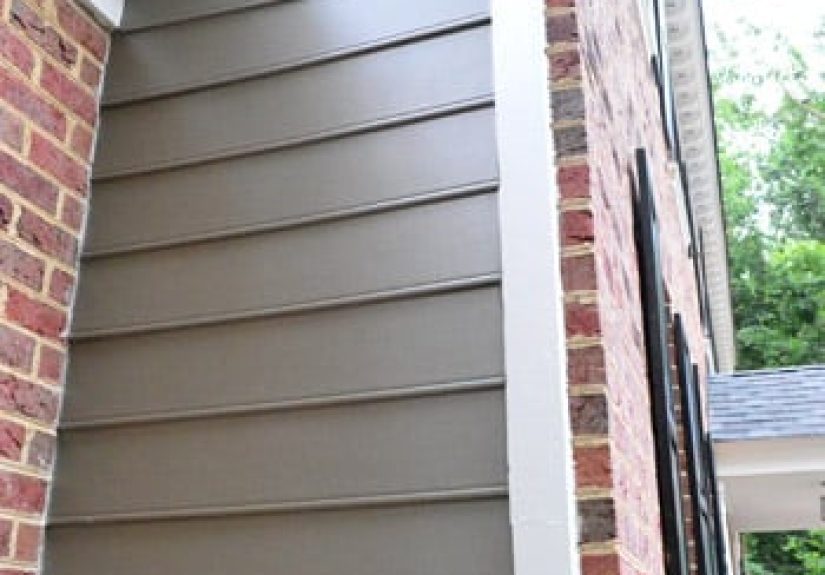
6) Siding Material & Climate: The Practical Stuff That Saves Regret
Color isn’t just aestheticmaterial and climate can limit your options.
Vinyl siding
If you’re painting vinyl, avoid choosing a much darker color than the original. Dark colors absorb more heat, and excess heat can contribute to warping or buckling. If you want a dark look, check manufacturer guidance and consider replacing the siding instead of repainting.
Fiber cement and engineered wood
These materials generally tolerate repainting and deeper colors better than vinyl. If you’re replacing siding, factory-finished options can offer strong durability and consistent color. Even then, remember that darker colors tend to show fading sooner in intense UV exposure.
Wood
Wood can look amazing, but it needs maintenance. Dark colors can be gorgeous on woodjust be realistic about prep, priming, and repaint intervals, especially in wet, humid, or coastal climates.
7) Test Colors the Right Way (So Sunlight Doesn’t Humiliate You)
Exterior colors must be tested outdoors. A chip that looked perfect under warm indoor lights can look completely different in real daylight.
A simple, effective testing routine
- Use big samples: paint poster boards or sample panels (at least 2 ft x 2 ft).
- Add a white border: it prevents your current siding color from skewing perception.
- Move the sample: test on sunny and shady sides of the house.
- Check multiple times: morning, afternoon, dusk, and after rain.
- View from the street: that’s how most people see your home.
Take photos. Your eyes adapt quickly; your camera doesn’t care about your feelings. If a color looks weird in every photo, it will look weird in real life, too.
8) Don’t Ignore Sheen: It Changes the Whole Look
Sheen affects appearance, durability, and how much texture shows. A common approach is a lower sheen on the body and a slightly higher sheen on trim for a crisp edge.
- Body: flat to satin (satin is a popular “durable but not shiny” choice)
- Trim: satin to semi-gloss for better washability and definition
- Front door: semi-gloss to gloss for durability and visual punch
If your trim is older, rough, or heavily patched, very glossy finishes can highlight every bump. Satin on trim can still look clean without acting like a spotlight.
Six Siding + Trim Combos That Usually Work
Use these as starting points, then tweak undertones to match your roof and masonry.
1) Warm greige siding + soft white trim + black accents
Easy, flexible, and works in many neighborhoods. Black accents modernize without overwhelming.
2) Creamy off-white siding + warm white trim + natural wood door
Two whites can work when they’re intentionally different. Wood adds depth and warmth.
3) Muted sage siding + creamy trim + bronze hardware
Great with stone and landscaping. Sage reads “color” without being loud.
4) Navy siding + clean white trim + brass or wood accents
Classic and tailored. Looks especially sharp with simple trim lines.
5) Charcoal siding + low-contrast trim + bold door
Modern and calm. Keep landscaping lively so the exterior doesn’t feel flat.
6) Light gray siding + white trim + red or deep green door
A traditional look that still feels fresh, especially with upgraded lighting and house numbers.
Final Check Before You Commit
- Stand 30 feet back: exteriors are judged at a distance.
- Look at your neighbors: aim to complement the street without disappearing.
- Check rules: HOA or historic district guidelines can limit color choices.
- Plan the order: repair & prep first, then body color, then trim, then accents.
Conclusion
Picking a new siding color and updating exterior trim is equal parts design and damage controldamage control against sunlight, undertones, and that one neighbor who will absolutely comment on your choices. Start with your fixed elements, keep the palette tight, use LRV and undertones to narrow options, and test large samples outdoors. Then choose trim that either crisps up the architecture or modernizes it with subtle contrast, and let the front door handle the personality.
If you follow that process, your exterior won’t just look “new.” It’ll look rightlike it was always meant to be that way.
Our Experience: Picking A New Siding Color & Updating Our Exterior Trim
We went into our exterior update with the confidence of people who had watched three renovation videos and were therefore basically licensed professionals. Our plan was “pick a siding color, pick a trim color, done.” Then we met outdoor light, which is not a gentle teacher.
The first mistake: we chose a dramatic charcoal because it looked amazing online. On our actual house, it felt heavyespecially next to a warm, weathered-brown roof. Instead of “modern contrast,” it was “two colors refusing to make eye contact.” That was the moment we learned warm vs. cool isn’t a suggestion; it’s a law of nature.
The second mistake: we tried a greige that seemed perfectly neutral on the chip. In the afternoon shade it pulled green, and suddenly our stone looked oddly pink. We didn’t notice it until we moved the sample board to a different elevation. That little exercise saved us from an expensive “why does the house look seasick?” situation.
After that, we got serious. We painted big sample boards (not tiny swatches), added a white border around the edges, and moved them around the house like we were curating an outdoor art exhibit called “Please Stop Being Purple.” We checked them in the morning, at noon, at dusk, and after rain. Rainy light was the surprise MVPsome colors went muddy, while others stayed clean and calm.
Trim was its own mini-drama. We assumed trim was simply “white,” but our existing trim had aged into a creamy yellow that looked fine until we held a cleaner white next to it. Then it looked like it belonged in a sepia photo. A stark, bright white felt harsh in direct sun, so we landed on a softer warm white that still read fresh. Instantly, the windows looked sharper and the whole facade looked newerwithout glowing.
We also learned that sheen matters. We briefly flirted with a high-sheen look because it sounded “fresh.” On the body, it highlighted every texture and patch. On trim, it looked greatafter prep. We ended up with a durable, low-luster finish on the siding and a slightly higher sheen on trim so edges looked crisp without spotlighting every bump.
The unsung hero move was painting gutters and downspouts so they blended in. They stopped visually chopping up the exterior. Then we gave the front door a deeper accent color, which delivered the drama we wantedwithout turning the whole house into a trend experiment. In the end, we chose a balanced mid-tone neutral for siding, a warm clean white for trim, and one confident accent. It feels timeless but updated, and we didn’t repaint twice, which is the true victory condition.
One thing we wish we’d done sooner: treat the project like a tiny research study. We drove around at different times of day, snapping photos of exteriors we liked and jotting down what worked (roof + siding + trim + landscaping). We also used a simple digital mockup tool to preview directions, not to pick an exact shade, but to catch obvious mistakeslike how a certain gray made our warm roof look even browner. Finally, we tested the trim white next to our window frames and the garage door, because those items act like fixed elements too. A trim white that feels warm on fascia can look slightly gray next to bright-white windows, and that side-by-side test saved us from repainting the trim just to “match the windows,” which would have been a very expensive hobby.