Table of Contents >> Show >> Hide
- Why Learning Facial Structure Makes Everything Easier
- What You Need Before You Start
- How to Draw a Girl’s Face Step by Step
- Step 1: Sketch the Basic Head Shape
- Step 2: Draw a Vertical Center Line
- Step 3: Mark the Eye Line
- Step 4: Place the Nose and Mouth Guidelines
- Step 5: Add the Hairline and Ears
- Step 6: Draw the Eyes
- Step 7: Shape the Nose
- Step 8: Draw the Mouth and Lips
- Step 9: Refine the Jaw, Cheeks, and Chin
- Step 10: Draw the Hair as Masses First
- How to Shade a Girl’s Face So It Looks More Real
- How to Make the Face Look More Feminine Without Losing Realism
- Common Mistakes When Drawing a Girl’s Face
- Practice Tips That Actually Help
- A Simple Example of the Drawing Process
- Experiences Artists Often Have While Learning How to Draw a Girl’s Face
- Final Thoughts
Drawing a girl’s face sounds simple until your sketch somehow ends up looking like a surprised potato with eyeliner. The good news is that portrait drawing is not magic, and it is definitely not reserved for people who were apparently born holding a pencil like a tiny Renaissance master. It is a skill. That means you can learn it, repeat it, mess it up, erase it, and get better every time.
If you want to know how to draw a girl’s face in a way that looks balanced, expressive, and believable, the secret is not “draw better.” The secret is structure. Most strong portraits begin with proportion, simple guidelines, and an understanding of where the eyes, nose, mouth, ears, and hairline actually sit. Once those landmarks are in the right place, the face starts looking human. Then you can add style, personality, mood, and detail without the whole thing collapsing into chaos.
In this guide, you will learn a practical step-by-step method for drawing a girl’s face from the front, plus shading tips, common mistakes to avoid, and ways to make your portrait feel more natural. We will also talk about what artists usually mean when they aim for a more feminine face in a drawing. Spoiler: it is less about one “perfect” look and more about softer transitions, subtle shapes, and careful observation. Real faces vary a lot, and your drawing should leave room for that.
Why Learning Facial Structure Makes Everything Easier
Before you dive into eyelashes, glossy lips, or dramatic hair, you need the framework. Think of it like building a house. You do not start with throw pillows. You start with walls that stay upright. In portrait drawing, your walls are the head shape and the feature guidelines.
Most artists begin with an oval or egg-like head shape because it helps organize the face into clear sections. A common beginner mistake is drawing the eyes too high, the forehead too small, or the mouth too low. Another classic move is making one eye mysteriously larger than the other, as if the portrait just got shocking news. Guidelines solve this problem.
When you understand where the eyes sit, how far the nose falls, and how the mouth relates to both, you stop guessing. And when you stop guessing, drawing becomes much less stressful and a lot more fun.
What You Need Before You Start
You do not need fancy tools to draw a girl’s face. A regular pencil, eraser, and paper are enough. An HB pencil is great for sketching, while a softer pencil like 2B or 4B is useful for darker shadows and accents. A kneaded eraser helps lift graphite gently, which is perfect for soft highlights in the cheeks, nose, or lower lip.
If you are using digital tools, the same principles apply. Start light, build shapes first, and do not rush to detail. Whether your canvas is paper or a tablet, the face still follows structure.
How to Draw a Girl’s Face Step by Step
Step 1: Sketch the Basic Head Shape
Start with a lightly drawn oval or egg shape. Keep the top rounder and the lower part slightly narrower. Avoid making the chin too pointy unless you are drawing a very stylized character. For a more natural look, the jaw should taper gently instead of dropping into a sharp V like it is auditioning for a superhero comic.
At this stage, think of the head as a simple form, not a finished face. You are mapping territory, not decorating it yet.
Step 2: Draw a Vertical Center Line
Add a vertical line down the middle of the face. This helps keep both sides aligned. Even if the face is front-facing, tiny imbalances can throw off the whole portrait. The center line is your referee. It keeps the nose from wandering off and helps you place the mouth and chin more accurately.
Step 3: Mark the Eye Line
Now draw a horizontal line halfway down the head. This is the eye line. Yes, halfway. Beginners often place the eyes much higher because hair, brows, and forehead space feel invisible at first. But the upper skull needs room. A generous forehead is not a mistake. It is anatomy doing its job.
Step 4: Place the Nose and Mouth Guidelines
Find the halfway point between the eye line and the chin. That is roughly where the base of the nose sits. Then find the halfway point between the bottom of the nose and the chin. That gives you a strong guide for the mouth line.
These are not rigid laws carved into marble. Faces vary. But these proportions give you a reliable starting point that keeps the features from bunching together or drifting too far apart.
Step 5: Add the Hairline and Ears
The hairline usually sits above the eye line, roughly in the upper third of the head. Then place the ears on the sides of the head. In a front view, the tops of the ears often line up around the brow area, and the bottoms line up near the base of the nose.
If the hair covers the ears, still sketch them lightly underneath. Hidden structure makes visible features more convincing.
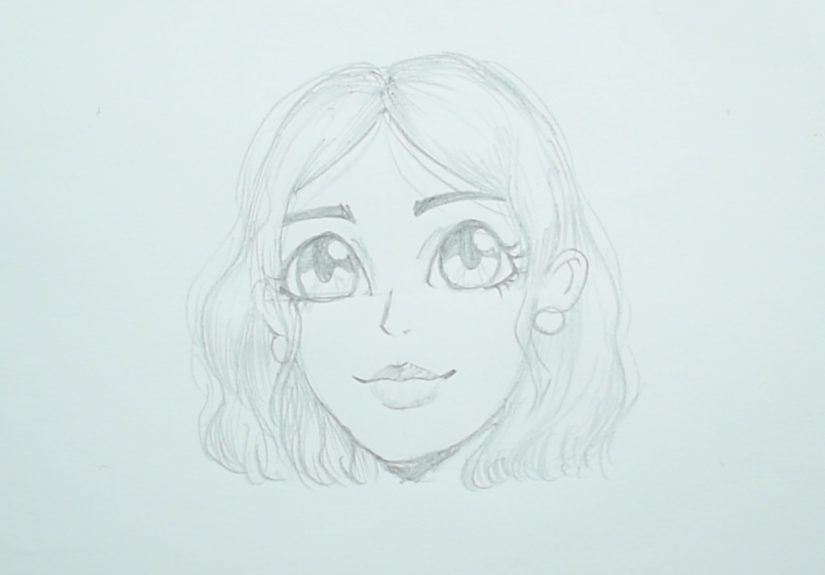
Step 6: Draw the Eyes
Place the eyes on the eye line. A common rule is that the space between the eyes is about the width of one eye. That means the face across the eye area often fits roughly five eye widths: one eye, one eye-space, and the other eye, plus side spaces.
Do not draw the eyes as giant almonds floating on the face. Start with the eye sockets and lids. Think in terms of the upper lid, lower lid, tear duct, and iris placement. The upper lid usually overlaps the iris slightly, which helps the eye look more natural and less like a surprised cartoon sticker.
If you want a softer, feminine feel, many artists use gentler upper lash curves, slightly fuller lids, and lighter line weight around the lower lid. But keep it subtle. Overdoing lashes can turn the portrait into a makeup ad from another dimension.
Step 7: Shape the Nose
Sketch the bridge of the nose lightly from the brow area downward. Then define the base, nostrils, and tip with small, careful shapes instead of one hard outline. In realistic portrait drawing, the nose is often suggested with shading more than with lines.
A useful guide is that the width of the nose often aligns roughly with the inner corners of the eyes. Again, it is approximate, not absolute. Use the rule, then compare it with your reference if you have one.
Step 8: Draw the Mouth and Lips
Place the mouth on your mouth guideline. The corners of the mouth often line up roughly beneath the centers of the eyes, though expression and individual features can shift that. Begin with the center line of the mouth, sometimes called the aperture line. Then add the upper lip shape and the fuller lower lip beneath it.
Here is a shading tip that instantly helps: the upper lip is often darker than the lower lip because it angles downward and catches less light. The lower lip usually picks up more highlight. That one observation can save your lips from looking flat.
Step 9: Refine the Jaw, Cheeks, and Chin
Now soften the face shape. When artists draw a girl’s face, they often reduce harsh angles and use smoother transitions around the cheek and jaw. That does not mean every feminine face has a tiny chin and glass-smooth symmetry. Real faces are wonderfully different. The goal is to observe and choose the shapes that fit the look you want.
For a youthful portrait, slightly fuller cheeks and a softer jawline can help. For a more mature look, you might define the cheekbones more clearly and sharpen some planes around the jaw and nose. Both can still read as feminine.
Step 10: Draw the Hair as Masses First
Do not draw individual strands right away unless you enjoy suffering for no reason. First, block in the overall shape of the hair. Where does it part? Where is the volume? How far does it sit from the skull? Hair is not glued flat to the head unless your character had a very rough morning.
Once the large masses are in place, add direction lines that follow the flow of the hair. Group strands together. Think in ribbons, not spaghetti. Darker values usually appear where the hair overlaps, turns, or parts.
How to Shade a Girl’s Face So It Looks More Real
Good shading creates form. Great shading makes a portrait feel alive. Instead of coloring every area evenly, look for planes of light and shadow. The forehead, nose bridge, cheekbones, upper lip, chin, and neck all catch light differently.
Start by identifying your light source. Is it from above, from one side, or straight on? Once that is clear, place the darkest values in the eye sockets, nostrils, under the nose, under the lower lip, beneath the chin, and in the hair shadows. Build gradually. Portraits look better when values are layered instead of smashed onto the page in one dramatic graphite avalanche.
Crosshatching and soft blending can both work. If you use hatching, keep your strokes following the form of the face. Curved strokes around the cheeks and jaw help create volume. If you blend, do not erase all structure. Too much smudging can make the face look muddy, like it lost a fight with a charcoal cloud.
How to Make the Face Look More Feminine Without Losing Realism
This part matters because it is easy to fall into stereotypes. A feminine face in drawing is not about drawing one “ideal” face. It is about choosing proportions and details thoughtfully.
Many artists suggest a softer brow ridge, smoother jaw transition, gentler chin shape, finer nose bridge, and slightly fuller lips when aiming for a feminine read. Eyebrows may be drawn with a cleaner arc, and line work can be lighter overall. But those are tendencies, not rules. A girl can have bold brows, a strong nose, a square jaw, or a serious expression and still look completely believable and beautiful in a drawing.
So rather than chasing a cliché, focus on observation, subtlety, and harmony between features. The best portraits feel specific, not generic.
Common Mistakes When Drawing a Girl’s Face
Placing the Eyes Too High
This is the champion of beginner mistakes. Keep the eyes around the halfway point of the head.
Drawing Features Before the Head Shape
Always build the structure first. Dropping detailed eyes into empty space is like installing windows before you have walls.
Making Both Sides Too Symmetrical
Real faces are not perfectly mirrored. A tiny difference in eyelid height or mouth corner angle can add life.
Outlining Everything Equally
Heavy outlines flatten a portrait. Use softer edges in shadow transitions and stronger lines only where they help define form.
Drawing Hair Strand by Strand Too Early
Hair needs volume first, details second. Think shape, flow, and shadow before individual strands.
Practice Tips That Actually Help
Use references. That is not cheating. It is training your eye. In fact, some teachers even recommend tracing a reference once in a while to study feature placement and value shapes. The point is not to hide behind tracing forever. The point is to understand what you are seeing.
Try drawing the same girl’s face three ways: one with only guidelines, one with flat outlines, and one with full shading. This teaches you how structure, line, and value each do a different job.
Also, practice individual features. Spend one day just drawing eyes. Another day, noses. Another day, lips. When you finally put them together on a full face, the process becomes much less intimidating.
A Simple Example of the Drawing Process
Imagine you are sketching a front-facing portrait of a teenage girl with shoulder-length hair and a calm expression. You start with an egg-shaped head and a vertical center line. The eye line falls halfway down. The nose sits halfway between the eyes and chin. The mouth sits halfway between nose and chin. You lightly place the ears, then draw almond-like eye shapes with a soft upper lid curve. The nose is built with gentle side planes, not harsh contour lines. The lips are defined with a darker upper lip and a lighter lower lip. The hair is blocked in as two large masses framing the face. Finally, you shade beneath the chin, around the nose, inside the hair, and under the lower lip. Suddenly, the portrait feels dimensional rather than pasted onto the page.
That is the real trick of portrait drawing: small decisions adding up to a face that feels solid, readable, and expressive.
Experiences Artists Often Have While Learning How to Draw a Girl’s Face
Learning how to draw a girl’s face comes with a very specific emotional roller coaster. First, there is optimism. You sharpen your pencil, open the sketchbook, and think, “This time, I’ve got it.” Then, five minutes later, one eye is somehow in a different zip code than the other, and the nose looks like it was borrowed from a completely different person. This is normal. In fact, it is practically a rite of passage.
Most beginners discover that faces are harder than they expected because people instantly notice when something is even slightly off. A tree can be crooked and still look charming. A face with one eyebrow floating too high looks like it knows your browser history. That sensitivity is exactly why portrait drawing is such good training. It forces you to slow down, compare shapes, and notice proportion in a deeper way.
Another common experience is realizing that the first sketch usually looks worse right before it starts looking better. The construction phase can feel awkward. The head is bald, the guidelines are everywhere, and the features look stiff. Many people quit at this point because the drawing feels ugly. But that “awkward phase” is part of the process, not proof that you are failing. Once the shading starts, the planes of the face come together, the hair adds movement, and the expression begins to appear.
Artists also learn that drawing a girl’s face is not really about drawing “pretty” features. It is about observing relationships. How far is the nose from the upper lip? How wide is the jaw compared with the forehead? Does the eye tilt slightly upward or sit more level? The more you pay attention to those relationships, the less you rely on generic symbols and the more believable your portraits become.
One especially useful experience is drawing from the same reference more than once. On the first try, you are mostly surviving. On the second try, you start noticing structure. On the third try, you finally understand why the cheek shadow matters or why the hair needs more volume above the skull. Repetition feels boring until it suddenly becomes the reason your work improves.
There is also the strange but wonderful moment when a portrait begins to “look back” at you. It happens after enough corrections, enough erased guidelines, and enough careful shading. The drawing stops being a bunch of marks and starts feeling like a person. That moment is addictive. It is one of the reasons artists keep coming back to faces again and again.
Over time, many artists move from copying a method to developing a style. Some prefer realistic shading. Others lean into softer anime-inspired features, stronger lashes, or cleaner line art. The foundation remains the same, but the personality changes. That is where drawing gets really rewarding. You are no longer just learning how to draw a girl’s face. You are learning how you like to draw a face.
So if your early attempts feel clumsy, welcome to the club. Every solid portrait artist has made weird eyes, lopsided mouths, and hair that looked like a helmet. Improvement comes from practice, patience, and the willingness to keep drawing through the awkward stages. Every sketch teaches something. Even the ugly ones. Sometimes especially the ugly ones.
Final Thoughts
If you want to get better at drawing a girl’s face, focus on three things: structure, observation, and repetition. Start with the head shape. Use guidelines. Place the features with purpose. Build the hair in masses. Shade according to form. Then practice enough that the process starts feeling familiar rather than mysterious.
The best part is that every portrait teaches you something new. One sketch improves your eye placement. Another improves your shading. Another teaches you that hair needs volume and patience, not panic. Keep going. A strong face drawing is not made in one perfect attempt. It is built one thoughtful line at a time.