Table of Contents >> Show >> Hide
- What You’ll Build (and What You’ll Learn)
- Why Cats Scratch (and Why Your Couch Is Collateral Damage)
- Why PVC Pipe Works for a DIY Cat Scratching Post
- The Secret Specs That Make Cats Actually Use It
- Materials & Tools Checklist
- Step-by-Step: Build a PVC Pipe Cat Scratching Post
- Step 1: Pick your size (fast planning)
- Step 2: Prep the base (the “anti-wobble” foundation)
- Step 3: Mount the PVC securely
- Step 4: Add hidden weight (recommended for energetic cats)
- Step 5: Wrap the post with sisal rope (the satisfying scratch surface)
- Step 6: Add a top perch or toy (optional, but cats love perks)
- Step 7: Place it where your cat already wants to scratch
- Pro Upgrades & Variations (Pick Your Cat’s Favorite)
- How to Get Your Cat to Use the DIY PVC Scratching Post
- Safety & Durability Checks
- Maintenance: Rewrap, Refresh, Repeat
- Troubleshooting (Because Cats Have Opinions)
- Real-Life Experience: What Building a PVC Cat Scratching Post Actually Feels Like ()
- Final Thoughts
Your cat isn’t “being naughty.” Your cat is being a cat. Scratching is how they stretch, de-stress, mark territory, and keep claws in working order.
Your couch just happens to be… extremely scratchable.
The fix isn’t a lecture (cats do not read Yelp reviews of your furniture). The fix is giving them a scratching post that’s tall, stable,
and feels amazing under the claws. In this guide, you’ll build a sturdy, budget-friendly scratching post using PVC pipe and sisal ropecustomizable enough
to match your space, and tough enough to survive daily “I am the boss” maintenance sessions.
Why Cats Scratch (and Why Your Couch Is Collateral Damage)
Scratching is a normal, healthy behavior. Cats scratch to:
- Stretch their shoulders, back, and pawsespecially after naps (which is… always).
- Condition their claws by shedding old outer nail layers.
- Mark territory with scent glands in their paws and visible scratch marks (a.k.a. “I live here, peasants”).
- Burn stress and energy. A good scratch can be a mini reset button.
So when you build a scratching post, you’re not just making “cat furniture.” You’re creating a legal scratching zone that meets real instinctual needs.
The trick is making it more satisfying than your sofa arm.
Why PVC Pipe Works for a DIY Cat Scratching Post
PVC is an underrated DIY base for a scratching post because it’s:
- Straight and consistent (easy wrapping, no weird bumps).
- Durable and moisture-resistant (helpful if your cat is a chaotic little goblin with a water bowl).
- Easy to customize with fittings, flanges, caps, and modular add-ons.
- Budget-friendly compared to thick hardwood posts.
The only downside: PVC is lightweight. That means your base design matters. If the post wobbles even once, some cats will treat it like a betrayal
and go back to the couch. We’ll fix that with a stable base and optional added weight.
The Secret Specs That Make Cats Actually Use It
1) Height: go tall enough for a full-body stretch
Most cats prefer a vertical post that lets them stretch fullythink roughly 30–32 inches tall for adult cats.
Bigger cats may love 34–36 inches. Kittens can use shorter posts, but building “adult height” now saves you from rebuilding in six months.
2) Stability: zero wobble, zero excuses
A scratching post should not shift, slide, or tip when your cat leans into it. Stability comes from:
- A wide base (bigger footprint = less tipping).
- Weight (pavers, double plywood layers, or hidden weights).
- Solid mounting (a flange screwed into plywood beats “hope and vibes”).
- Non-slip feet if you’re on tile or hardwood.
3) Texture: sisal rope is a classic for a reason
Sisal rope is grippy, satisfying, and shred-friendly in a way cats usually love. Carpet can also work,
but looped carpets can snag claws. If you’re choosing between rope and carpet, rope is typically the safer “universal crowd-pleaser.”
4) Diameter: thicker feels sturdier
A post around 3–4 inches in diameter feels more stable to most cats than skinny posts. PVC makes this easy:
choose 3-inch for small-to-average cats, 4-inch for larger cats or multi-cat households.
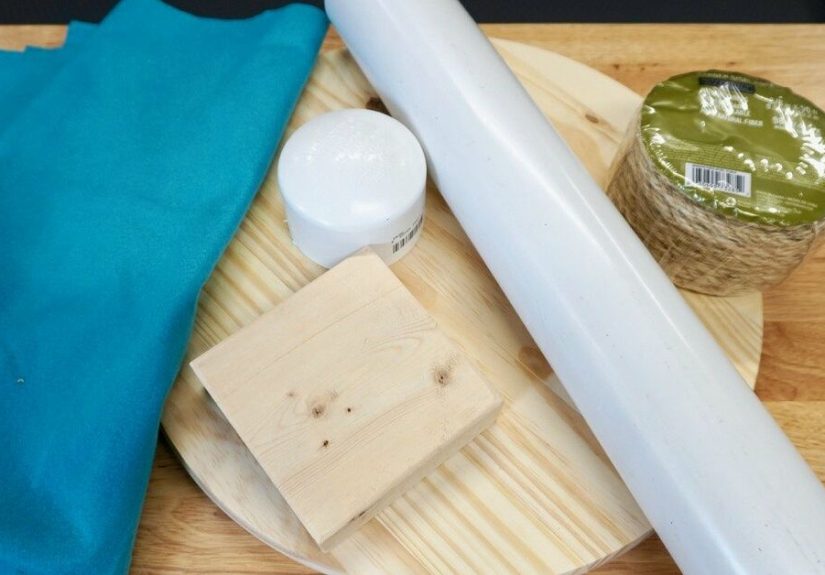
Materials & Tools Checklist
Core materials (the essentials)
- PVC pipe (Schedule 40 recommended): 3″ or 4″ diameter, cut to 30–36″ length
- PVC flange or mounting base (matched to your pipe size)
- Base board: 3/4″ plywood, at least 18″ x 18″ (24″ x 24″ is extra stable)
- Sisal rope:
- For a 3″ pipe at ~32″ tall: plan ~70–80 feet
- For a 4″ pipe at ~32″ tall: plan ~90–110 feet
- Fasteners: wood screws (for flange), washers (optional but nice), staples (for rope ends)
- Adhesive: hot glue sticks or a pet-safe adhesive for extra hold (optional but helpful)
- Non-slip feet or rubber pads (strongly recommended on smooth floors)
Optional upgrades (high value)
- Weight: a concrete paver, gym weight plate, or sandbag hidden under a second plywood layer
- Top perch: small plywood platform + carpet scrap
- Cat attraction: catnip, silvervine powder, or a dangling toy
- Finish/sealant for plywood (water-based, fully cured before use)
Tools
- Measuring tape, pencil
- Saw (or have the store cut the plywood/PVC)
- Drill/driver + bits
- Sandpaper (or sanding block)
- Staple gun (manual or pneumatic)
- Scissors or utility knife (rope cutting)
Pro tip: If you want the easiest build, ask the hardware store to cut your plywood square and your PVC to length.
You walk out feeling like a DIY wizard with none of the sawdust in your hair.
Step-by-Step: Build a PVC Pipe Cat Scratching Post
Step 1: Pick your size (fast planning)
- Standard adult cat: 32″ tall, 3–4″ diameter, 18″–24″ base
- Large cat / multi-cat: 34–36″ tall, 4″ diameter, 24″ base + added weight
- Senior cat: keep it stable and add a lower scratch option (see variations below)
Step 2: Prep the base (the “anti-wobble” foundation)
- Cut plywood to 18″ x 18″ minimum. If you have space, 24″ x 24″ is even better.
- Sand edges and corners so nothing sharp is left to surprise toes (yours or theirs).
- Attach rubber feet underneathespecially if you have hardwood, tile, or laminate.
- If adding weight, plan where it will sit (centered is best).
Step 3: Mount the PVC securely
- Center the flange on the base and mark screw holes.
- Pre-drill holes (this reduces splitting and makes screws go in clean).
- Screw the flange down tightly using washers if needed for extra grip.
- Insert the PVC pipe into the flange. Make sure it’s straight (a slight lean looks innocent but becomes wobbly under cat power).
Optional reinforcement: If your flange design allows, add a screw through the flange into the PVC (or use a fitting designed to lock the pipe).
The goal is simple: the pipe should feel like it’s part of the base, not just “hanging out.”
Step 4: Add hidden weight (recommended for energetic cats)
If your cat launches into scratch sessions like they’re training for a UFC title, add weight:
- Place a concrete paver (or weight plate) on the base, centered around the pipe.
- Cover it with a second piece of plywood (same size) to “sandwich” the weight inside.
- Screw the plywood layers together. Now your post has a secret: it’s basically a tiny cat gym machine.
Step 5: Wrap the post with sisal rope (the satisfying scratch surface)
- Anchor the rope at the bottom: staple the rope end to the PVC near the base (or staple it into the plywood right at the bottom edge).
- Wrap tightly: keep each loop snug and pressed against the previous loopno gaps.
- Secure as you go: add a small dab/line of hot glue every few inches (or every few wraps), and/or add a staple periodically.
- Keep staples hidden: if you staple, aim for places that will be covered by the next rope wrap. Exposed staples are a no-go.
- Finish at the top: cut rope cleanly, tuck the end tight, and secure it with staples/glue.
- Add a top cap: a PVC cap (optional) hides the end and gives a neat finish.
Rope wrapping reality: your cat will supervise from one inch away and judge your technique. Ignore them. Continue wrapping.
Step 6: Add a top perch or toy (optional, but cats love perks)
A simple upgrade is a small top platformlike an 8″ x 8″ square of plywoodcovered in carpet or fabric.
Keep it centered so it doesn’t create a tipping lever.
- Attach the platform securely (screws + washers), then cover with carpet and staple on the underside.
- Add a dangling toy on a short string (short enough to avoid tangling hazards).
Step 7: Place it where your cat already wants to scratch
Put the post next to the furniture or spot your cat targets most. This isn’t “giving in.” It’s smart redirection.
Once the post becomes the preferred scratch zone, you can shift it slightly (slowly) to a more convenient location.
Pro Upgrades & Variations (Pick Your Cat’s Favorite)
Variation A: Add a horizontal scratch option
Some cats prefer scratching horizontally. Easy fix: build a simple flat scratch pad using a plywood rectangle wrapped in sisal,
or mount a shorter PVC segment sideways on a low base. If your cat is a “carpet scratcher,” this can be the winning move.
Variation B: Small apartment version
Use a 3″ PVC pipe and a dense base: 18″ x 18″ plywood with a hidden paver. This keeps the footprint compact without sacrificing stability.
Variation C: Multi-cat “two-post” model
If you have two cats who both want to scratch at the same time (because sharing is a myth),
mount two PVC posts onto one 24″ x 36″ base. It reduces traffic jams and furniture-related drama.
Variation D: Senior-friendly setup
Keep the tall post, but also provide a lower scratch surface nearby. Older cats may prefer easier angles.
Add a gentle ramp or a low platform if you’re building a full tower later.
How to Get Your Cat to Use the DIY PVC Scratching Post
The goal is to make the post the best scratch experience in the room. Try this:
- Location first: place the post right next to their favorite scratch target.
- Add attraction: sprinkle catnip at the base or rub a pinch into the rope (not every cat responds, but many do).
- Reward the right choice: when they scratch the post, give treats, praise, or play. Make it a win.
- Redirect calmly: if they scratch furniture, guide them to the post and reward there.
- Avoid punishment: scolding often creates anxiety, not better scratching decisions.
If your cat is skeptical at first, try interactive play near the post. A wand toy session often ends with a satisfying scratch “cooldown.”
Safety & Durability Checks
- Stability test: push the post firmly from the side. If it rocks, widen the base or add weight.
- No exposed fasteners: staples and screw tips should be buried, covered, or placed where paws can’t contact them.
- Let adhesives cure: if you used glue beyond hot glue dabs, allow full curing and air-out time before letting your cat use it.
- Watch for chewing: if your cat gnaws rope or hardware, supervise and adjust. (Some cats are scratchers; some are engineers.)
- Rope tension: loose rope becomes a snag hazard and wears out faster. Tight wrap = longer life.
Maintenance: Rewrap, Refresh, Repeat
A well-used post will look ragged. That’s not failurethat’s success. When the rope gets dangerously frayed or too loose:
- Remove the old rope (cut carefully and pull away).
- Inspect for exposed staples or damaged areas.
- Rewrap with fresh sisal, using the same tight-wrap method.
The beauty of a PVC core is that you’re not rebuilding from scratch every time. You’re just giving your cat a “new season” of scratchable goodness.
Troubleshooting (Because Cats Have Opinions)
“My cat ignores it.”
- Move it closer to the furniture they scratch.
- Try catnip or silvervine.
- Try a different texture: some cats like rougher rope or even corrugated cardboard nearby.
- Check height and wobbleif it’s short or unstable, many cats will pass.
“My cat scratches it… and still scratches the couch.”
- Add a second post near the second “problem zone.”
- Use temporary deterrents on furniture (like protective covers) while training the habit.
- Reward every post-scratch moment at first. Yes, you’re bribing. No, it’s not beneath you.
“The rope keeps slipping.”
- Wrap tighter. No gaps. Pull like you mean it.
- Secure more often (staple every few wraps, or add more glue points).
- Start with a stronger anchor at the bottom (staple into the base board if needed).
“It wobbles on tile.”
- Add rubber feet, a non-slip mat, or a heavier base.
- Increase base size or add hidden weight.
Real-Life Experience: What Building a PVC Cat Scratching Post Actually Feels Like ()
Building a PVC pipe scratching post is one of those DIY projects that looks deceptively simpleuntil you’re on wrap number 800 and realize sisal rope has
the personality of a stubborn shoelace. The first time I built one, I learned the most important truth immediately: cats don’t care that you “followed the plan.”
They care that the post doesn’t wobble and that it scratches right.
My original version had a respectable height, a clean rope wrap, and (in my mind) the charm of handcrafted perfection. My cat stepped up, scratched twice,
and then delivered the harshest review possible: she walked away and scratched the couch directly in front of me. That’s when I noticed the post
had a tiny bit of movementbarely visible, but enough to make it feel unreliable. I added weight to the base (a paver hidden under a second plywood layer),
and suddenly the post stopped feeling like a “DIY object” and started feeling like a real piece of cat furniture.
The second surprise was rope tension. If you wrap sisal loosely because your hands get tired, your cat will undo your work like it’s a hobby. Tight wrapping
isn’t just about durabilityit’s about satisfaction. When the rope is snug, claws dig in cleanly. When it’s loose, it shifts, gaps form, and the post becomes
less fun. I started anchoring the rope end aggressively at the bottom (stapled into the base area where it wouldn’t be exposed), and I added a small glue line
every few inches. That combination held up far better, and rewrapping later became easier because the rope wasn’t sliding around in random layers.
Placement was the third lesson. I used to think you “put the scratching post where you want it,” like a tasteful lamp. Cats disagree. The winning strategy
was putting the post right next to the scratch zone my cat already choseher favorite couch corner. Once she used the post consistently for a week,
I nudged it a few inches away every couple of days. Slow moves worked; fast moves got me a dramatic return to couch scratching. (Cats love consistency,
unless it’s your schedule.)
My favorite small upgrade turned out to be the simplest: a tiny top perch and a dangling toy. The perch made the post feel like a destination, not just a tool.
The toy encouraged play near the post, and play often ended with scratchinglike a cool-down stretch after a workout. The end result wasn’t just fewer claw marks
on furniture; it was a more enriched environment. That’s the real win: you’re not only “protecting your couch,” you’re giving your cat something worth choosing.
If you build one today, here’s my honest recommendation: prioritize stability over aesthetics, wrap the rope tighter than you think you need to, and place it
shamelessly close to the furniture your cat already targets. Your cat will thank you the only way they know howby scratching the post like they own the place.